Supercharged111
Truly Awesome
- Joined
- Aug 20, 2015
- Messages
- 12,773
- Reaction score
- 15,621
Dont forget to share with us as well.
Only if it's good and achieves the desired result! The quickie I shot already is lame because nothing happens really.


Disclaimer: Links on this page pointing to Amazon, eBay and other sites may include affiliate code. If you click them and make a purchase, we may earn a small commission.
Dont forget to share with us as well.
So confession time. It would seem that I screwed up the preload on the left rear drum/hub when I dealt with the parking brake ordeal.
You must be registered for see images attach
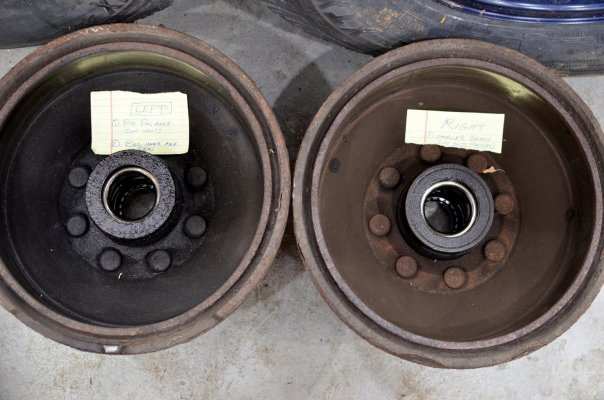
Yeah that's not good. Truck felt nutless after the tune, but it would appear that the tune was not to blame. All that and the damn thing never made a sound. Ended up trashing the hub but I think I saved the spindle. I was rewarded with a junkyard fresh drum and hub with intact USA made Timken bearings today and it cleaned up nicely.
You must be registered for see images attach
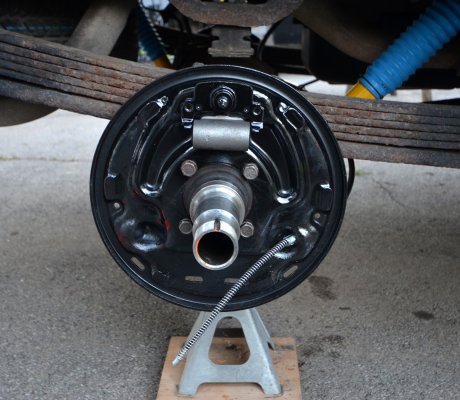
I have a couple questions to float by someone I trust tomorrow and then I can just slam it in and go. I think. First concern is the spindle itself. The old inner bearing's inner race spun, galled, and welded itself to the spindle. Overall this resulted in a metal deposit on the spindle. The hub on the other hand experienced a significant metal withdrawal. The question is what do I risk by slamming a bearing onto a spindle that may have a couple thou worth of crap on top? I whizzed it down pretty good so I think it's pretty close. I picked up a socket today so I can sink that spindle nut down as tight as it takes to seat that inner bearing instead of tapping in the recesses with a hammer and screwdriver. Next question is should I have squirted some gear oil in there before sealing it all up? My gut says no as the pig piddles gear oil into the hub when filled fully, but my follow on is does the gear oil get slung in a way under motion that would further saturate the hubs? And finally, how right is too tight for a parking brake adjustment? Should the bar dealie be fully backed off or is a bare minimum amount of slack sufficient?
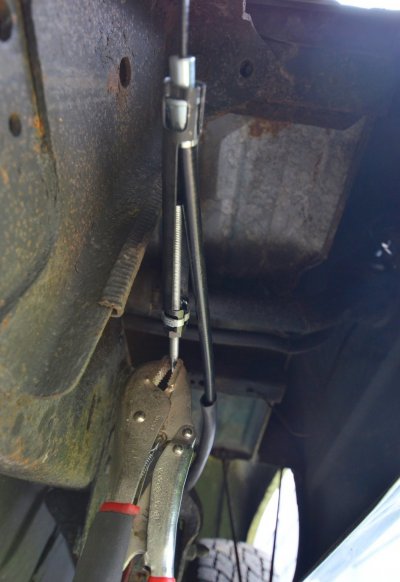
So while I couldn't slide just a bearing on by hand, I decided to just bang a new seal into the clean drum and see if it wasn't going to slide on for me as an assembly. To my surprise, it slid right on. Given the resistance the naked bearing gave me, I feel halfway decent about having not taken too much off. Cool. Now to take a step back and make sure all the details are taken care of. I backed the parking brake off until there was a trace of left to right travel in the thing that goes between the shoe and parking brake arm. Next I had a good conversation. I'd been installing these bearings bone dry under the assumption that a fully filled diff will piddle gear oil out to the hubs just sitting on level ground. Apparently this is not the case, and I'll be looking at these diffs with a more critical eye in the future to note the height of fill plug relative to axle tubes. The other thing is the amount of restriction there is for the oil to pass from the pig to the wheel bearings. There are carrier bearings in the way in addition to axle shafts jammed into side gears that aren't meant to flow a significant amount of oil outboard. So I goobered some Brad Penn engine assembly lube (camel snot) onto the bearings and spun them around. I also shot some gear oil into the hub, then set it up on the spindle. With my newly purchased spindle nut socket (for a Dana 70, but worked) I torqued the thing to 50 ft/lb while spinning the drum. When I backed it off and went for zero endplay I was centered between 2 windows so backed it off one and locked it in right there. The I cranked up the shoes until I got them to kiss the drum, figured if they needed to be tighter the self adjuster will have my back as it's not a crappy 8.5" diff. I then gave the hub probably 6 more squirts of gear oil while spinning the drum and it kept drawing it in through the bearing. Next I squirted some into the axle tube itself, slammed the axle shaft back in, wheels, and dropped it on the ground and moved it over off the curb so the road crown could let the remainder of that oil dribble into the hub. It must have worked because I made it to the hangar. The parking brake does suck though. I hate that I can't leave the hubs on to yank a drum as I'm unsure how much endplay that bar now has. Surely it's more than it was before. Problem is that the right side has more slack than the left side. I'm apprehensive about just blindly cranking that parking brake cable without eyes on those bars on both sides, I fear I'd pull on one and have the shoes over-adjusted via the parking brake cable that way.