to you all who replied about the battery, I am sorry. You were right. The test at the auto part store said it was bad. I will come back after replacing for an update
Greetings Skylar M,
Thanks for the status update. Many times a weak 12V battery that can't continue to deliver
adequate current under load (ie: voltage initially correct but sags under load) will give you
the "Click, but no Crank" symptom. As expressed by several members, a new battery that
can pass a 'load test'
should solve your problem.
To understand 'why' this occurs, then you might find the following of interest. IF for some
reason your 'Click, but no Crank' symptom persists after installing a fresh battery, then I'm
sure that the following will help to narrow down/locate the root cause.
Factory Theft Deterrent will allow the engine to crank. If it doesn't crank, it isn't the anti-theft system.
Start with manually cranking the engine by the crank pully bolt to verify its not hydro-locked.
Next, check for power & ground at the starter.
Nad, I am in complete agreement with your statement that the Factory Theft Deterrent is not
involved in a no-crank scenario. (For no start students reading along -- instead, the engine
cranks but the ECM doesn't ground the injectors. No fuel = engine cranks over, but no worky.)
In the following page taken from the '98 C/K FSM, Manual 3 of 4, under the section "Engine Electrical",
not only is the Factory Theft Deterrent conspicuous by it's absence, but it will also allow me to
illustrate that there are 3 different "click", "Click", and "
CLICK" ...but no Crank failure scenarios:
Page 6-995:
You must be registered for see images attach
NOTE: Took the liberty to mark this up to match the wiring colors for a stock gasoline engine GMT400. (And also corrected the main "+" battery cable color listed.)
For some the above is self-explanatory, and for these folks the remainder of this reply is definitely
Optional reading.
But for those who are still coming up to speed on all things GMT400 electrical, here's the sequence of events that will help to explain this schematic:
NOTE: In the final 2-3 years of the GMT400 manuals the General started organizing each page where the top is where the power for this circuit is coming
from, and the bottom of the page is where the load > ground is documented. This is to help the troubleshooter figure out what is upstream vs downstream
of the load. I find this much more intuitive than the old spaghetti style in the older electrical manuals. (!)
* So, starting at the top, the 40A Fuse 6 (in the Underhood Relay Center) feeds 'Always Hot' power to both the Ignition Switch as well as the power-delivery
side of the Starter Relay. Since the relay is drawn 'Normally Open', we know that the power stops there until the control side of the relay has power applied.
Same thing for the Ignition Switch -- no power will flow *except* for when the key is turned all the way to the Start position.
* The human turns the key to the Start position. This conducts the 'Always On' power to/through the CRANK fuse. (#8 in the Instrument Panel) Assuming
an automatic transmission (In
Park or
Neutral) -or- a manual transmission (Clutch fully depressed) this 12V signal is forwarded to the control side of the
Starter Relay. (physically located back in the Underhood Relay Center) Assuming a good ground on the other side, the current flow from this 12V signal will
pull this 'Normally Open' relay
closed. This closing will send ~15-25A worth of power to the Starter Solenoid windings via the Purple wire we've all touched
during a starter swap.
(By the way, the sound of the Starter Relay by itself = a quiet 'click'.)
* With all that setup, here's what I've really been wanting to share as a troubleshooter.
You see, most folks think that the starter starts spinning *immediately*, and then gets
thrown into the ring gear on the flywheel/flexplate. Negative.
Instead, the NON-spinning starter pinion gear *is* thrown from it's at-rest position into
a fully meshed position with the flywheel/flexplate ring gear
first. Once the pinion gear
is fully extended, simultaneously the high amperage contacts for the main starter are
also closed, power is (finally) drawn from the big red battery cable...and *then* the
starter starts to spin the pinion...and the engine, IF the engine is free to turn over.
And once the human releases the key and it rotates out of the Start position, this
circuit is de-energized, and thanks to the return spring in the starter Bendix drive
the starter pinion gear is returned to the at-rest position.
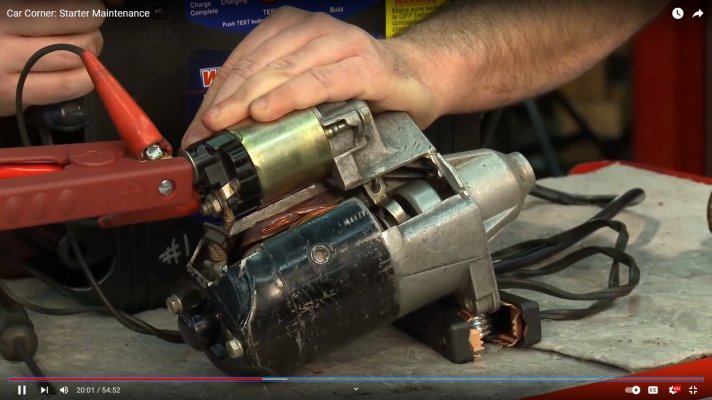
For visual learners, I recommend you skip to the ~19:57 mark on this video, and watch for
about a minute or so to see how these starters actually work on a cut-open unit:
xc_hide_links_from_guests_guests_error_hide_media
* Now that you understand the sequencing and dynamics of our starters, now you can
appreciate the difference between the "Click" of a poorly powered Starter Solenoid vs the
authoritative "
CLICK" of a properly powered Starter Solenoid.
* In the case of the weak "Click", this is the scenario where the Starter Solenoid begins it's
travel, but because the battery voltage sags under load, an insufficient magnetic field is
generated, so the solenoid can't physically overcome the return spring on the Bendix drive,
it only travels part way & stalls...so the big power contacts for the main starter motor are
never engaged. This literally translates into the symptom "Click, but no Crank".
* In the case of the strong "
CLICK" scenario, thanks to a strong battery the starter
solenoid has a plenty strong magnetic field that easily overcomes the return spring in
the Bendix drive, so the pinion gear makes the full travel + the high power contacts
are closed, and (assuming a healthy starter & engine) ...engine cranks over.
****
Really experienced mechanics can discern the difference between these 3 levels of clicking.
If you consider yourself a serious student, the best way to teach/calibrate yourself about this
*before* you actually need it for broke/fix troubleshooting is to insert a fault, predict
the outcome, and then attempt to start your vehicle. NOTE: Always remove the fault
and verify proper starting operation before continuing.
Q1: For example, what happens if you pull the 10A CRANK fuse out of the instrument panel
fuse block?
Q2: What happens if you pull the 40A Fuse 6 in the Underhood Relay Center?
Q3: What happens if you pull the Purple wire from the Starter Solenoid? Will you be
able to still hear the Starter Relay operating?
Q4: Disconnect just the large diameter red power cable to the starter. Does the
starter solenoid still
"CLICK" with authority?
Q5: If you have an automatic transmission, place the gear selector into the R, D, S, or L
positions and attempt to start the vehicle. Does the resulting behavior make sense when
you look at the diagram above.
And so on and so forth.
Now I realize that most owners are not interested in disturbing a starting circuit that's
operating correctly. And I can appreciate that. But for those who wish to coexist with
their aging GMT400, and at the same time not be fearful of the dreaded "Click, but no Crank"
scenario, spending an hour or two performing the 'Fault Insertion > Symptom prediction > Observation
training on your vehicle when it is healthy will pay troubleshooting dividends down the road
if/when
your faithful traveling companion's starter fails to proceed.
As always, apologies for the length. Hopefully anyone still reading this was a member of the target audience. :0)
Cheers --