Rebuilt Motor Backfiring No Start

Disclaimer: Links on this page pointing to Amazon, eBay and other sites may include affiliate code. If you click them and make a purchase, we may earn a small commission.

heyitzjoel

Newbie
Joined
Mar 28, 2023
Messages
8
Reaction score
5
Location
34983
Okay so I turned the engine over with the distributor on and the cap off to see where the rotor lands at TDC compression, I opened up the valve covers to verify this and made sure that the intake valve opens and closes. Everything lines up perfectly. The rocker arms were a little too tight IMO some of the springs looked a little compressed so I loosened them just a little. Let’s see if she starts up.
 

Attachments

  • IMG_5130.png
    IMG_5130.png
    1 MB · Views: 4
  • IMG_5131.jpeg
    IMG_5131.jpeg
    107 KB · Views: 4
  • IMG_5132.jpeg
    IMG_5132.jpeg
    133.4 KB · Views: 4

heyitzjoel

Newbie
Joined
Mar 28, 2023
Messages
8
Reaction score
5
Location
34983
Okay I think loosening the rockers works because now she’s starting to crank normally but it’s just hesitating to full start up. My battery is pretty low I think I’m gonna take it to charge!
 

heyitzjoel

Newbie
Joined
Mar 28, 2023
Messages
8
Reaction score
5
Location
34983
If the valve springs were compressed, the valvetrain was adjusted WAY too tight.
Yeah I'm dumb, when I read zero lash, I thought that was on the valve stem not the pushrod. So I overtightened it way too much, I rotated the engine to TDC both compression & exhaust and loosened them to the point where the pushrod starts to have no more up/down play and now when I start it stutters, still no start but my battery is low. I'm so close to getting this darn thing started ):
 

Road Trip

Supporting Member
Supporting Member
Joined
Jul 8, 2023
Messages
1,117
Reaction score
3,185
Location
Syracuse, NY
The rocker arms were a little too tight IMO some of the springs looked a little compressed so I loosened them just a little. Let’s see if she starts up.

Greetings heyitzjoel,

The root cause of a sneeze/backfire out of the throttle body is a spark occurring while the intake valve is open. (not fully seated)

The root cause of a backfire out the exhaust is a spark occurring while the exhaust valve is open. (not fully seated.)

Especially if the engine has never run before, this is finally troubleshot to one or more valves hung open due to being
not set correctly. (Valves are perpetrator, Ignition is the victim)

****

On the other hand, if the engine has a history of running quietly and smoothly, and suddenly there are intermittent
backfires, this is normally traced to the valves operating correctly, but now we have a spark occurring at the wrong
time (cross-fire) again firing when either the intake or exhaust is open? (Valves are victim, Ignition is Perpetrator.)

Of course, when you are first trying to start a new motor, it's quite possible to get *both* the valve adjustment
and the distributor alignment goofed up, and now no matter what we try, it's always seems to backfire?

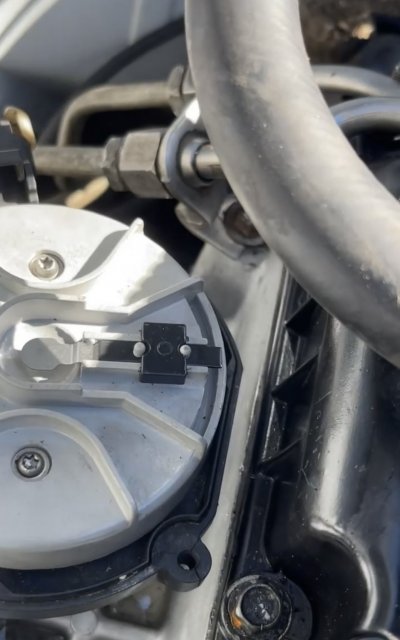
1) So, in order to sort all this out, the first step is to get the ignition timing right.
Your description of watching the intake valve close and then very next TDC
sounds correct. And if you get the dizzy stabbed with the rotor pointing to
the #1 spark plug terminal then this should be good to go.

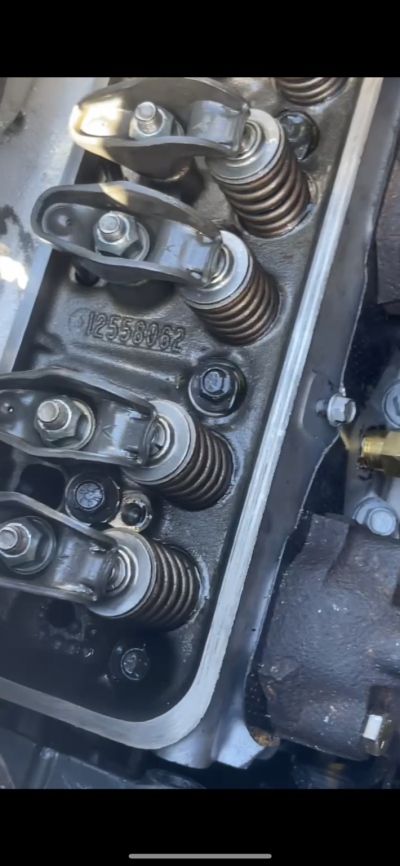
2) Now to fix the other half of this equation. Long story short, from the
picture you posted I'm thinking that some of your valves are set OK, but
others are set too tight? Check this out:

You must be registered for see images attach


Unless all 16 lifters were pumped up, and all possess the same internal
clearances = the same bleed-down rate, it's possible to have difficulty
to set the cold preload by feel alone. (ie: The lifters with looser internal
clearances don't give the right resistance, so it's easy to incorrectly set
them after the internal plunger is bottomed out internally.)

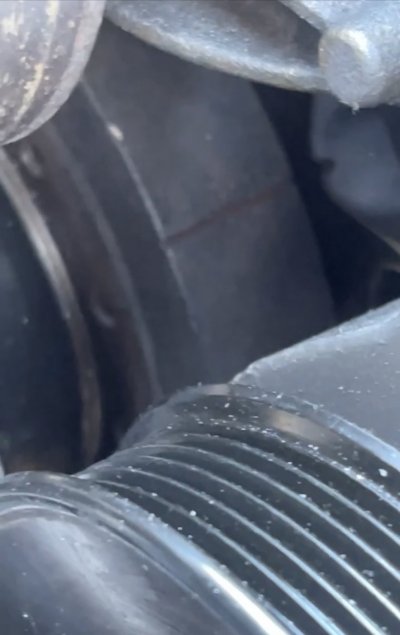
Instead, when setting the valves cold, it's far preferable to watch
the lifter that you are adjusting. Just as soon as you see the
inner plunger come off of the retainer surrounding the pushrod,
this is your zero-lash point. This is what you will be looking at:

You must be registered for see images attach


Of course this means performing the valve adjustment *before* installing
the intake manifold. But instead of pulling the intake manifold back off, you
may consider getting it close enough to start, and then dialing it all in for the
win via a 'running preload' adjustment session.

The point that I'm trying to make is that we can use the number of threads
showing after a valve adjustment procedure has been done as a cross-check
to verify if we got it close enough or we need to make another pass and figure
out what's going on?

NOTE: On a blueprinted engine where everything is held to the center of factory
tolerances, once the valves are set there will be the same number of threads between
the tops of all 16 self-locking nuts and the top of the stud.

In the real world, thanks to recessed valve seats, slight differences in valve stem
lengths if only a couple were replaced, etc., there will be some variability. BUT
if we have an explanation for each variation then we're in control & good to go.

Again, take a look at the threads on all 16 rocker arm/stud assemblies, and see
if you can get them a little more in agreement.

Does this makes sense?

Hang in there, you are close to success!

Best of luck --
 
Last edited:

heyitzjoel

Newbie
Joined
Mar 28, 2023
Messages
8
Reaction score
5
Location
34983
Okay so I went through hell since Wednesday I worked on the truck day and night. The truck WOULD not fully start for the life of me no matter how many times I put the engine at TDC. Everyone kept saying timing, timing, timing. "You're probably not at TDC". Well I mean after checking like 10+ times I figured it HAS to be something else. It sounded like it wanted to start but as soon as I let go of the key it would turn off. It just kept cranking, firing, sputtering and dying. I went ahead and replaced the Crankshaft Position Sensor, AGAIN. This time I was getting a crank but no spark so I started checking voltage on all the wires to the ICM, CPS and Ignition Coil. Replaced the connecting wire to the CPS. Still nothing. I started checking fuses and I noticed my ECM 20 volt fuse was popped. Replaced that and still nothing. Replaced all my ground wires, even the one attached to the bolt next to the water pump coming from the wire harness. I realized my RPM gauge was not jumping and this time I got crank and NO SPARK. I thought I made things worse. I kept reading and reading about how ****** these Crankshaft Position Sensors are so I decided to go and grab a third one before I finally give up. Felt like I tried everything. Plugged it in and it fired right up.
 

Road Trip

Supporting Member
Supporting Member
Joined
Jul 8, 2023
Messages
1,117
Reaction score
3,185
Location
Syracuse, NY
I kept reading and reading about how ****** these Crankshaft Position Sensors are so I decided to go and grab a third one before I finally give up. Felt like I tried everything. Plugged it in and it fired right up.

Sincere congratulations for staying on point and not giving up. This happens all the time, from an
individual project like yours all the way to huge operations like NASA. Consider this your Apollo 13
moment. (A triumph of troubleshooting over adversity.)

Words alone cannot do justice to communicating how how much DOA repair parts s*ck.

Nice follow through. Looks like your truck is going to teach you a lot more than simple maintenance.

:waytogo:
 

Attachments

  • Apollo 13 Lovell, James, Kluger, Jeffrey 9780618619580 Amazon.jpg
    Apollo 13 Lovell, James, Kluger, Jeffrey 9780618619580 Amazon.jpg
    220.5 KB · Views: 4
Last edited:
Top