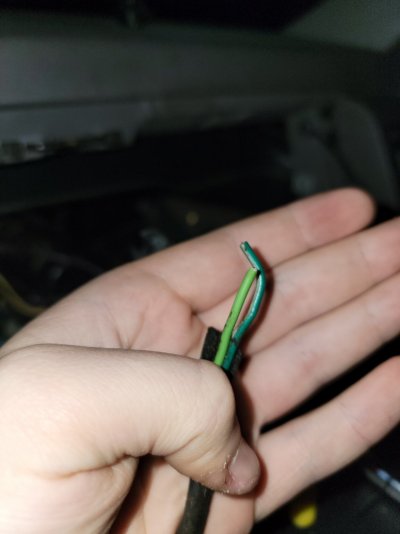
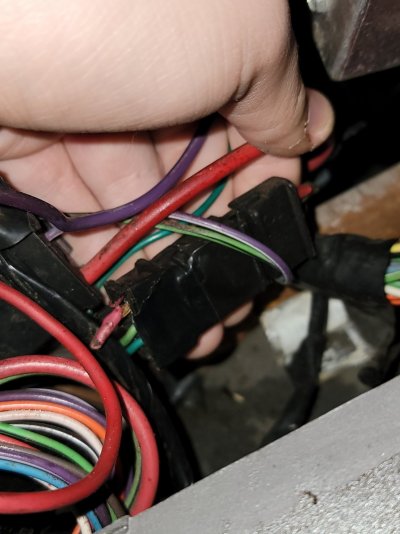
Can't identify these wires

Disclaimer: Links on this page pointing to Amazon, eBay and other sites may include affiliate code. If you click them and make a purchase, we may earn a small commission.

nhelmar19

Newbie
Joined
Jan 3, 2022
Messages
11
Reaction score
1
Location
wilmington ma
I made a previous post about an issue I'm having with my HVAC controls where the temp and vent arrows are flashing. While trying to rule out issues with that I found a light green/dark green set of wires that appear to be cut and I can't find where they would be connected to. I also found the plug in the second photo which appears to have a red wire cut on both ends with a light green and maybe teal wire on one end. I couldn't find exactly what these might be in the few diagrams I managed to get and the previous owner who did an interior swap on the truck couldn't help me out either. The light/dark green wires are going into the same loom as the switch for the door that operates the interior light.
Any help is appreciated, TIA. Oh the truck is a 92 k1500 with the 5.7
 

Attachments

  • 20220105_162929.jpg
    20220105_162929.jpg
    138.7 KB · Views: 26
  • 20220105_163036.jpg
    20220105_163036.jpg
    199.8 KB · Views: 25

PlayingWithTBI

2022 Truck of the Year
Supporting Member
Joined
Jan 3, 2019
Messages
9,706
Reaction score
15,102
Location
Tonopah, AZ
The light/dark green wires are going into the same loom as the switch for the door that operates the interior light.
The only light green/dark green combo I know of is going to the A/C Low Pressure Cycling switch from the control panel. At least it's on my 88.
 

steveed

Supporting Member
Supporting Member
Joined
Jul 18, 2017
Messages
107
Reaction score
112
Location
Austin, TX
That red/lgreen/dgreen connector goes through the bulk head and the red goes to the battery junction block. lgreen/dgreen go to the ac pressure cycle switch. Its in the file 1992_ST-375-92-EDD_Chevrolet_CK_Wiring_Manual section on AC starts on page 159 (really 162 in the PDF). Diagram is after the troubleshooting page number 166.

Had to rewire mine when I removed the TBI for the LS.
 

someotherguy

Truly Awesome
Joined
Sep 28, 2013
Messages
10,039
Reaction score
14,827
Location
Houston TX
Super fuzzy memory here - what color was the wire you're supposed to cut to the controls for the TSB about the A/C cutting out and the icon on the display blinking? There's code in the controller to disable the A/C if it detects the compressor cycling too often, but there's a condition where it can be falsely triggered, and the official TSB solution was to cut one of the wires at the controller.

Richard
 

steveed

Supporting Member
Supporting Member
Joined
Jul 18, 2017
Messages
107
Reaction score
112
Location
Austin, TX
Found on another forum from a 2010 post:


LOW CHARGE INDICATOR FLASHES DISCONNECT CHARGE DETECTION #92-201-1B - (05/13/1992)
Subject: AIR CONDITIONING LOW CHARGE INDICATOR FLASHES

Model and Year: 1991-92 C/K TRUCKS

Some owners of 1991-1992 C/K vehicles may comment that the A/C letters in the middle of the control head face are flashing. The HVAC control system used on 1991 and 1992 C/K vehicles incorporates a low A/C charge warning system. If a low charge is detected, the control head will not allow the compressor to engage and the A/C letters in the middle of the control head face that usually signity A/C operation will blink.

The HVAC control head determines a low charge by monitoring the circuit from the pressure cycling switch. If the cycling switch will not allow the compressor to run more than 1.5 seconds, ten times in a row, the control head assumes a low charge and disables the compressor until reset.

On some vehicles, it has been found that the wire from the pressure cycling switch to the control head is sensitive to EMI (electro magnetic interference) and gives false compressor cycling information to the HVAC control head which then disables the compressor.

If you encounter a vehicle with the control head A/C indicator flashing the low charge signal, but can find no reason for the flash using normal diagnostic procedures; including checking the wiring harness for chafing; remove the pressure cycling switch feedback wire from the control head connector using the service procedure outlined below. This process disables the A/C Low Charge detection feature, however, the customer will still be alerted to a low charge by excessive compressor cycling and poor A/C performance.

SERVICE PROCEDURE

1 . Remove the instrument panel trim bezel.

2. Remove the A/C control head.

3. Disconnect the control head electrical connector.

4. Remove the dark green circuit 59 wire located in harness connector socket number one. Do not cut the wire, remove the terminal (Figure 1).

5. Fold the wire back along the harness and tape it so that it cannot short when the control head is installed.

6. Install the control head.

7. Install the instrument panel bezel.

WARRANTY INFORMATION

For vehicles repaired under warranty use:

Labor Operation: D0362

Use applicable labor time guide for labor hours.

Figure 1

General Motors bulletins are intended for use by professional technicians, not a "do-it-yourselfer". They are written to inform those technicians of conditions that may occur on some vehicles, or to provide information that could assist in the proper service of a vehicle. Properly trained technicians have the equipment, tools, safety instructions and know-how to do a job properly and safely. If a condition is described, do not assume that the bulletin applies to your vehicle, or that your vehicle will have that condition. See a General Motors dealer servicing your brand of General Motors vehicle for information on whether your vehicle may benefit from the information.


GM bulletins are intended for use by professional technicians, NOT a "do-it-yourselfer". They are written to inform these technicians of conditions that may occur on some vehicles, or to provide information that could assist in the proper service of a vehicle. Properly trained technicians have the equipment, tools, safety instructions, and know-how to do a job properly and safely. If a condition is described, DO NOT assume that the bulletin applies to your vehicle, or that your vehicle will have that condition. See your GM dealer for information on whether your vehicle may benefit from the information.
 

nhelmar19

Newbie
Joined
Jan 3, 2022
Messages
11
Reaction score
1
Location
wilmington ma
Found on another forum from a 2010 post:


LOW CHARGE INDICATOR FLASHES DISCONNECT CHARGE DETECTION #92-201-1B - (05/13/1992)
Subject: AIR CONDITIONING LOW CHARGE INDICATOR FLASHES

Model and Year: 1991-92 C/K TRUCKS

Some owners of 1991-1992 C/K vehicles may comment that the A/C letters in the middle of the control head face are flashing. The HVAC control system used on 1991 and 1992 C/K vehicles incorporates a low A/C charge warning system. If a low charge is detected, the control head will not allow the compressor to engage and the A/C letters in the middle of the control head face that usually signity A/C operation will blink.

The HVAC control head determines a low charge by monitoring the circuit from the pressure cycling switch. If the cycling switch will not allow the compressor to run more than 1.5 seconds, ten times in a row, the control head assumes a low charge and disables the compressor until reset.

On some vehicles, it has been found that the wire from the pressure cycling switch to the control head is sensitive to EMI (electro magnetic interference) and gives false compressor cycling information to the HVAC control head which then disables the compressor.

If you encounter a vehicle with the control head A/C indicator flashing the low charge signal, but can find no reason for the flash using normal diagnostic procedures; including checking the wiring harness for chafing; remove the pressure cycling switch feedback wire from the control head connector using the service procedure outlined below. This process disables the A/C Low Charge detection feature, however, the customer will still be alerted to a low charge by excessive compressor cycling and poor A/C performance.

SERVICE PROCEDURE

1 . Remove the instrument panel trim bezel.

2. Remove the A/C control head.

3. Disconnect the control head electrical connector.

4. Remove the dark green circuit 59 wire located in harness connector socket number one. Do not cut the wire, remove the terminal (Figure 1).

5. Fold the wire back along the harness and tape it so that it cannot short when the control head is installed.

6. Install the control head.

7. Install the instrument panel bezel.

WARRANTY INFORMATION

For vehicles repaired under warranty use:

Labor Operation: D0362

Use applicable labor time guide for labor hours.

Figure 1

General Motors bulletins are intended for use by professional technicians, not a "do-it-yourselfer". They are written to inform those technicians of conditions that may occur on some vehicles, or to provide information that could assist in the proper service of a vehicle. Properly trained technicians have the equipment, tools, safety instructions and know-how to do a job properly and safely. If a condition is described, do not assume that the bulletin applies to your vehicle, or that your vehicle will have that condition. See a General Motors dealer servicing your brand of General Motors vehicle for information on whether your vehicle may benefit from the information.


GM bulletins are intended for use by professional technicians, NOT a "do-it-yourselfer". They are written to inform these technicians of conditions that may occur on some vehicles, or to provide information that could assist in the proper service of a vehicle. Properly trained technicians have the equipment, tools, safety instructions, and know-how to do a job properly and safely. If a condition is described, DO NOT assume that the bulletin applies to your vehicle, or that your vehicle will have that condition. See your GM dealer for information on whether your vehicle may benefit from the information.
Oddly enough the A/C light doesnt flash, although after you mentioned this i went out and checked and the A/C system had no pressure in it. If the system detected no Freon would it shut the whole unit off? I get no voltage at the blower motor as well.
 

steveed

Supporting Member
Supporting Member
Joined
Jul 18, 2017
Messages
107
Reaction score
112
Location
Austin, TX
I would figure out why those wires are cut and use the diagram in the manual to repair the circuits. Or really get the wiring harness from the heater/ac box at the junkyard.

That section in the manual I pointed out starts with this:

BLOWER CONTROLS
Battery voltage is supplied at all times to Terminal 1 of the Low Blower Relay through RED (2) wire. When the Heater and A/C Controller is OFF, both the Low Blower and High Blower Relays are de-energized. In this state there is no voltage path through the relay contacts to the Blower Motor so the Blower Motor does not run.

Looking at that wire it appears cut so maybe the power is going to the AC control but it is not going to the blower relay.
 

nhelmar19

Newbie
Joined
Jan 3, 2022
Messages
11
Reaction score
1
Location
wilmington ma
I would figure out why those wires are cut and use the diagram in the manual to repair the circuits. Or really get the wiring harness from the heater/ac box at the junkyard.

That section in the manual I pointed out starts with this:


Looking at that wire it appears cut so maybe the power is going to the AC control but it is not going to the blower relay.
Seems like thats the case, the controls power on and operate the actuators fine but never once powered the blower motor on. Im gonna give it a better look tomorrow, with lack of heat in this crisp 20 degree new england weather i dont spend a lot of time working on the truck at once lol, also i went on the manual to the page you described and i couldnt find a diagram for the ac system
 

steveed

Supporting Member
Supporting Member
Joined
Jul 18, 2017
Messages
107
Reaction score
112
Location
Austin, TX
Did you see the section that starts with Blower controls? Just scroll down after that somewhere in the 160s. I have the page printed off and it says 166.
 
Top