Bang for the buck Functional Renewal of rust belt '99 C2500

Disclaimer: Links on this page pointing to Amazon, eBay and other sites may include affiliate code. If you click them and make a purchase, we may earn a small commission.

Boots97

I'm Awesome
Joined
Apr 19, 2023
Messages
444
Reaction score
887
Location
Apple Valley, MN
Yup I hear you on the zany aftermarket wheels! People in Houston seem to think that putting big ugly but shiny chrome rims and rubber band tires on their vehicles makes them hot rods or customs. No thanks folks, I go to proper custom car shows and know what's what!
I used Brasso liquid on my center caps and that shined them up a little. I need to take them off and properly polish them, but just haven't gotten around to it. I see sets of the wheels I want , on trucks in the yards....when I'm broke! There was actually a set on a truck Saturday morning at the yard closest to me, that looked good, but I didn't have the $300 it would take to bring them home. I haven't been working for several months so the truck budget is pretty small right now.... I was literally counting out $1 bills to get the Escalade parts and 88-89 quad beams that I got!

THANK GOD there's SOME people here who are on the same page as me.

I absolutely HATE aftermarket wheels on ANY vehicle. They DO NOT make you look cool and they often look terrible compared to OEM wheels.

That being said, I'd love to get some K2XX or T1XX wheels for my truck one day. Preferably Trail Boss, Midnight Edition, or ZR2 wheels. I really like my stock wheels and they're still in good condition and I like the meatiness of my tires too. However, 265/75/R16 tires are becoming less and less common, especially good condition used ones which I'm always scouring for. This is probably why I'll switch over in a few years if supply of this size keeps getting lower and lower.
 

dave s

I'm Awesome
Joined
Oct 25, 2019
Messages
232
Reaction score
392
Location
pa
Hey I like the next to last pic you posted of the B model with the astronauts all posing in front. It was the airplane I was crew chief on at Langley and 158 in the late 70's was then a member of the 48th Fighter Intercept Squadrons B flight. Now that;s a blast from the past! Thanks for posting.
 

Road Trip

Supporting Member
Supporting Member
Joined
Jul 8, 2023
Messages
1,117
Reaction score
3,184
Location
Syracuse, NY
Hey I like the next to last pic you posted of the B model with the astronauts all posing in front. It was the airplane I was crew chief on at Langley and 158 in the late 70's was then a member of the 48th Fighter Intercept Squadrons B flight. Now that;s a blast from the past! Thanks for posting.
Man, that is very cool. Taking care of the same plane that
once upon a time was Mercury 7's training jet is literally
having your hands on a piece of aerospace history.

If you'd like to wander a little further down memory lane
here's a nice F-106 page on the USAF museum's website.

Anyway, I salute your good taste in both Interceptors and
trucks. Maybe someday we'll cross paths in person & I
can buy you a beer...and we can reminisce about how
the binary afterburner would rock the flightline when it lit
off - my inner adrenaline junkie loved that! :0)

Cheers --
 
Last edited:

Road Trip

Supporting Member
Supporting Member
Joined
Jul 8, 2023
Messages
1,117
Reaction score
3,184
Location
Syracuse, NY
Alright, for strict continuity I could continue to describe how I took the old steelies
and ran them through my blast cabinet & de-emphasized them by painting
them to match...let's save those photos for another day.
Well, for anyone out there that's been waiting w/bated breath for the
rusted wheels resto process...today's your lucky day! :0)

Since the following is pretty self-explanatory, let's jump into the
photos & dispense with all the pretty verbiage.

Comparison of wet-sanded/polished LF fender vs rest of truck as purchased (Also blacked out steelies by PO)
You must be registered for see images attach


If this was PBS's Antiques Roadshow I'd be in the photo wearing a goofy bowtie and
waxing poetic about how the patina on this work truck documents the struggles
and oppression that it has suffered since lumbering off of the Arlington, TX
assembly line back in the summer of '99.

The reality is that cameras are pretty forgiving of older paint jobs -- what looks
OK in a photo often looks weathered in person. Like all sun damage, the original
clear coat on this truck was turning opaque, some on the sides, much more so
on the horizontal surfaces.

Before I started with the wet-sanding & polishing, the left front fender was an
exact visual match of the rest of the truck. It's amazing how removing the
dead/opaque outer layer of clear coat can reveal the color coat underneath
with like-new clarity. NOTE: My goal was for the vehicle to not look 'polished'
(ie: swirl-marks, etc) ...but instead for the paint to simply look new.

If all 4 tires looked this good I might have just left them alone, but as you
saw back in post #4 the passenger side wheels looked pretty rough.
So I had the tires dismounted so I could take care of business in the blast cab.

Inside of steel wheels heavily rusted / Using Black Beauty coal slag at 120psi
You must be registered for see images attach


Same wheel, front face after 2nd pass using finer media
You must be registered for see images attach


Sometimes I'll prime/sand/prime/sand/loop on error... until I am satisfied with
the quality of the underlying surface. (They aren't kidding when they say that
surface prep is everything!) Seriously, when I decided to make the investment
into this Skat Blast cab, I was just trying to claw back most the time I was
spending (trying) to get parts clean enough to inspect/paint/reinstall.

This was back in '06. At that time for every 10 items I painted, I would be
disappointed in 9 of them. They never looked like they were painted at the
factory...they looked like *I* painted them, normally due to flaws underneath
the new paint surface drawing undo attention to themselves. Very disappointing
to spend all that time & then not wanting anyone else to see the finished result. :-(

Once we figured out which media was the best for the task at hand (Black Beauty
for the scaly stuff, all the way to crushed walnut shell for engine blocks & aluminum
heads) this cab was *much* faster than all the other surface prep methods we had
used before. (wire brushes, flap wheels, sanders of all flavors, etc)

And before could I put 2 and 2 together, my overall satisfaction with the paint finishes
flipped -- now when I painted 10 items, 9 of them were satisfactory! (I never get
10/10, there's always sumptin' wrong. :0)

So the photo above is the secret sauce of driving old in the rust belt. Surface prep
is everything...so you might as well do it as fast as humanly possible & get it over with!

Given that this is supposed to be a work vehicle, plus the fact that the 'facing out' surface
was all but blemish free, I simply primed, color coated, and clear coated the wheel before
popping them into the oven for a 90 minute bake at ~200 degrees.

You must be registered for see images attach


The finished product. As close as I could get the original 20+ year old rust belt steelies to look like the factory painted them Indigo Blue metallic.
You must be registered for see images attach


OK, GMT400 has just told me that there's a limit of 5 attachments,
so I'll pickle this & wrap it up in the next posting...
 
Last edited:

Road Trip

Supporting Member
Supporting Member
Joined
Jul 8, 2023
Messages
1,117
Reaction score
3,184
Location
Syracuse, NY
I used Brasso liquid on my center caps and that shined them up a little. I need to take them off and properly polish them, but just haven't gotten around to it.

I was surprised how well the center caps came back on this salty survivor. Here's a side-by-side comparison after vs as found:
You must be registered for see images attach

The center caps polished up better than I hoped, even allowing the viewer to see a reflection of the photographer. Given that nobody will ever be this close to the cap
in real life, they end up looking like new from the normal viewing (standing) position.

FWIW I took a closeup of the Indigo Blue Metallic paint using the camera flash so that you could see all the various shades & metallic effect.
Now it actually looks even better in the (full spectrum) direct sun!
You must be registered for see images attach


And so that you don't have to go all the way back up to the beginning of the thread for comparison purposes, here's the finished product one more time:
You must be registered for see images attach


"That's all I've got to say about that." -- F. 'Road Trip' Gump
 
Last edited:

BigReb95

I'm Awesome
Joined
Dec 21, 2020
Messages
112
Reaction score
186
Location
Upstate NY
Very nice truck! Especially one from up where we are. I’m about 40 minutes east from Syracuse, and I’ve had to travel to find vehicles, including my truck. I went to NC for mine as it’s rust free. I’ve replaced just about everything else except body+frame. But, you can’t fix rot.

Gotta keep ‘em going, you have a beauty there. Good job on the wheels!
 

Road Trip

Supporting Member
Supporting Member
Joined
Jul 8, 2023
Messages
1,117
Reaction score
3,184
Location
Syracuse, NY
Clarifying the original windshield for $ worth of Cerium Oxide vs. Replacing it for $$$

After the original paint came back so nice, now instead of
a net win like I was expecting, it seemed like a net loss...for now
the rest of the vehicle (which looked authentic/good enuf up 'til now)
no longer matched visually?

Of course, nobody expects to get a perfectly clear windshield when you
buy an old work truck with 220K miles on the odo. But by the same
token, a windshield that turns the driver into an amateur meteorologist
every time they pilot the beast is no bueno. (Sunny day? Commuting
westward into the evening sun after a hard shift at the day job?
Oh snap, I won't be able to see out...Again! :-()

Before I share the repair method, first let's get the Before & After
photos out of the way:

Fine windshield wiper scratches in windshield as found. (Included w/purchase price, no extra charge. :0)
You must be registered for see images attach


Passenger side after polishing w/Cerium Oxide + felt pad on buffer + spray bottle of water as required.
You must be registered for see images attach


Big Picture / bird's-eye view -- Final result after paint finish + original windshield (& door glass) are all polished
You must be registered for see images attach


In my next reply I will share the specifics on how to make the best of the windshield
that *you* have to work with...
 
Last edited:

Road Trip

Supporting Member
Supporting Member
Joined
Jul 8, 2023
Messages
1,117
Reaction score
3,184
Location
Syracuse, NY
Clarifying the original windshield for $ worth of Cerium Oxide vs. Replacing it for $$$

And now...the Rest of the Story (w/apologies to Paul Harvey :0)

Before discovering Cerium Oxide (after a deep dive down the
glass geek rabbit-hole) I had tried everything in my personal
arsenal. No joy, I tried everything in my paint-correcting
stash, nope / nothing / nada -- didn't even make a 1%
improvement in being able to see out. :-(

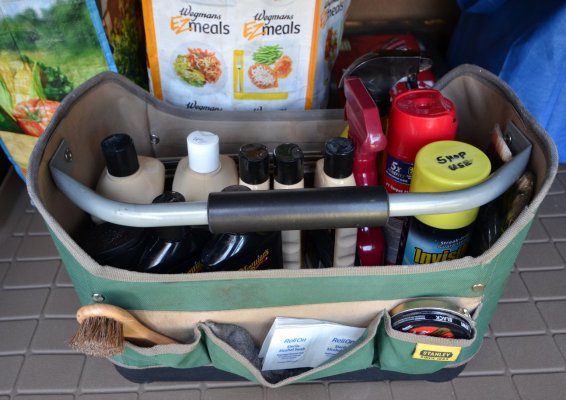
What I currently use (as of July '23) to make the best of the paint that is sitting in my driveway.
You must be registered for see images attach


Here is the magic secret sauce:
You must be registered for see images attach

NOTE: With Cerium Oxide, A little goes a *loooooong* way. Me? I've done 2 windshields so far from this 8 oz bag, and I could certainly do another 1...or possibly 2 more. (!)

And this is what it looks like during the polishing process:
You must be registered for see images attach

NOTE: Yes, this is not a GMT400 vehicle. It's my DD - a Mohave Mist metallic '02 AWD CR-V w/unicorn factory 5-speed manual. Now w/formerly badly scratched windshield!


Instead of assuming that everyone wants a detailed blow-by-blow of exactly how to polish a windshield
(that might flirt w/blowing out my account's word count quota ;0)
I would instead suggest that you follow this link to the Cerium Oxide seller's Amazon
listing and read through all the Customer Reviews -- this is the mother load of
glass polishing info for those of us who never gave into the urge to make
their own optics for their backyard celestial telescope.

On the other hand, if after reading those customer reviews you
still have some questions, don't hesitate to reply here, and
I'll do what I can to make this budget glass restoration subject crystal clear.

Cheers --
 

Attachments

  • Paint correction carry-all setup (sml).jpg
    Paint correction carry-all setup (sml).jpg
    277.2 KB · Views: 25
Last edited:

johnckhall

GO DAWGS!!!
Joined
Mar 7, 2022
Messages
619
Reaction score
1,923
Location
Coastal Georgia
Great work and a lot of elbow grease to get it there. My first GMT400 in '94 was Indigo Blue Metallic. It's a beautiful paint and tends to flop some in different light. My favorite GM paint on these trucks by far!
 

Road Trip

Supporting Member
Supporting Member
Joined
Jul 8, 2023
Messages
1,117
Reaction score
3,184
Location
Syracuse, NY
Worn sway bar bushing replacement / upgraded to new, lower friction/sticktion parts -- very happy

While the tires/wheels were off for refurbishment, a glint of daylight
between the front sway bar & associated bushing caught my eye:

You must be registered for see images attach


OK, this is a no-brainer & an easy fix. Did some research, and found out that
MOOG offers a Problem Solver sway bar bushing, not made of Poly, but rubber with a
fabric inner lining that reduces the 'sticktion' caused by rubber bushings
welding themselves to the sway bar. Here's how MOOG describes it:

You must be registered for see images attach


Sold on the concept! Now to buy the ones that fit my truck:

You must be registered for see images attach


I ordered these up & installed them. The fitment is as factory original, and I
was able to swing the bar as suspended by these new bushings the full suspension travel
by hand with very little resistance. (This bodes well for those of you who
drive over the highway expansion joints down south, by allowing the sway
bar to pivot/remain out of circuit when both tires hit the same thing at the same time.)

Then again, not such a noticeable improvement for those who either spend
most of their time on irregular gravel roads and/or are lucky to drive on
billiard table smooth pavement.)

Pic of MOOG Problem Solver sway bar bushing 9 months after installation
You must be registered for see images attach


Instead of a word salad comparing the ride quality of these fabric-lined new bushings
vs the original rubber or aftermarket poly versions -- these ride the best of
anything I've experienced to date. Highly recommended, would buy again.

****

The End link saga -- Caution: Disappointment dead ahead


While I was in the area, I decided to check out the rest of this circuit
by inspecting the associated end links. What I saw cracked me up:
You must be registered for see images attach


In an effort to just keep things quiet (plus the fact that I don't foresee the
truck entered into any Gymkhanas down the road) I opted to go with
'USA-made' rubber end link bushings. I installed these at the same time I
did the sway bar bushings. They looked good right after they were installed,
but check out what I saw today after ~9 months of light service.

(Oops, just hit the 5 attachment limit; see next posting for failed new
end link bushings.)
 
Last edited:
Top