Bang for the buck Functional Renewal of rust belt '99 C2500

Disclaimer: Links on this page pointing to Amazon, eBay and other sites may include affiliate code. If you click them and make a purchase, we may earn a small commission.

Road Trip

Supporting Member
Supporting Member
Joined
Jul 8, 2023
Messages
1,163
Reaction score
3,353
Location
Syracuse, NY
The end-link saga (Continued)

As I was saying, here's the new end links after ~9 months and light-duty service:
You must be registered for see images attach

Not good. I didn't cheap out, the seller claimed that they were "Made in the USA"?

So now I'm asking the community what end links did you purchase &
have been satisfied with the performance & longevity? Is it me, or
has buying repair parts devolved into a complete crapshoot?

****

Hope this helps someone what to look for, and what to get,
based upon my own experience trying to fix this truck.

Cheers --
 
Last edited:

johnckhall

GO DAWGS!!!
Joined
Mar 7, 2022
Messages
637
Reaction score
1,994
Location
Coastal Georgia
As a physics teacher, my answer would be when you have worn out parts (along with extraneous movement of other parts), the wear is going to be exponential on new parts if you're just replacing a bushing or two here and there. I agree, the rubber on the bushings you replaced does look a little suspect after 9 months. With the amount of rust and wear you see on the underside of your truck, it would require a complete front end overhaul for the working parts to work in unison with each other.
 

Caman96

OEM Baby!
Supporting Member
Joined
Jul 17, 2020
Messages
7,160
Reaction score
14,002
Location
The Hub
Well, for anyone out there that's been waiting w/bated breath for the
rusted wheels resto process...today's your lucky day! :0)

Since the following is pretty self-explanatory, let's jump into the
photos & dispense with all the pretty verbiage.

Comparison of wet-sanded/polished LF fender vs rest of truck as purchased (Also blacked out steelies by PO)
You must be registered for see images attach


If this was PBS's Antiques Roadshow I'd be in the photo wearing a goofy bowtie and
waxing poetic about how the patina on this work truck documents the struggles
and oppression that it has suffered since lumbering off of the Arlington, TX
assembly line back in the summer of '99.

The reality is that cameras are pretty forgiving of older paint jobs -- what looks
OK in a photo often looks weathered in person. Like all sun damage, the original
clear coat on this truck was turning opaque, some on the sides, much more so
on the horizontal surfaces.

Before I started with the wet-sanding & polishing, the left front fender was an
exact visual match of the rest of the truck. It's amazing how removing the
dead/opaque outer layer of clear coat can reveal the color coat underneath
with like-new clarity. NOTE: My goal was for the vehicle to not look 'polished'
(ie: swirl-marks, etc) ...but instead for the paint to simply look new.

If all 4 tires looked this good I might have just left them alone, but as you
saw back in post #4 the passenger side wheels looked pretty rough.
So I had the tires dismounted so I could take care of business in the blast cab.

Inside of steel wheels heavily rusted / Using Black Beauty coal slag at 120psi
You must be registered for see images attach


Same wheel, front face after 2nd pass using finer media
You must be registered for see images attach


Sometimes I'll prime/sand/prime/sand/loop on error... until I am satisfied with
the quality of the underlying surface. (They aren't kidding when they say that
surface prep is everything!) Seriously, when I decided to make the investment
into this Skat Blast cab, I was just trying to claw back most the time I was
spending (trying) to get parts clean enough to inspect/paint/reinstall.

This was back in '06. At that time for every 10 items I painted, I would be
disappointed in 9 of them. They never looked like they were painted at the
factory...they looked like *I* painted them, normally due to flaws underneath
the new paint surface drawing undo attention to themselves. Very disappointing
to spend all that time & then not wanting anyone else to see the finished result. :-(

Once we figured out which media was the best for the task at hand (Black Beauty
for the scaly stuff, all the way to crushed walnut shell for engine blocks & aluminum
heads) this cab was *much* faster than all the other surface prep methods we had
used before. (wire brushes, flap wheels, sanders of all flavors, etc)

And before could I put 2 and 2 together, my overall satisfaction with the paint finishes
flipped -- now when I painted 10 items, 9 of them were satisfactory! (I never get
10/10, there's always sumptin' wrong. :0)

So the photo above is the secret sauce of driving old in the rust belt. Surface prep
is everything...so you might as well do it as fast as humanly possible & get it over with!

Given that this is supposed to be a work vehicle, plus the fact that the 'facing out' surface
was all but blemish free, I simply primed, color coated, and clear coated the wheel before
popping them into the oven for a 90 minute bake at ~200 degrees.

You must be registered for see images attach


The finished product. As close as I could get the original 20+ year old rust belt steelies to look like the factory painted them Indigo Blue metallic.
You must be registered for see images attach


OK, GMT400 has just told me that there's a limit of 5 attachments,
so I'll pickle this & wrap it up in the next posting...
I do like the color match too @Road Trip, I stripped mine down to bare metal and used an Argent Silver.
You must be registered for see images attach
 

Road Trip

Supporting Member
Supporting Member
Joined
Jul 8, 2023
Messages
1,163
Reaction score
3,353
Location
Syracuse, NY
I do like the color match too @Road Trip, I stripped mine down to bare metal and used an Argent Silver.
Sir,

Nice attention to detail --Those wheels look showroom fresh -- super sanitary!

They look factory painted -- it's so hard to take old wheels and take them back
in time like this!

Looking at your wheels, I decided to drag out my NOS '99 C/K Sales Brochure
& compare your wheels against what they have on p. 14.

The page is a nonstandard size, so I had to scan it the best I could on a Canon
G6020. Here's the big picture:

You must be registered for see images attach

I think your 6-lug wheels are represented by the wheel in the lower right?

To get a little better view in order to better compare them to your restored wheels,
I recropped, focusing on the lower 4:

You must be registered for see images attach


Disclaimer: I *think* that in '99 all the 1500 series were the new Silverado,
and you could only get the OBS in the 2500/3500 series. However, I
thought the 6-lug photo was interesting, and could show you what your
rig would look like if you were wondering.

Again, super super clean. If I saw this in the Lowe Depot parking lot, I
would make a beeline to get an eye full of what has the look of a low mile estate
sale survivor. And the color of the truck is a personal favorite of mine. :0)

Thanks for sharing!
 

Caman96

OEM Baby!
Supporting Member
Joined
Jul 17, 2020
Messages
7,160
Reaction score
14,002
Location
The Hub
Thanks, I have the trim rings and center caps as well. I don’t mind the way it looks without them, I also like the look with them. But once they go on , it scratches the paint. Eventually they’ll go back on. Btw, I’m only about 1 hour from Otis AFB. Back in early 80’s I lived across the street that was part of South Weymouth Naval Air Station. Every weekend weekend early in the morning your bed would shake as they roared directly over the band house we lived in. I enjoyed it though.
:patriot:
 

Road Trip

Supporting Member
Supporting Member
Joined
Jul 8, 2023
Messages
1,163
Reaction score
3,353
Location
Syracuse, NY
As a physics teacher, my answer would be when you have worn out parts (along with extraneous movement of other parts), the wear is going to be exponential on new parts if you're just replacing a bushing or two here and there. I agree, the rubber on the bushings you replaced does look a little suspect after 9 months. With the amount of rust and wear you see on the underside of your truck, it would require a complete front end overhaul for the working parts to work in unison with each other.
I'd tend to agree with your assessment. Especially given how heavy
the forces (that are balanced against each other) seem to be
in this 8600 GVW front suspension?

FWIW the truck drives straight & true with no hint of any front
end wear, but at the same time I'm sure that a lot of the front
end parts are at/near the end of their service life? As I've mentioned
elsewhere, the truck seems to drive way better than it should?

Having said that, I did notice a little excess play while driving straight
ahead. I'd bet a dollar that the rag joint is the same one that it left
the assembly line with during the previous century. (!)

I am going to start there in the near term, with a complete mid-life
steering system refurb down the road. (Note: Right now I'm deep
into the rear brakes; they were victims of benign neglect...more
on that later in this build thread.)

All food for thought. Thanks for gonkulating on my setup &
sharing your perspective. Cheers --
 
Last edited:

Road Trip

Supporting Member
Supporting Member
Joined
Jul 8, 2023
Messages
1,163
Reaction score
3,353
Location
Syracuse, NY
Thanks, I have the trim rings and center caps as well. I don’t mind the way it looks without them, I also like the look with them. But once they go on , it scratches the paint. Eventually they’ll go back on.

Exactly. That perfectly describes my love/hate relationship with trim rings. I like the look,
but at the same time scratches turn into bubbly rust in no time up here. :-( I'm
thinking that the PO must have been thinking the same way, since the truck didn't
come with any. Given all this, my plan is to stay plain & keep it waxed.

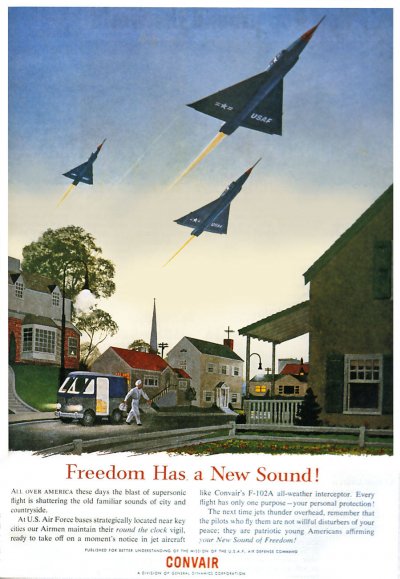
Btw, I’m only about 1 hour from Otis AFB. Back in early 80’s I lived across the street that was part of South Weymouth Naval Air Station. Every weekend weekend early in the morning your bed would shake as they roared directly over the band house we lived in. I enjoyed it though.
:patriot:

Do you remember the bumper stickers down on Cape Cod where
they stated "Jet Noise is the Sound of Freedom"?

I also remember that there was a constant debate in all the local papers
about this noise not belonging in their back yard. We were briefed that
if civilians accosted us we were to maintain our military bearing and
redirect their concerns to a base phone number.

Last, I attached an image from the late '50s that people
would have seen in various magazines. It was a different time.

Small world. Glad you appreciated the sound of the Naval Air Station
the same way I enjoyed the F-111s being test flown over Ft. Worth
when I was a kid.

Be sure to enjoy that minty truck! Color me jealous! :0)
 

Attachments

  • Convair F-102 Freedom Has a New Sound.jpg
    Convair F-102 Freedom Has a New Sound.jpg
    170.3 KB · Views: 25
Last edited:

Road Trip

Supporting Member
Supporting Member
Joined
Jul 8, 2023
Messages
1,163
Reaction score
3,353
Location
Syracuse, NY
Very happy with Mevotech TTX parts.
Thanks Caman96 for taking the time to snag & share that sharp photo!

Any estimate of how long that end link has been in
service? BTW, I do like the way it looks -- I'm off to
check out the Mevotech website...
 

Caman96

OEM Baby!
Supporting Member
Joined
Jul 17, 2020
Messages
7,160
Reaction score
14,002
Location
The Hub
Thanks Caman96 for taking the time to snag & share that sharp photo!

Any estimate of how long that end link has been in
service? BTW, I do like the way it looks -- I'm off to
check out the Mevotech website...
April 2022 installed. Also used Mevotech TTX upper and lower bj’s and TTX inner and outer tie rods. Few other new parts too.
 
Top