Chasing down cyl. 2 misfire (P0302)

Disclaimer: Links on this page pointing to Amazon, eBay and other sites may include affiliate code. If you click them and make a purchase, we may earn a small commission.

alvaroemg

I'm Awesome
Joined
Feb 23, 2023
Messages
144
Reaction score
149
Location
Sacramento
1999 chev suburban k1500 5.7 , 167,820 miles

Here i will document my journey in fixing my misfire code.

To start, I replaced the heads about 8 months ago. Both were cracked and the machine shop told me it would be cheaper to get brand new heads and they would do the valves and seals.

Once complete the head job, I had misfires on many cylinders and truck was running rough.

I re-adjusted my rocker arms with the truck running and it was running better with most misfires gone but on #2. Distributor was still out of time and for the life if me, i could not get it lined up properly so i took it to a local mexican guys shop.
He also did all 16 lifters as I had ticking on the left side. Purchased MELLING JB2079 from RockAuto.

He zero’d in the distributor and called me that the truck was ready a few days later.

a few days later(its been raining and cold weather) misfire on #2 came back, sometimes turning to multiple cylinder misfires.

When the weather is nice, misfire disappears but comes back later throughout the day. Or ill stop at the store and turn it back on and its gone.

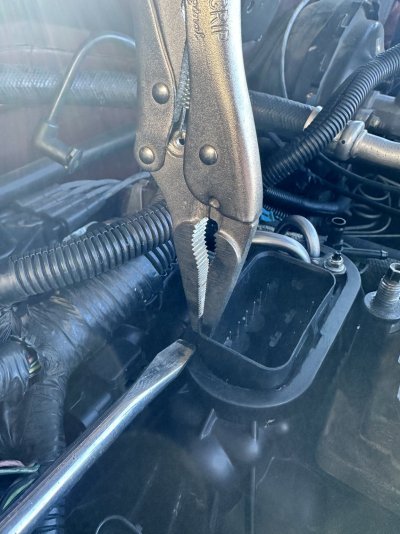
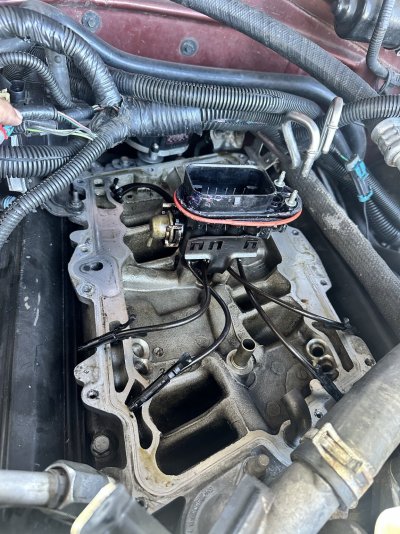
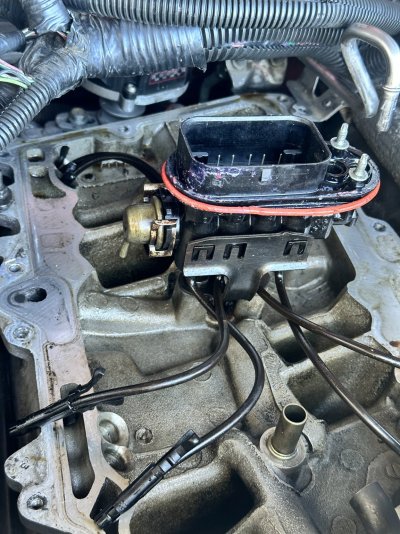
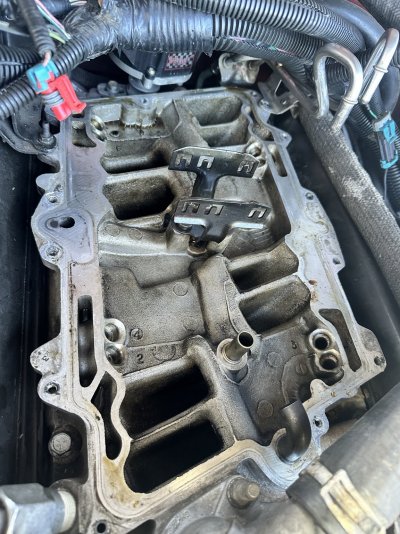
I should of replaced my injector spider when I did the heads but i didn't due to funds. So finally i decided to deal with the #2 misfire and jumped to the main repair i’ve been thinking of for months. I purchased the FJ504 standard Injector spider and swapped it out yesterday. My intake plenum was pretty clean as I don’t have over 1000 miles on the new heads yet.

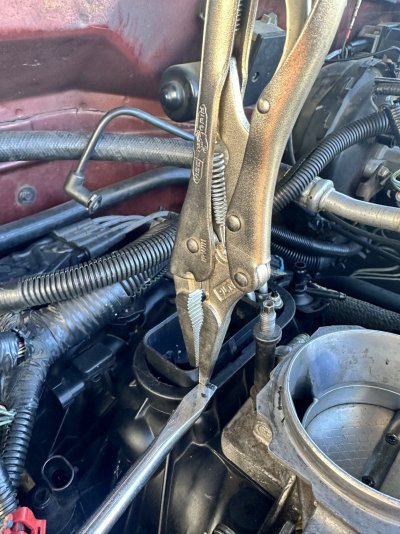
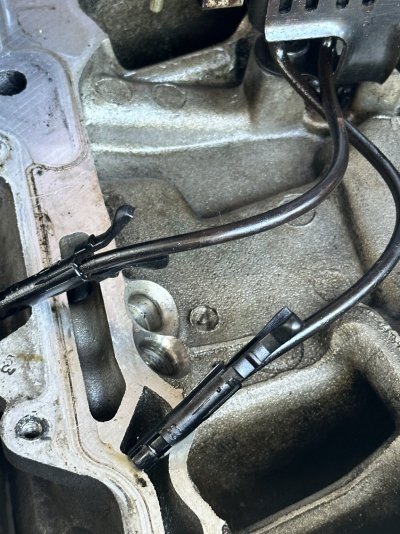
Swapped the spider out, checked for leaks by unplugging the ignition spark cable and priming the fuel. Everything checked out, finished installation. Truck started right up and was idling great. On my way home(i was at a friends shop doing the swap) CEL came back on. I already knew what it was.

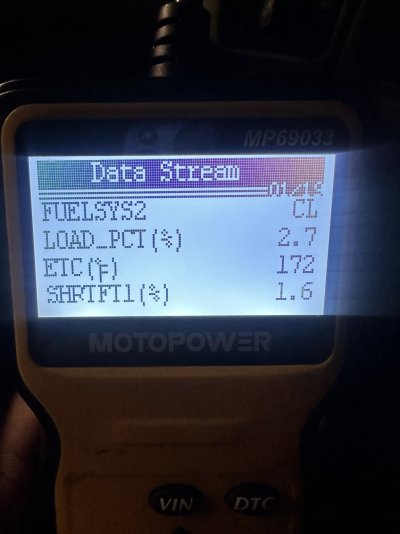
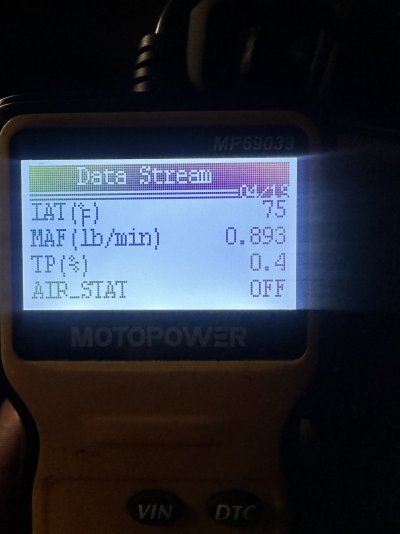
I got home, plugged my little $20 scanner and sure enough, P0302 code came up. I erased it and drove for a bit last night and it didn’t come back. Response is pretty good from the throttle, something i’ve never had and it made me smile when I stepped on it.

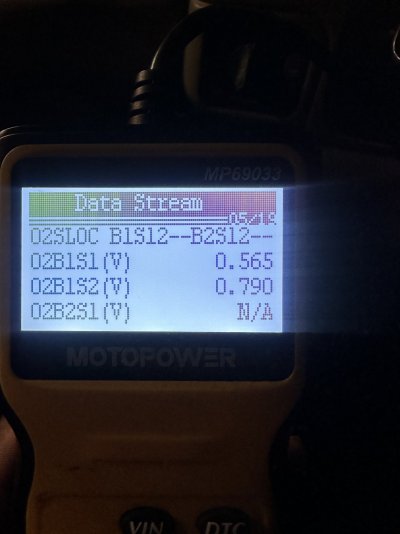
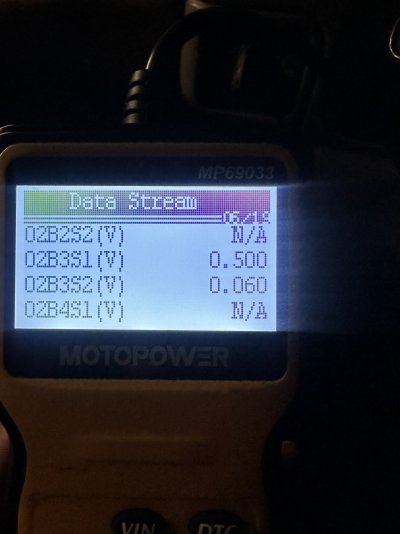
I took some pictures of my scanner at idle with the CEL on prior to erasing it, if anyone can chime in on what they mean.

My plan is to:

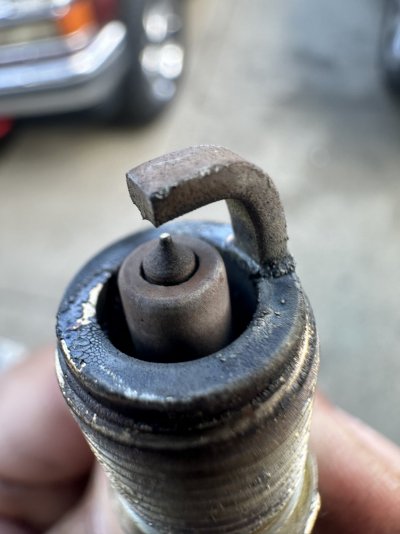
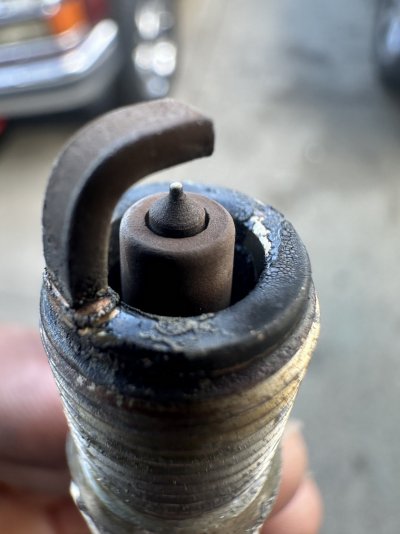
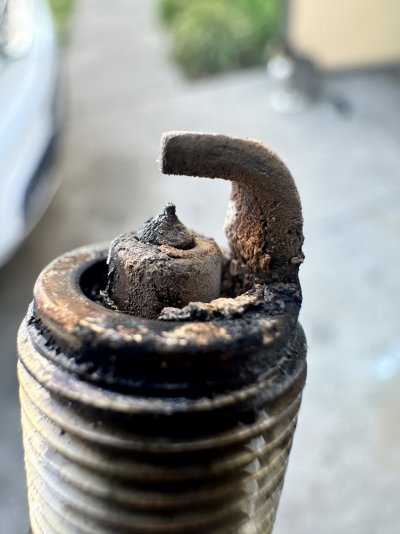
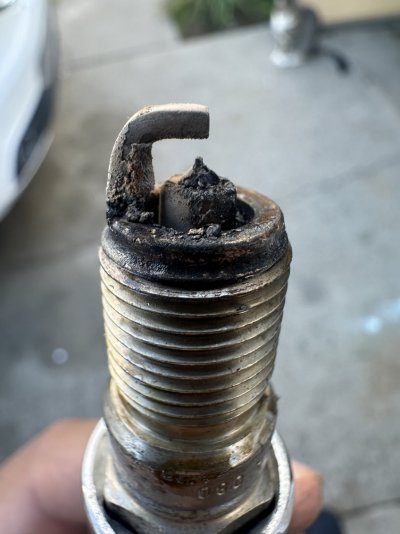
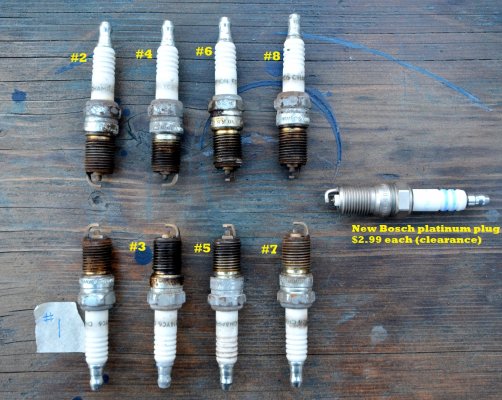
1- Check/replace spark plug/s.(new about 2 years)
2- Replace wires(new about 2 years, maybe wire routing is wrong)
3- check cap and rotor (distributor is brand new from Bravex, 4 months old)(Might upgrade to the blue standard cap and rotor).
4- run fuel psi test
5- run compression test
6- run a can of seafoam injector clean on the throttle body for possible sticking intake valve
7- run a ratio of 1ga/1oz of seafoam in my fuel tank. My tank holds 42 gallons, so I will use 42oz of seafoam.
8- replace my fuel filter after the gas tank seafoam treatment(filter is a K&N filter)
9- replace all 4 o2 sensors(they are due for un upgrade)


My starting order would be #4 followed by #5.
 

Attachments

  • IMG_2058.jpeg
    IMG_2058.jpeg
    470.7 KB · Views: 7
  • IMG_2059.jpeg
    IMG_2059.jpeg
    400.3 KB · Views: 6
  • IMG_2060.jpeg
    IMG_2060.jpeg
    464.7 KB · Views: 6
  • IMG_2061.jpeg
    IMG_2061.jpeg
    459.2 KB · Views: 7
Last edited:

alvaroemg

I'm Awesome
Joined
Feb 23, 2023
Messages
144
Reaction score
149
Location
Sacramento
I was having trouble sitting the spider on the intake fully, so what I did was get some locking pliers and using a screw driver to pry up on the pliers to bring up the spider housing. Worked really good and super easy. Of course, inside of intake plenum and o ring seal on the spider were lubed up. With the fuel lines fully seated and secured, pry up on them slowly and the spider should come up on that side. The main hold down points are the 2 nuts holding down the fuel lines, so the housing wont brake or the lines.
 

Attachments

  • IMG_2062.jpeg
    IMG_2062.jpeg
    320 KB · Views: 8
  • IMG_2063.jpeg
    IMG_2063.jpeg
    392.6 KB · Views: 8

alvaroemg

I'm Awesome
Joined
Feb 23, 2023
Messages
144
Reaction score
149
Location
Sacramento
There are my scanner photos.
 

Attachments

  • IMG_2064.jpeg
    IMG_2064.jpeg
    193.4 KB · Views: 4
  • IMG_2065.jpeg
    IMG_2065.jpeg
    189.3 KB · Views: 6
  • IMG_2066.jpeg
    IMG_2066.jpeg
    207.6 KB · Views: 3
  • IMG_2067.jpeg
    IMG_2067.jpeg
    189.3 KB · Views: 3
  • IMG_2068.jpeg
    IMG_2068.jpeg
    181 KB · Views: 4

alvaroemg

I'm Awesome
Joined
Feb 23, 2023
Messages
144
Reaction score
149
Location
Sacramento
After a 7 day work week I am finally back in town. I pulled the spark plug today for cyl 2 and cyl 4 for comparison. I will attach 2 pictures of each.

I’ve got BOSCH double platinum SP’s. Will be changing them to ACDelco copper and re-gaping to .045.

Cyl 2 SP looks in better condition than cyl 4 SP. i’ve swapped the SP from #2 to #4 and have reset the CEL. I will drive around town later on tonight and see what happens.
 

Attachments

  • IMG_2151.jpeg
    IMG_2151.jpeg
    178 KB · Views: 5
  • IMG_2149.jpeg
    IMG_2149.jpeg
    178.2 KB · Views: 6
  • IMG_2154.jpeg
    IMG_2154.jpeg
    195.7 KB · Views: 6
  • IMG_2152.jpeg
    IMG_2152.jpeg
    193.6 KB · Views: 6

HotWheelsBurban

Gotta have 4 doors..... Rawhide, TOTY 2023!
Joined
Sep 18, 2019
Messages
9,860
Reaction score
18,057
Location
Houston, Texas
I would definitely upgrade to the vented cap and rotor from UMP; they're well worth the money. I have them on both trucks and I'm quite pleased with the performance. We can drive in pouring rain and no misfires from moisture. The brass contacts also will last lots longer than the aluminum ones and are more corrosion resistant too. I grew up using Blue Streak parts where available (helps when your family has a parts store!) and the UMP is like a Blue Streak in my opinion.
 

Road Trip

Supporting Member
Supporting Member
Joined
Jul 8, 2023
Messages
1,118
Reaction score
3,190
Location
Syracuse, NY
After a 7 day work week I am finally back in town. I pulled the spark plug today for cyl 2 and cyl 4 for comparison. I will attach 2 pictures of each.

I’ve got BOSCH double platinum SP’s. Will be changing them to ACDelco copper and re-gaping to .045.

Cyl 2 SP looks in better condition than cyl 4 SP. i’ve swapped the SP from #2 to #4 and have reset the CEL. I will drive around town later on tonight and see what happens.

Greetings alvaroemg,

First of all thanks for sharing your journey to date. There's a lot that the forum can learn from each individual
effort to keep one of these GMT400s on the road. (!)

****

Alright, when it comes to chasing a misfire please keep in mind that back when these OBD2 versions of the
GMT400s were built it seems that it's quite possible for the VCM to misreport which cylinder is misfiring, especially
if the 'Cam Retard' (CMP <> CKP timing correlation) is not within specification.

And even if your VCM reports it correctly, it's been documented that some (but not all) of the scan tools either misreport
which cylinder is misfiring, or the scan tool simply reports ALL misfires as the random P0300.

Given the above, I will take a careful reading of the spark plugs as the most reliable way to figure out the misfire if
there's anything visibly different than the other cylinders. And those 2 fouled plugs are definitely suspect and look
capable of causing misfires due to the conductive carbon deposits.

I concur with your plan to go to the copper plugs gapped to .045". And I'd ask you to start logging exactly how many
miles it takes for your engine to consume a quart of oil. And after driving on those new plugs for awhile, if the misfire
returns then you could pull them and arrange them exactly as they came out of your engine. By doing so we will then
be able to give you a much better read of what's going on. (See attached.)

If your scan tool can report how close your distributor is clocked to specification (CMP retard) this would be helpful
also. (ie: minimize the chance that you experience misfiring due to the wrong spark plug terminal being closer to
the rotor than the correct one.)

Best of luck getting your powerplant fully sorted out. Looking forward to what you discover.
 

Attachments

  • 8 old champion spark plugs as found from previous owner.JPG
    8 old champion spark plugs as found from previous owner.JPG
    612 KB · Views: 6
Last edited:

alvaroemg

I'm Awesome
Joined
Feb 23, 2023
Messages
144
Reaction score
149
Location
Sacramento
Greetings alvaroemg,

First of all thanks for sharing your journey to date. There's a lot that the forum can learn from each individual
effort to keep one of these GMT400s on the road. (!)

****

Alright, when it comes to chasing a misfire please keep in mind that back when these OBD2 versions of the
GMT400s were built it seems that it's quite possible for the VCM to misreport which cylinder is misfiring, especially
if the 'Cam Retard' (CMP <> CKP timing correlation) is not within specification.

And even if your VCM reports it correctly, it's been documented that some (but not all) of the scan tools either misreport
which cylinder is misfiring, or the scan tool simply reports ALL misfires as the random P0300.

Given the above, I will take a careful reading of the spark plugs as the most reliable way to figure out the misfire if
there's anything visibly different than the other cylinders. And those 2 fouled plugs are definitely suspect and look
capable of causing misfires due to the conductive carbon deposits.

I concur with your plan to go to the copper plugs gapped to .045". And I'd ask you to start logging exactly how many
miles it takes for your engine to consume a quart of oil. And after driving on those new plugs for awhile, if the misfire
returns then you could pull them and arrange them exactly as they came out of your engine. By doing so we will then
be able to give you a much better read of what's going on. (See attached.)

If your scan tool can report how close your distributor is clocked to specification (CMP retard) this would be helpful
also. (ie: minimize the chance that you experience misfiring due to the wrong spark plug terminal being closer to
the rotor than the correct one.)

Best of luck getting your powerplant fully sorted out. Looking forward to what you discover.
Purchased a set of 8 SP (ACDelco Professional R44LTS6) for $9.96 out the door from Amazon. Arriving tomorrow by 3pm(PST).

My scan tool is a cheap-o $20 from Amazon, it does not tell Cam Retard.

I will casually go visit a neighbor tomorrow AND casually ask to use his expensive scanner. Will report back on the CAM Retard. What should I expect this number to be?

Also, my wires are a set from Auto Zone. Will be upgrading to AC Delcos 9718Q. Is this the go to for wires?
 

Road Trip

Supporting Member
Supporting Member
Joined
Jul 8, 2023
Messages
1,118
Reaction score
3,190
Location
Syracuse, NY
Purchased a set of 8 SP (ACDelco Professional R44LTS6) for $9.96 out the door from Amazon. Arriving tomorrow by 3pm(PST).

My scan tool is a cheap-o $20 from Amazon, it does not tell Cam Retard.

I will casually go visit a neighbor tomorrow AND casually ask to use his expensive scanner. Will report back on the CAM Retard. What should I expect this number to be?

Also, my wires are a set from Auto Zone. Will be upgrading to AC Delcos 9718Q. Is this the go to for wires?

I completely agree with the plug choice. Known-good plugs for the right price. Perfect
for a DD in normal use, solid basis for troubleshooting purposes.


As for the Cam Retard, I've attached a couple of pages from the DTC P1345 section of
the FSM. Essentially, the goal is 0° +/-2° measured at 1100 rpm. According to the
manual, they want you to rev the motor to 2000 rpm and see how much change you
observe. (If it varies more than a couple of degrees you are supposed to figure out if
the root cause is in the distributor, timing chain stretch, etc.) NOTE: A lot of forum members
report that their vehicle runs fine outside of this spec, as long as it's not enough error to
trigger the SES light for a P1345 code. Fingers crossed that the garage you used was able
to get it reasonably close to 0° -- one less variable to worry about.

As for the spark plug wires, the AC Delco wires you mentioned are the default. But in this
thread there was mention of the 9718 vs the 718, the former made in China, the latter
made in USA. (AC Delco wire discussion) I just checked, and what was listed in Amazon confirmed this.

Personally, my preference is always to use a set of wire wound RFI spark plug wires as opposed to the
older style high resistance RFI graphite-coated fiberglass. The wire wound rely on inductance to minimize
the RFI, and measure consistently from wire to wire.

On the other hand, the old graphite/fiberglass high resistance jobs seem to vary more from wire to wire,
especially after being in service and especially after being put through normal handling from replacing plugs, etc.
So from my perspective, IF the AC Delco wires are wire wound they would pass muster. Funny thing, I couldn't nail
down if the particular set you referenced was wire wound or not, for the listing I read seemed to mention both?

Note: From personal experience I've never been disappointed by NGK wire-wound spark plug wires. Hopefully
others will jump in here and share their first-hand 350 Vortec spark plug wire experiences.

EDIT: @Schurkey's post on plugs and wires is well worth a read: (Schurkey on plug gaps & spark plug wires)
Actually a pretty good discussion breaks out after this reply.

Bottom line, I'm hoping that the funky plugs that you took photos of were victims of bad spark plug wires,
instead of good wires and there's issues with the respective cylinders that they were installed in.

Hope this helps.
 

Attachments

  • P1345 CMP CKP sync specs (circled) -- 99 Chevrolet & GMC CK Truck SM - Vol. 1 & 2.jpg
    P1345 CMP CKP sync specs (circled) -- 99 Chevrolet & GMC CK Truck SM - Vol. 1 & 2.jpg
    238.2 KB · Views: 3
  • P1345 2nd page of sync specs (circled) -- 99 Chevrolet & GMC CK Truck SM - Vol. 1 & 2.jpg
    P1345 2nd page of sync specs (circled) -- 99 Chevrolet & GMC CK Truck SM - Vol. 1 & 2.jpg
    219.8 KB · Views: 3
Last edited:
Top