My Flat Tappet Cam Wiped Out So I Decided To Go Roller

Disclaimer: Links on this page pointing to Amazon, eBay and other sites may include affiliate code. If you click them and make a purchase, we may earn a small commission.

PlayingWithTBI

2022 Truck of the Year
Supporting Member
Joined
Jan 3, 2019
Messages
9,696
Reaction score
15,077
Location
Tonopah, AZ
I've heard bad things about that cam company too but, that was years ago and about flat tappet cams. The one I wiped out was a Lunati cam and lifter kit. I'm thinking no more flat tappet cams for this dude :33:
 

L31MaxExpress

I'm Awesome
Joined
Apr 21, 2018
Messages
6,098
Reaction score
7,953
Location
DFW, TX
I've heard bad things about that cam company too but, that was years ago and about flat tappet cams. The one I wiped out was a Lunati cam and lifter kit. I'm thinking no more flat tappet cams for this dude :33:
The last one I built for myself was the L30 305 in my 99 Tahoe. It was a Lunati camshaft with used, cleaned and home resurfaced, GM hardened foot lifters out of a TBI 350 crate engine that had low mileage when I swapped a roller cam into it. David Vizard details resurfacing those lifters in his budget small block book. Those lifters last practically forever.
 

Schurkey

Supporting Member
Supporting Member
Joined
Jan 14, 2018
Messages
11,208
Reaction score
14,154
Location
The Seasonally Frozen Wastelands
The last flat-tappet cam I installed, I paid the $110 extra to have it Nitrided. That was years ago; I don't know what they charge for Nitriding now.

Cam and lifter quality is more than just how hard the metal is. The curvature of the lifter foot should match the taper of the cam lobe. Mixing-and-(not) matching doesn't work very well; and nobody thinks about having to research the spherical radius of the lifters vs. the taper angle on the cam lobes.

I saw a nice graphic in the last week or so, depicting radius vs. taper. If I could remember where, I'd post it here.
 

PlayingWithTBI

2022 Truck of the Year
Supporting Member
Joined
Jan 3, 2019
Messages
9,696
Reaction score
15,077
Location
Tonopah, AZ
I'll go into what we did to get at the springs, cam, and lifters to change them. I know a lot of you have already done this but, in the interest of sharing, we'll get into it.

After removing the fan shroud, draining the radiator, removing the belt, tensioner, pulling the fan, this is what it looked like. We were able to leave the accessories brackets but, did have to pull the alternator to get the intake manifold off because of the Oil Pressure Switch in the back china rail.
You must be registered for see images attach


You must be registered for see images attach


Then we dropped the oil pan a little by removing all the bolts except a couple loose ones in the back. That allowed us to remove the timing cover without ruining the pan gasket that goes under it.

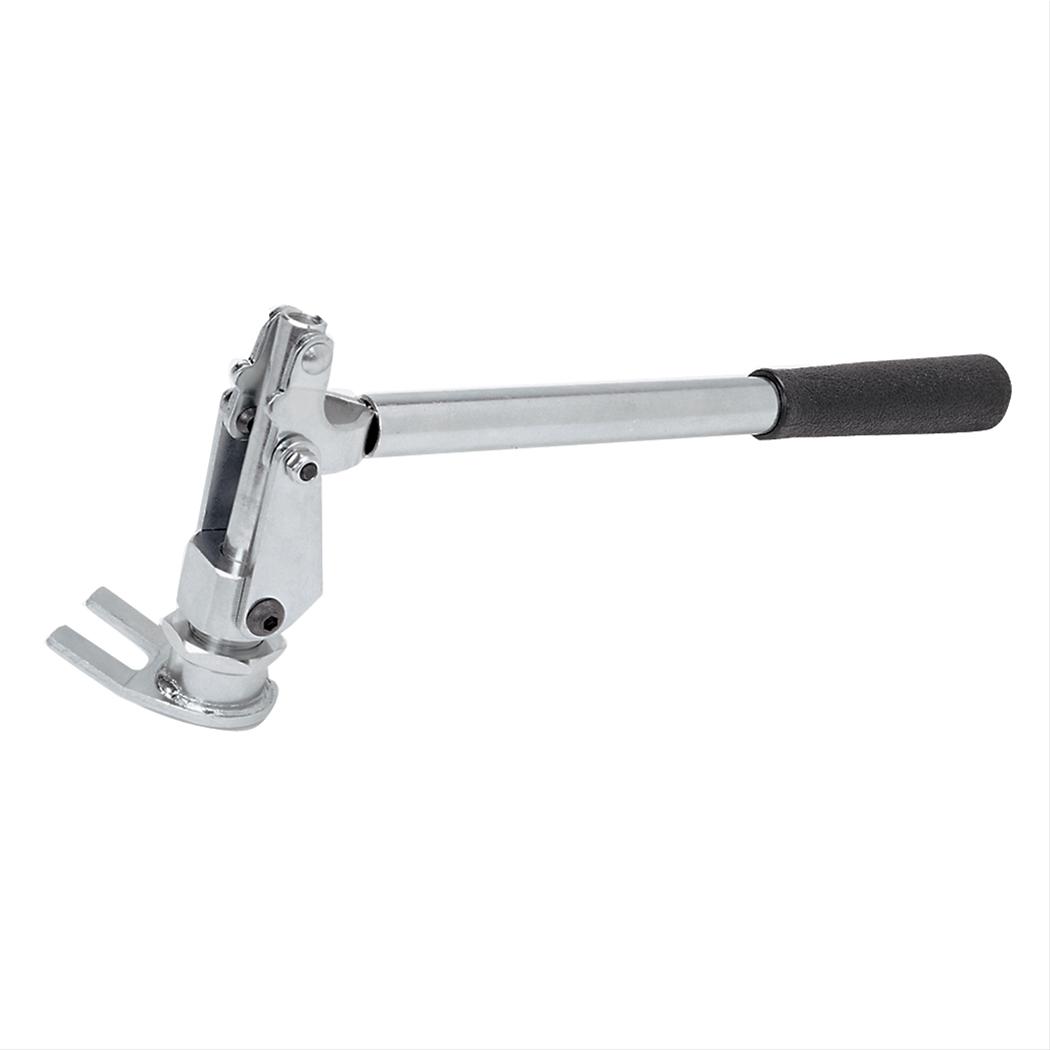
I must say it's a lot easier to do the springs with the heads on the bench instead of how we did it but, I didn't wanna disturb them too. We used this tool instead of the cheap clamp style from HF. It worked pretty well after we put the forked part in the vise and straightened out the angle a little. It kept pulling the spring towards it, making it hard to get both locks/keepers in without fighting it. As it was we still had to put a screwdriver in back and pry it out, to position the spring properly.
www.summitracing.com/parts/sum-906784


Using the hose and fitting off a compression checker, screwed into the corresponding cylinder's spark plug hole, we connected the shop air to it keeping the valves from falling into the cylinder. It's fun tapping the spring with a hammer to seat the locks and get a loud pop when the valve opens a bit.

As I mentioned in my 1st post there was some challenges fitting and getting everything to work but, we're making progress. :waytogo:
Next week, finish the springs, install lifters, dog bones, spider, push rods, and set lifter pre-load. Then start assembling the pieces and parts to make it look whole again. :cool:

Unfortunately, with my blown out knee, I'm not much help and, my son can only come over on Mondays (and not before noon, ha ha) so, I figure it'll be another couple weeks before we can make any noise.
 

Schurkey

Supporting Member
Supporting Member
Joined
Jan 14, 2018
Messages
11,208
Reaction score
14,154
Location
The Seasonally Frozen Wastelands
You must be registered for see images attach


I would have expected a TBI damper and timing pointer to be "straight up" instead of viewed by the PS pump. Are those the original damper and timing pointer? Have you verified that true TDC shows up as "0" degrees on the damper/pointer?
 

PlayingWithTBI

2022 Truck of the Year
Supporting Member
Joined
Jan 3, 2019
Messages
9,696
Reaction score
15,077
Location
Tonopah, AZ
Are those the original damper and timing pointer? Have you verified that true TDC shows up as "0" degrees on the damper/pointer?
Yes and yes, many times. This is an OE Mr Goodwrench long block, damper and timing cover (made in Meheeco). If they were straight up, how would you be able to set timing when it's directly behind the water pump, it'd be pretty hard to see. It's easy to see timing marks from that angle.
 

L31MaxExpress

I'm Awesome
Joined
Apr 21, 2018
Messages
6,098
Reaction score
7,953
Location
DFW, TX
You must be registered for see images attach


I would have expected a TBI damper and timing pointer to be "straight up" instead of viewed by the PS pump. Are those the original damper and timing pointer? Have you verified that true TDC shows up as "0" degrees on the damper/pointer?
My timing marks were in the same place on the OE 1983 305, an OEM 92 TBI 350 and my Goodwrench 350 TBI I had in my G20 van. The Targetmaster 350 in the 80 C10 was also in that position. The only one I have seen higher up were a car L69 and L03.
 
Last edited:

Schurkey

Supporting Member
Supporting Member
Joined
Jan 14, 2018
Messages
11,208
Reaction score
14,154
Location
The Seasonally Frozen Wastelands
The timing marks on my '88 K1500 5.7L are "straight up and down". Takes the long water pump, and firing the timing light down between the timing cover, water pump, and accessory drive plate.

I thought all small-block and V6 TBI trucks were like that. But since you have a replacement engine, I guess that explains why it's different.

Maybe I should start looking around for the timing cover and damper like you have. Might be more convenient. OTOH, it's not like I need to time the ignition often.
 
Top