Replace everything one piece at a time, and the order won't matter.
In terms of plug wires, the order that you replace them doesn't matter...but the
routing does. This is especially critical for the plug wires going to #5 and #7. The service manual will have plug-wire routing diagrams, and that should be followed EXACTLY, including the original plug wire brackets, clips, holders, etc.
Of course, lots of times the original plug wire routing items are long-gone, and then you just do the best you can, or you try to find replacements at the Treasure Yard, or aftermarket replacements from any one of a thousand vendors.
Download the factory service manual and read the maintenance section.
REALLY good advice. If it's time for a "tune-up" it's probably also time for various fluids to be replaced/flushed, and chassis/suspension items to be greased or otherwise lubed. Same for door hinges and hood hinges--lubricate and inspect.
Wheel balance? Brake inspection front and rear? Making sure all the light-bulbs work, and the windshield wiper blades aren't degraded? Verifying rubber hoses for coolant, vacuum, and brakes? Verifying serpentine belt and tensioner? The list goes on...and on...and on.
Basically, replace the stuff that gets old and crusty.
The '90s style tune-up is to replace the spark plugs, wires, cap, rotor, fuel filter, and air filter.
Yes, but a "complete" tune-up involves inspection of things, not just replacement of certain parts.
1. Connect a scan tool to a fully warmed-up engine. Make a record of all trouble codes, idle-speed, and idle short- and long-term fuel trim numbers. Verify all sensors, assure IAC, EGR solenoid, AIR (if equipped) are all working properly. Shut off engine. If there are existing trouble-codes, consider fixing them first (although MAYBE they fix themselves if the tune-up restores proper engine operation.)
2. Remove spark plugs, inspect plugs for "issues"--oil or fuel fouling, coolant ingestion, excessive wear, cracked porcelain, carbon tracking on the porcelain, etc.
3. Cranking compression test of all eight cylinders. Use a battery charger as needed so the battery doesn't lose charge and cause slow cranking. If the cranking compression pressure is nicely-even on all cylinders, install fresh spark plugs of appropriate type. If the cranking compression is excessively low, or uneven, more diagnosis is warranted.
4. Inspect or replace plug wires, cap, rotor, fuel filter, air filter, PCV valve and hoses, PCV filter (if used.) Make sure plug wires are routed properly. Verify magnet on distributor shaft for pickup coil--TBI distributors often crack the magnet. Assure that the vent screens in the TBI distributor base are not plugged. Wiggle mainshaft to assess distributor shaft bushing wear, and twist mainshaft to assess distributor gear/cam gear wear.
5. Connect TBI fuel pressure adapter and gauge--if you use the adapter style that goes in place of the fuel filter, do this as part of the fuel filter replacement. Otherwise, you'll disconnect the fuel supply hose at the throttle body, and install a different style of pressure adapter there.
6. With fresh plugs, inspected/verified or replaced wires, cap, rotor, etc., turn ignition "on". Note fuel pressure during prime cycle. TBI engines don't retain fuel pressure, so it'll drop fast. Start engine, note fuel pressure while running. If it's acceptable, shut engine off, remove pressure adapter, and reconnect fuel plumbing.
7. With engine off, disconnect the "set timing" connector. Start engine, verify initial timing. If it's in spec--or otherwise where you want it ('cause it's fairly common to add a degree or three of advance beyond what "spec" calls for) shut engine off, connect "set timing" connector, re-start engine. Make sure you have more advance with the timing connector re-connected--typically something like 12--15 degrees more advance, although this can vary some.
If your initial timing is way off--
especially retarded--the timing chain 'n' sprockets, and/or the distributor drive gear on the cam, or the driven gear on the bottom of the distributor is suspect for excess wear.
8. While you have the timing light connected, watch the timing mark as you tap on the iron of the cylinder head or exhaust manifold with a small hammer. You should see the timing retard, and hear the idle speed drop--and then recover--as the knock sensor responds to the vibration of the hammer-tap. I learned fairly recently that some 454s
did not have a knock sensor, so you'd want to verify before you go nuts with the hammer.
9. Shut engine off. Disconnect battery for fifteen seconds to clear the trouble code you just set by disconnecting the "set timing" connector. This also clears all the other trouble codes (if any) and resets the fuel trims--which is why you recorded all that stuff earlier, so you can analyze it before it's erased from memory. Inspect battery cable ends for corrosion (fuzzy green, and "hard black") Battery terminals and cable ends need to be bright 'n' shiny, and then properly tight.
10. Start engine. Verify EGR operation, heated-air intake operation (if equipped) and evaporative-canister venting.
11. Connect battery charger as needed to bring battery to full charge. "Full charge" is generally 12.6--12.7 AFTER the battery has been
off the charger for an hour or more. Right after charging the battery could be 13+ volts, but the excess voltage is due to "surface charge" and that will self-dissipate with a little time.
12. Replace the O2 sensor unless you know it's history and can PROVE that it's working properly. O2 sensors get lazy with age/mileage, they can "seem" to be working OK but in fact they've degraded.
13. If you had the equipment--and
most guys won't--verify starter amperage draw, and battery voltage when cranking, then alternator amperage output when the engine is running at fast idle. Assure that alternator "ripple" is acceptable, and the voltage is properly regulated. Check for parasitic draw on the battery AFTER the on-board electronics (computer, mainly) has "gone to sleep", sometimes ten or thirty or fifty seconds after the lights and radio are turned off, doors have been closed with the key out of the lock-cylinder.
Cap and rotor - United Motor Products. They are hands-down the best quality.
Spark plugs - NGK or AC. The OEM plugs came from AC, and NGK has been the one ignition supplier I've found that works in everything. Don't buy "trick" plugs like E3.
Wires - United Motor Products or NGK.
Fuel and air filters - Wix or AC Delco
^^^ Yup. I would add an O2 sensor and maybe PCV valve. Compare "new" parts to the "old" parts--did someone sell you the wrong spark plugs? Did someone sell the wrong plugs to the PREVIOUS tune-up person?
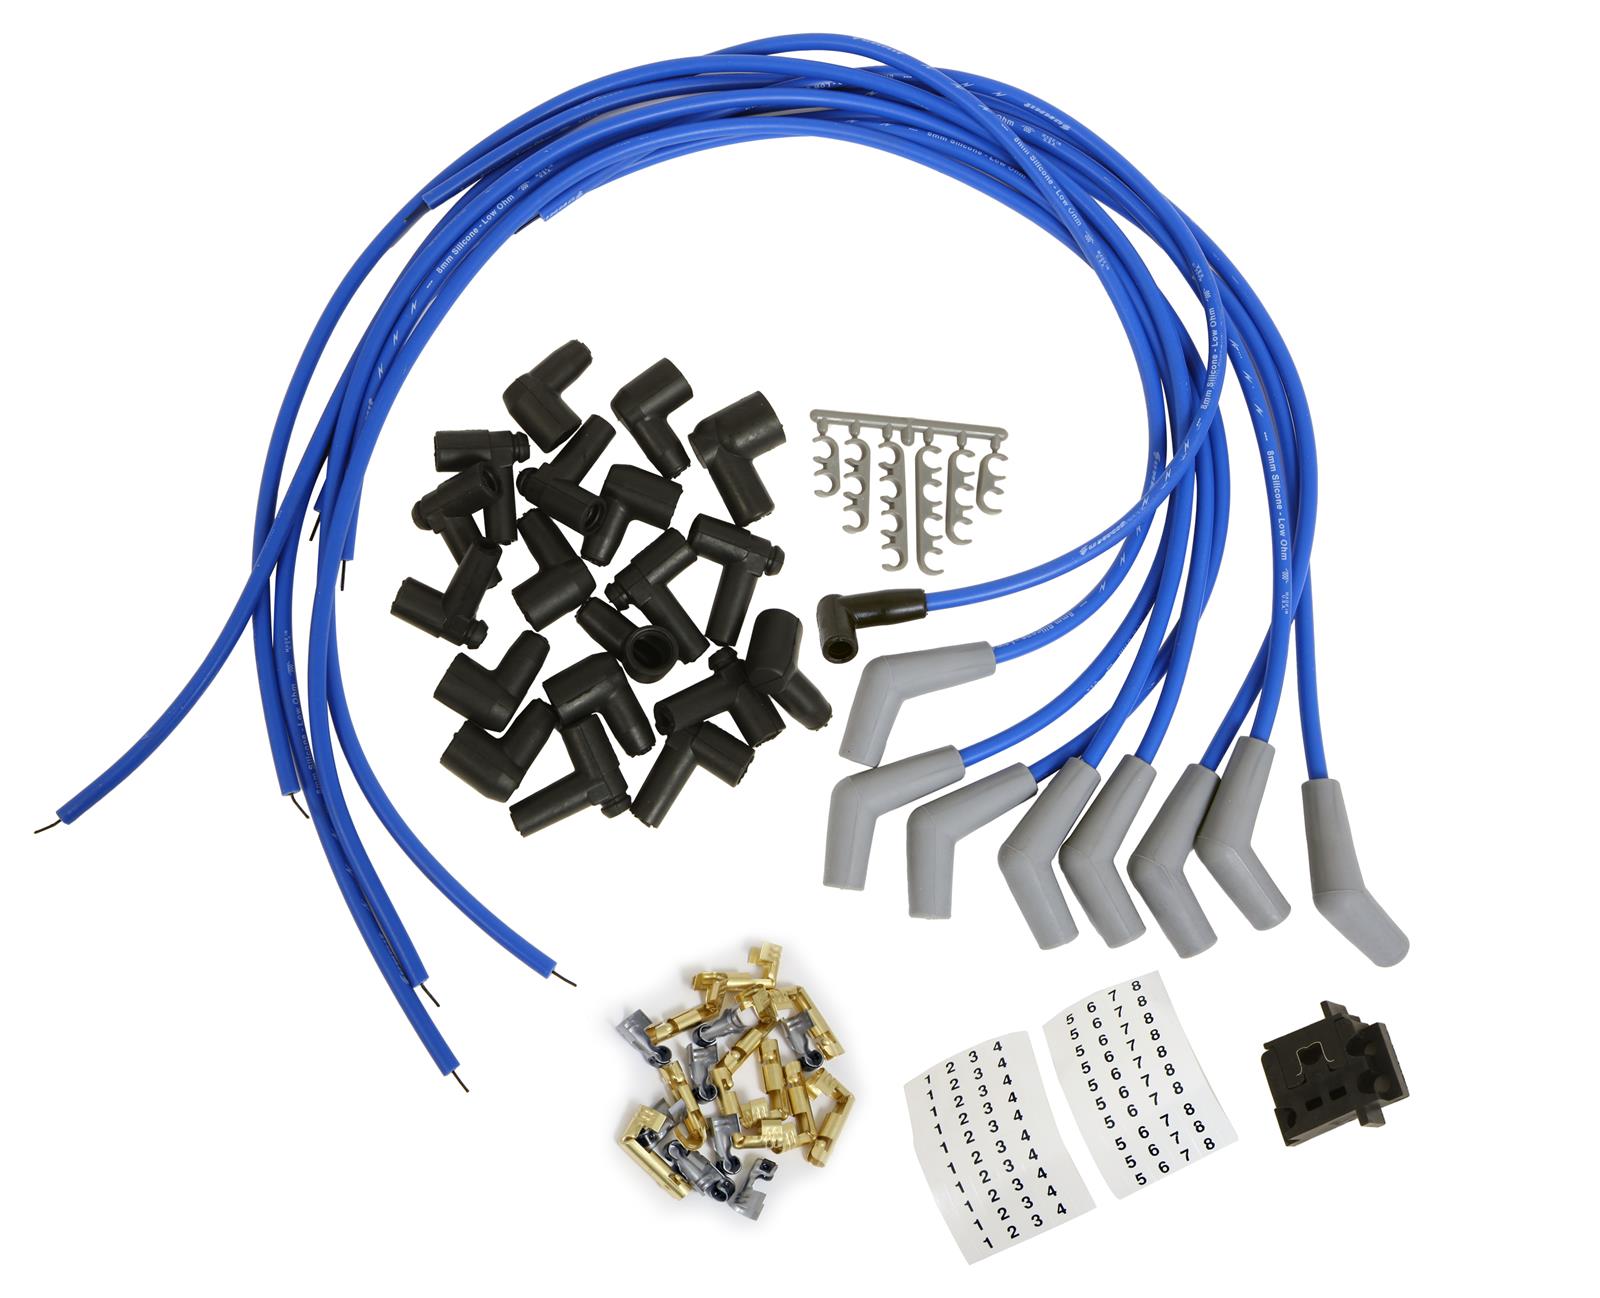
The Summit-brand "cut-to-fit" plug wires are some of my favorites. Plug wires sets are goofy: "
Custom-Fit" plug wire set usually have wires that are too damn long, so they universally "fit" as many vehicles as possible. "
Universal" wire sets are cut-to-length to suit the exact vehicle and plug-wire routing so they're customized to what the customer wants.
The Summit cut-to-fit sets come with the crimping tool, distributor-end terminals and boots, etc. You'd need to select the part number that has the correct plug boot--with big-blocks, it's usually a straight- or nearly-straight boot. Summit has various colors, some with ceramic boots that might be nice if you had headers. Prices vary.
Example:
www.summitracing.com/parts/sum-860827
Free Shipping - Summit Racing™ 8mm Ignition Wires with qualifying orders of $109. Shop Spark Plug Wire Sets at Summit Racing.

www.summitracing.com
Best practice is to replace your plug wires one at a time so that you don't mix up the order. Other than that order doesn't matter.
But routing does. Be absolutely sure that #5 and #7 especially don't run parallel, (or even sorta-parallel) unless they're well-separated.