Hi Scott,
Sounds like you have 2 different audible issues. I don't want you to wear yourself out
chasing the one that won't affect performance & reliability, and giving up before fixing
the one that you should/can find a fix for. (!)
1) The non-issue is the 'couple of taps' & quiet.
If you can't find absolute perfection in terms of a stray tap on startup, then if you are
going to err, then please err on the side that gives you the smoothest idle. Simply put,
the more consistently that the valves are closing (and getting rid of the heat that will
burn them if not shed) the smoother the idle. So if 3/4 of a turn preload still gives you
a smooth idle, then let's stay at this setting. And again, if the engine stop lottery puts
the loosest lifter on top of it's cam lobe every so often and you end up with a few taps
on start up, I'm perfectly OK with that.
****
2) The "good minute or so of tapping". THIS is worth digging a little deeper into your oiling
system using a common sense approach. Chevrolet came up with a way to literally bleed
off the issue and also improve the timing chain oiling. Literally pocket change to implement
IF the engine is already apart, on a stand, and awaiting assembly. A big job to retrofit when
the engine is all together, for those plugs are in the front of the block sitting behind the
camshaft's gear for the timing chain. Given where you are right now, the risk/reward to
retrofit those plugs with the drilled "air bubble bleeders" is not good.
On the other hand, if you were to approach the 'air bubble' problem from the other side
of the equation, then we might be able to fix this issue for a reasonable amount of money.
In English, the problem that Schurkey describes is the development of an air bubble in
the dead-ended drilled oil passage that feeds your lifters. Since the passage is currently
dead-ended, then the only way for the air to escape is for it to be pushed through one of
the lifters towards the end of the passage. (Since the oil is being pumped forward from
the back of the engine, the probability will be that it will be one of the lifters towards the
front of the engine that will tap while the air is being pushed through it.)
So what I propose is to instead focus on the 'Why is the air bubble developing' in the first place?
And in order for all of us to reason through how this air bubble could develop in the first place,
let's look at the SBC oiling system as shown in the Chevrolet Power Manual one more time:
So when you start your engine, the crank turns the cam, the cam turns the distributor shaft,
and the distributor shaft turns the oil pump. Oil starts flowing up as the arrows indicate. From
the oil pump pickup, through the pump, then oil filter, and on to the (3) individual drilled oil passages
that run from back to front in the vicinity of the camshaft. And after having performed a running
preload, you gotta believe in the rest of the drawing above, from lifter through rocker arm
spit holes. :0)
OK then, so what happens once you shut the engine off and it comes to a stop? There's all this
oil way up high, all the way up to the spit holes in the rocker arms? Well, if gravity has it's way,
it's all going to flow backwards from where it came from, and end up back in the oil pan.
Now the only problem with the drawing above is that it's from the front of the engine, so there
is some important detail obscured. Good news, I found a similar drawing from the back, and
let's check it out:
The arrows show the oil flow when the pump is turning. For gravity, turn the arrows
backwards. Without a good anti-drainback valve in the oil filter, gravity will push the oil
back through the filter, to the pump, and back through the pickup in the pan.
So as this drainback is occurring, since nature abhors a vacuum, then air is drawn into those
drilled oil passages. And there is your bubble.
The solution? I don't know what brand oil filter you used, but if we are going to avoid this
drainback from happening, you need to find out which brand has *the best* anti-drainback
valve in it, and use that. And you don't have to change the oil, just replace/upgrade the
oil filter see if the problem goes away. (I'm hoping that someone can step in here and
identify which brand has the best anti-drainback filters these days?)
But wait, there's 1 more item I want you to consider. Given a choice between dirty oil
and NO oil, the engineers opted to put in a bypass around the oil filter. This way, once
there's more than ~12 psi or more of pressure drop across the filter, the bypass opens
and let's oil go from the oil pump directly to the oil passages. Guess what? IF this
bypass doesn't seat 100%, then here's a 2nd path where the oil can drain back to the
pan. (!)
Good news, this bypass is easy to get to, since it's located in the part that provides the
threads for the oil filter to spin onto:
****
To summarize, there are 2 different noises, identifiable by the duration of the noise.
1) A few ticks on startup & disappears? Not a problem per the FSM.
2) Ticking sound lasting around a minute? Working theory is an air bubble
developed in the oil passages feeding the lifters because oil is being allowed
to drain back into the pan. The long ticking is caused by the trapped air
bubble being forced through a good lifter. (Lifter as victim.)
Common-sense solution #1. Change oil filter to one with known-good anti-drainback valve.
IF solution #1 doesn't cure air bubble creation, Solution #2 is to inspect/clean/replace
as needed to cure a leaky bypass valve on oil filter adapter assembly. NOTE: Solution
shown for standard 2WD mount. Engine oil cooler or 90° filter mount for 4WD clearance
may be different. (!)
Remember that early '50s Chrysler training slide show about the hydraulic lifter and
how it needs a steady, air free oil supply in order to work quietly? Well, since you
cleaned up your lifters so that they are no longer sticky, we've fixed 95% of the
problem, and now you have 1 potential oil filter upgrade + 1 more bypass valve to
clean/replace and you should be good to go. (!)
And Congratulations, for you have now studied the small block Chevrolet V8 oil
delivery system more than 99.9% of the people driving one today. :0)
So, decide on a lifter preload, set it, and realize that this external adjustment
will not cure air in the delivery system. The clicking for a minute is an air bubble
that we should try to eliminate from being created with some attention down
in the vicinity of the oil filter.
Let us know what you discover. And @Schurkey, thanks for sharing the existence
of the plugs with the bleeders in them. I will take advantage of those from this
point forward...for I hate ticky lifters almost as much as scott2093 does.")
Cheers --
Sounds like you have 2 different audible issues. I don't want you to wear yourself out
chasing the one that won't affect performance & reliability, and giving up before fixing
the one that you should/can find a fix for. (!)
1) The non-issue is the 'couple of taps' & quiet.
If you can't find absolute perfection in terms of a stray tap on startup, then if you are
going to err, then please err on the side that gives you the smoothest idle. Simply put,
the more consistently that the valves are closing (and getting rid of the heat that will
burn them if not shed) the smoother the idle. So if 3/4 of a turn preload still gives you
a smooth idle, then let's stay at this setting. And again, if the engine stop lottery puts
the loosest lifter on top of it's cam lobe every so often and you end up with a few taps
on start up, I'm perfectly OK with that.
****
2) The "good minute or so of tapping". THIS is worth digging a little deeper into your oiling
system using a common sense approach. Chevrolet came up with a way to literally bleed
off the issue and also improve the timing chain oiling. Literally pocket change to implement
IF the engine is already apart, on a stand, and awaiting assembly. A big job to retrofit when
the engine is all together, for those plugs are in the front of the block sitting behind the
camshaft's gear for the timing chain. Given where you are right now, the risk/reward to
retrofit those plugs with the drilled "air bubble bleeders" is not good.
On the other hand, if you were to approach the 'air bubble' problem from the other side
of the equation, then we might be able to fix this issue for a reasonable amount of money.
In English, the problem that Schurkey describes is the development of an air bubble in
the dead-ended drilled oil passage that feeds your lifters. Since the passage is currently
dead-ended, then the only way for the air to escape is for it to be pushed through one of
the lifters towards the end of the passage. (Since the oil is being pumped forward from
the back of the engine, the probability will be that it will be one of the lifters towards the
front of the engine that will tap while the air is being pushed through it.)
So what I propose is to instead focus on the 'Why is the air bubble developing' in the first place?
And in order for all of us to reason through how this air bubble could develop in the first place,
let's look at the SBC oiling system as shown in the Chevrolet Power Manual one more time:
You must be registered for see images attach
So when you start your engine, the crank turns the cam, the cam turns the distributor shaft,
and the distributor shaft turns the oil pump. Oil starts flowing up as the arrows indicate. From
the oil pump pickup, through the pump, then oil filter, and on to the (3) individual drilled oil passages
that run from back to front in the vicinity of the camshaft. And after having performed a running
preload, you gotta believe in the rest of the drawing above, from lifter through rocker arm
spit holes. :0)
OK then, so what happens once you shut the engine off and it comes to a stop? There's all this
oil way up high, all the way up to the spit holes in the rocker arms? Well, if gravity has it's way,
it's all going to flow backwards from where it came from, and end up back in the oil pan.
Now the only problem with the drawing above is that it's from the front of the engine, so there
is some important detail obscured. Good news, I found a similar drawing from the back, and
let's check it out:
You must be registered for see images attach
The arrows show the oil flow when the pump is turning. For gravity, turn the arrows
backwards. Without a good anti-drainback valve in the oil filter, gravity will push the oil
back through the filter, to the pump, and back through the pickup in the pan.
So as this drainback is occurring, since nature abhors a vacuum, then air is drawn into those
drilled oil passages. And there is your bubble.
The solution? I don't know what brand oil filter you used, but if we are going to avoid this
drainback from happening, you need to find out which brand has *the best* anti-drainback
valve in it, and use that. And you don't have to change the oil, just replace/upgrade the
oil filter see if the problem goes away. (I'm hoping that someone can step in here and
identify which brand has the best anti-drainback filters these days?)
But wait, there's 1 more item I want you to consider. Given a choice between dirty oil
and NO oil, the engineers opted to put in a bypass around the oil filter. This way, once
there's more than ~12 psi or more of pressure drop across the filter, the bypass opens
and let's oil go from the oil pump directly to the oil passages. Guess what? IF this
bypass doesn't seat 100%, then here's a 2nd path where the oil can drain back to the
pan. (!)
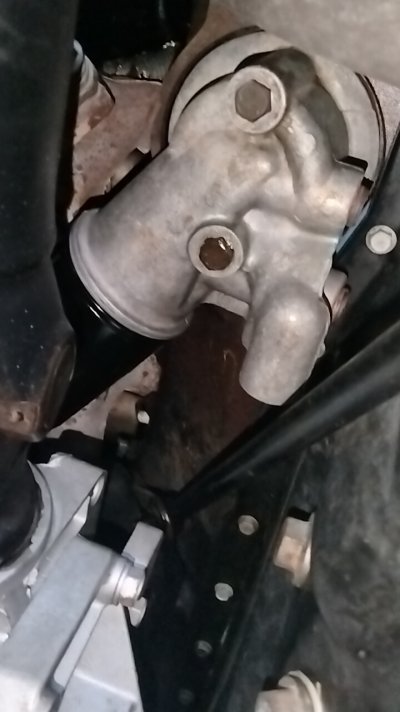
Good news, this bypass is easy to get to, since it's located in the part that provides the
threads for the oil filter to spin onto:
You must be registered for see images attach
****
To summarize, there are 2 different noises, identifiable by the duration of the noise.
1) A few ticks on startup & disappears? Not a problem per the FSM.
2) Ticking sound lasting around a minute? Working theory is an air bubble
developed in the oil passages feeding the lifters because oil is being allowed
to drain back into the pan. The long ticking is caused by the trapped air
bubble being forced through a good lifter. (Lifter as victim.)
Common-sense solution #1. Change oil filter to one with known-good anti-drainback valve.
IF solution #1 doesn't cure air bubble creation, Solution #2 is to inspect/clean/replace
as needed to cure a leaky bypass valve on oil filter adapter assembly. NOTE: Solution
shown for standard 2WD mount. Engine oil cooler or 90° filter mount for 4WD clearance
may be different. (!)
Remember that early '50s Chrysler training slide show about the hydraulic lifter and
how it needs a steady, air free oil supply in order to work quietly? Well, since you
cleaned up your lifters so that they are no longer sticky, we've fixed 95% of the
problem, and now you have 1 potential oil filter upgrade + 1 more bypass valve to
clean/replace and you should be good to go. (!)
And Congratulations, for you have now studied the small block Chevrolet V8 oil
delivery system more than 99.9% of the people driving one today. :0)
So, decide on a lifter preload, set it, and realize that this external adjustment
will not cure air in the delivery system. The clicking for a minute is an air bubble
that we should try to eliminate from being created with some attention down
in the vicinity of the oil filter.
Let us know what you discover. And @Schurkey, thanks for sharing the existence
of the plugs with the bleeders in them. I will take advantage of those from this
point forward...for I hate ticky lifters almost as much as scott2093 does.
Cheers --
Last edited: