Let's get connected!!!

Disclaimer: Links on this page pointing to Amazon, eBay and other sites may include affiliate code. If you click them and make a purchase, we may earn a small commission.

62barsoom

I'm Awesome
Joined
May 9, 2021
Messages
460
Reaction score
952
Location
US
Are those the heat gun type? I think that's a low temp bismuth based solder. It's used a lot in clock repair for soldering dials and bezels where you don't want to discolor the paint or brass. I personally have never used them but I can see where they would make a good connection.
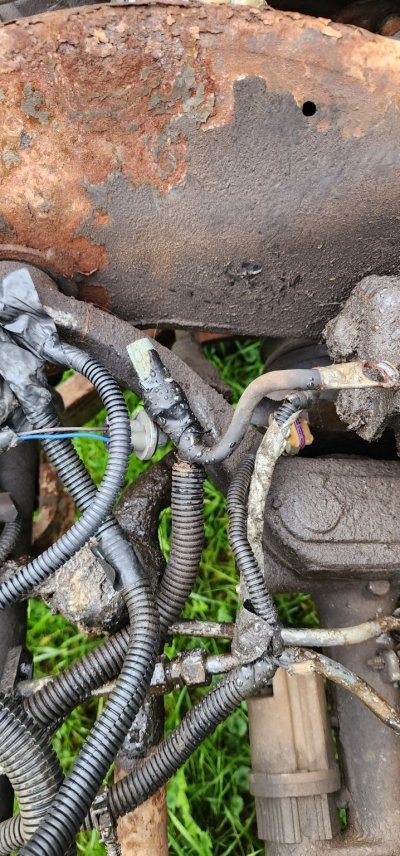
That they are, seem to join well, and are waterproof. I last used them to install a headlight on a friend's coleman mini bike.
 

62barsoom

I'm Awesome
Joined
May 9, 2021
Messages
460
Reaction score
952
Location
US
Nothing wrong with that,y'all were competing for quality not quantity.
Everything thing on those test cells were cannon plugs. 2 to 30 or so conductor. We built the whole cable, crimp, solder, get inspected, shrink, assemble connector, ring it out under inspection. No hurry worries.
 

62barsoom

I'm Awesome
Joined
May 9, 2021
Messages
460
Reaction score
952
Location
US
Here's a great how not to shot. Yes that's a wire nut. Although I have to say this repair worked for years. Primary lead to starter. Found it on the 05 donor truck.
 

Attachments

  • 20231021_142312.jpg
    20231021_142312.jpg
    362.5 KB · Views: 19

GoToGuy

I'm Awesome
Joined
Sep 16, 2020
Messages
3,132
Reaction score
3,680
Location
CAL
OK now we're gonna do a splice. MaxEx wanted to jump in there and describe his method of doing splices but as I said at the beginning I will not use crimp connectors for wire splices. No offense intended Max.

This time we're gonna strip our wires back about an inch and slide a long enough piece of heat shrink tubing over one end of our wire that will be long enough to cover the connection plus a little for seal.
You must be registered for see images attach

Twist the wires together like you're making a western union splice,break out your soldering iron and 60/40 rosin core solder and solder it up. Make sure you push the heat shrink up over the wire a good ways or it will shrink during soldering and you will not be happy.
You must be registered for see images attach

The next step I found necessary around boats because even though zinc chloride flux is not highly corrosive it still was creating green connections after about a year out there in the Gulf of Mexico.
You must be registered for see images attach

Take your favorite aerosol solvent of choice that is not chlorinated,spray a little on the corner of a rag and wipe down your solder joint. It will clean the rosin flux off and keep it from corroding if moisture does get past the heat shrink.
Slide the heat shrink over the connection as centered up as you can and shrink it down.
You must be registered for see images attach
Why would you call that a " Western Union splice " . All you did was twist them. There is no overlap with tension causing a tightening joint. That is not a " W / U splice " . Why not demonstrate the correct method. A,B,C,D complete. E and F long and long twist variations. NASA did test on these joints and found the joint exceeded the wire strength and an light application of solder didn't improve or degrade the joint strength.
You must be registered for see images attach
 

Scooterwrench

Supporting Member
Supporting Member
Joined
Jun 11, 2023
Messages
1,721
Reaction score
3,161
Location
Fanning Springs,FL.
Why would you call that a " Western Union splice " . All you did was twist them. There is no overlap with tension causing a tightening joint. That is not a " W / U splice " . Why not demonstrate the correct method. A,B,C,D complete. E and F long and long twist variations. NASA did test on these joints and found the joint exceeded the wire strength and an light application of solder didn't improve or degrade the joint strength.
You must be registered for see images attach
Uh,I said "sort of". Trying to do a true W/U splice on stranded wire is like trying to herd cats.
 

Scooterwrench

Supporting Member
Supporting Member
Joined
Jun 11, 2023
Messages
1,721
Reaction score
3,161
Location
Fanning Springs,FL.
A couple days ago I started a thread on a MetriPack connector I was fighting with and finally did get the terminals out. The FSM says do it like this,
You must be registered for see images attach

Yeah that doesn't work on this,
You must be registered for see images attach

This is the IAC connector for an '87 454 throttle body. I fought this thing for about an hour till I finally threw in the towel and ordered a new connector and terminals. Well I'm not about to be whooped by a damn connector so I decided I was going figure out how to get these out.
You must be registered for see images attach

I was using the wide blade of my terminal tool trying to do it like the book says and after that didn't work I got to studying the connector and discovered there are little channels along the tops of each terminal socket and I could see the front edge of the lock tabs so I turned my tool around and used the narrow blade to reach down in the small channels and push the tabs down. Once the tabs are pushed back the terminals come out the front like the book says. After I got the terminals out I discovered a small shelf that was blocking my tool from going in the rear.
If y'all ever have to pull the terminals out of one of these the tip is go in the front with a small bladed tool to push the lock tab back.
 
Top