Low beams only stay on for 20 seconds

Disclaimer: Links on this page pointing to Amazon, eBay and other sites may include affiliate code. If you click them and make a purchase, we may earn a small commission.

Road Trip

Supporting Member
Supporting Member
Joined
Jul 8, 2023
Messages
1,117
Reaction score
3,185
Location
Syracuse, NY
Got it figured out! :cheers:

It was a bad dimmer switch

Went and looked over everything and the switch itself and the connector were all burnt up and melted looking.

Got everything replaced and headlights are working!

What I didn't realize is that the dimmer switch wasn't actually making the click sound when I tried to switch between high beams and low beams, so that was probably a warning sign to begin with.

Thanks for all the help guys you're the best!

On to the next thing trying to get this old girl back to running like new!
*YES*

Thanks for coming back and sharing what you discovered and how you fixed it. This
changes this thread from abstract troubleshooting theory quoting the FSM to a
proven real-world fix. Good stuff.

Safe travels!

Cheers --
 

Road Trip

Supporting Member
Supporting Member
Joined
Jul 8, 2023
Messages
1,117
Reaction score
3,185
Location
Syracuse, NY
PS: Could you take/share a photo of the bad switch before throwing it away?

This could give other owners an idea of what to look for when performing a
visual inspection?

Thanks in advance --
 

jfletch

Newbie
Joined
Nov 28, 2018
Messages
22
Reaction score
30
Location
Louisiana
Unfortunately I didnt save the old burnt up dimmer switch, but in the first page of the thread, I posted some dimmer switch reference videos.

In the second video he shows what his burnt dimmer switch looked like in his gmt400.

Mine looked similar to his, for reference.
 

someotherguy

Truly Awesome
Joined
Sep 28, 2013
Messages
10,037
Reaction score
14,820
Location
Houston TX
It's a '94 so I don't recall any factory relays for low or high beam, the full power of the circuit is routed through the headlight switch itself and the dimmer switch down low on the column between the dash and firewall. That dimmer switch could possibly be suspect, or oxidized connections at its socket. Kinda spitballin' here on an uncommon issue.

You must be registered for see images attach


Richard
Dammit I love being guessing right ;)

Richard
 

Road Trip

Supporting Member
Supporting Member
Joined
Jul 8, 2023
Messages
1,117
Reaction score
3,185
Location
Syracuse, NY
Unfortunately I didnt save the old burnt up dimmer switch, but in the first page of the thread, I posted some dimmer switch reference videos.

In the second video he shows what his burnt dimmer switch looked like in his gmt400.

Mine looked similar to his, for reference.

Good references!

I didn't watch the video initially, but I just viewed it now, and since you said that it
looked like yours, here's 3 screen snaps for future troubleshooters of headlights tripping
the thermal circuit breaker in the headlight switch.

You must be registered for see images attach

Toasted switch. Only 12.6-14.5 volts to work with, but with enough amps to drive a pair of headlights,
when combined with loosened connections (increased resistance) can definitely bring the heat. (!)


Matching smoked harness connector. (C203 in the wiring diagrams.)
You must be registered for see images attach


You must be registered for see images attach


There you have it. Thanks to all involved, we've got something solid
to point to as a reference for similar issues down the road.

Tip of the hat to Richard & jfletch and everyone else who joined in the fun.

Mission complete.
 

someotherguy

Truly Awesome
Joined
Sep 28, 2013
Messages
10,037
Reaction score
14,820
Location
Houston TX
Looks like they had the same idea to tape the rod to the column so it wouldn't get loose at the other end.

Those switches are crispy critters! I wonder how they got that bad. Maybe someone running high-wattage HID retrofits? Or more likely just higher current draw due to old, crummy connections throughout the circuit.

Richard
 

Road Trip

Supporting Member
Supporting Member
Joined
Jul 8, 2023
Messages
1,117
Reaction score
3,185
Location
Syracuse, NY
Looks like they had the same idea to tape the rod to the column so it wouldn't get loose at the other end.

Those switches are crispy critters! I wonder how they got that bad. Maybe someone running high-wattage HID retrofits? Or more likely just higher current draw due to old, crummy connections throughout the circuit.

Richard

You got it. Clean, tight connections, no matter the age, can not generate heat.

If you run through the electrical formulas, no resistance between 2 electrical connections
means that no power is generated/consumed at that specific point in the circuit.

As an everyday proof point of this concept, check out how resistance is used on purpose
in order to be able to cook the grits on an electric stove:

You must be registered for see images attach


Thankfully we're working with 12v DC circuits, so instead of having to wrap our heads around AC impedance
and all the Nikola Tesla head-stretching theory, on our GMT400s we're working with the real deal DC circuits,
the stuff that actually makes sense. :0)

If you own a DD, and you never drive it any further than easy walking distance away from home, feel
free to leave all the connections in your wiring harness in their relaxed-through-millions-of-vibrations over
the past 24+ years condition. (!)

But if you have a longer commute, a self-employed contractor type running your business off of your GMT400,
need to be able to take a loved one to the hospital without any warning 100% of the time without fail, or actually
take your vehicle on long distance road trips?

Then you would be A) motivated to look for any signs of heat/stress like in the pictures above, and B) even if
everything looks fine, you break these connectors open, look for trouble, tighten the female connectors, maybe
spritz a little Deoxit, and put all back together.

No resistance > No heat > No problemo.

****

Proven to yours truly without a doubt by tracking down & eliminating the tough intermittents in our 25+ year old
military fighters, featuring miles and miles of wiring, and lots of connections. Heck, we even had dedicated
pin retention test tools in our Daniels Kits that we would run through all the sockets in our cannon plugs. (Mil-Spec cannon plugs)

If the female socket couldn't retain the calibrated weight of the tool when dangling vertically, then it was an automatic fail.
And if that socket correlated to a flaky signal between 2 computers that had been blaming each other for the flaky
operation, there was lots of hooting & hollering by the repair team. *Yes* :0)

Tedious, painstaking, bordering on boring work, but only by doing this were we (Avionics) able
to tame the intermittents in our systems and no longer be the clear leader for which shop was responsible
for the majority of the non-mission-capable aircraft. Ready, Relevant, Reliable!

No fooling, if you apply the same technique to your GMT400, it can as reliable as a new vehicle. (More reliable,
actually, since it's beaucoup simpler than the newer rides. (!) As a matter of fact, they are now selling
pin retention test tools to automotive guys working on the newest stuff:

You must be registered for see images attach


It's crazy. New vehicles that roll down our highways in the 2020s are now just as complex as our military
fighters were back in the 1980s.

...but I digress. Keep your connections tight and the shiny side up.

Safe travels. With reliable headlights at your beck & call. :0)

Cheers --
 
Last edited:

AuroraGirl

I'm Awesome
Joined
Jul 27, 2020
Messages
1,057
Reaction score
1,232
Location
Northern Wisconsin
You got it. Clean, tight connections, no matter the age, can not generate heat.

If you run through the electrical formulas, no resistance between 2 electrical connections
means that no power is generated/consumed at that point.

As an everyday proof point of this concept, check out how resistance is used on purpose
in order to be able to cook the grits on an electric stove:

You must be registered for see images attach


Thankfully we're working with 12v DC circuits, so instead of having to wrap our heads around AC impedance
and all the Tesla head-stretching theory, on our GMT400s we're working with the real deal, the stuff that makes sense.

If you own a DD, and you never drive it any further than easy walking distance away from home, feel
free to leave everything in it's 24+ year old condition.

But if you have a longer commute, a self-employed contractor type running your business off of your GMT400,
or actually take your vehicle on road trips? Then you would be A) motivated to look for any signs of heat/stress
like in the pictures above, and B) even if everything looks fine, you break these connectors open, look for trouble,
tighten the female connectors, maybe a little Deoxit, and put all back together.

No resistance > No heat > No problemo.

Proven to me without a doubt by tracking down & eliminating the tough intermittents in our 25+ year old
military fighters, featuring miles and miles of wiring, and lots of connections. Heck, we even had dedicated
pin retention test tools in our Daniels Kits that we would run through all the sockets in our cannon plugs.

If the female socket couldn't retain the calibrated weight of the tool when dangling vertically, then it was an automatic fail.
And if that socket correlated to a flaky signal between 2 computers, there was lots of hooting & hollering
by the repair team. *Yes* :0)

Tedious, painstaking, bordering on boring work, but only by doing this were we (Avionics) able
to tame the intermittents in our systems and no longer be the clear leader for which shop was responsible
for non-mission-capable aircraft. Ready, Relevant, Reliable!

No fooling, if you apply the same technique to your GMT400, it can as reliable as a new vehicle. (More reliable,
actually, since it's beaucoup simpler than the newer rides. (!) As a matter of fact, they are now selling
pin retention test tools to automotive guys working on the newest stuff:

You must be registered for see images attach


It's crazy. New vehicles that roll down our highways in the 2020s are now just as complex as our military
fighters were back in the 1980s.

...but I digress. Keep your connections tight and the shiny side up.

Safe travels. With reliable headlights at your beck & call. :0)

Cheers --
i for one think using the GM brass riv-studs for grounds is a great idea
You must be registered for see images attach
 

Road Trip

Supporting Member
Supporting Member
Joined
Jul 8, 2023
Messages
1,117
Reaction score
3,185
Location
Syracuse, NY
i for one think using the GM brass riv-studs for grounds is a great idea

THANKS for sharing! Although the chore truck has been super reliable
this winter, there *is* room for improvement with the grounding. (In
particular, G101 (to the sheet metal adjacent to the battery) will no
longer tighten as it should:


You must be registered for see images attach


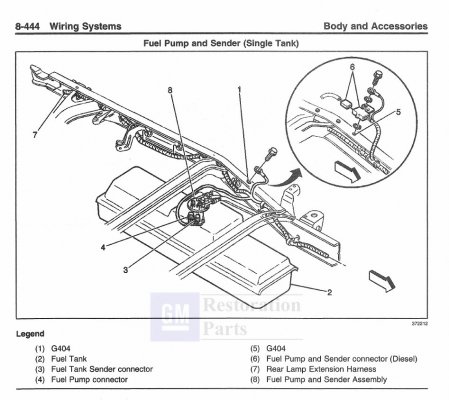
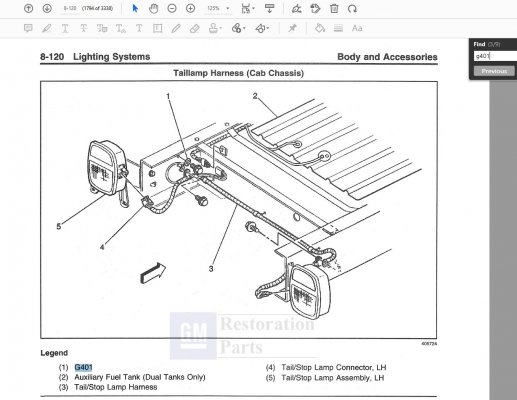
And while I'm at it, I'm going to upgrade G112 & G113 on the front, G404
near the fuel pump, and G401 out by the backup lights. And if I clean/service
G202 under the dash, that will be (6) less places I will have to worry about while
out on the open road.

Those conductive rivet studs look to be a worthwhile upgrade. I've been looking
for a no-kidding way to implement a 2024 ground distribution scheme into my
'99 chore truck, and now I know how I'm going to do just that.

(Insert tip of the hat to AuroraGirl for sharing those neat grounding rivets.)

Good stuff.
 

Attachments

  • G404 - fuel pump ground -- 99 Chevrolet & GMC CK Truck SM - Vol. 3 & 4.jpg
    G404 - fuel pump ground -- 99 Chevrolet & GMC CK Truck SM - Vol. 3 & 4.jpg
    146.6 KB · Views: 3
  • G401 ground location - 99 Chevrolet & GMC CK Truck SM - Vol. 3 & 4.jpg
    G401 ground location - 99 Chevrolet & GMC CK Truck SM - Vol. 3 & 4.jpg
    162 KB · Views: 3
Last edited:

AuroraGirl

I'm Awesome
Joined
Jul 27, 2020
Messages
1,057
Reaction score
1,232
Location
Northern Wisconsin
THANKS for sharing! Although the chore truck has been super reliable
this winter, there *is* room for improvement with the grounding. (In
particular, G101 (to the sheet metal adjacent to the battery) will no
longer tighten as it should:


You must be registered for see images attach


And while I'm at it, I'm going to upgrade G112 & G113 on the front, G404
near the fuel pump, and G401 out by the backup lights. And if I clean/service
G202 under the dash, that will be (6) less places I will have to worry about while
out on the open road.

Those conductive rivet studs look to be a worthwhile upgrade. I've been looking
for a no-kidding way to implement a 2024 ground distribution scheme into my
'99 chore truck, and now I know how I'm going to do just that.

(Insert tip of the hat to AuroraGirl for sharing those neat grounding rivets.)

Good stuff.
You must be registered for see images attach

heres the m6-m7, stud and bolts and the link for the instructions in full
 
Top