How I Added an Auxiliary Transmission Cooler

Disclaimer: Links on this page pointing to Amazon, eBay and other sites may include affiliate code. If you click them and make a purchase, we may earn a small commission.

Kens1990K2500

One Piece At A Time
Joined
Jul 1, 2021
Messages
226
Reaction score
272
Location
Rhode Island
I recently put a snow plow on my truck, and before I began plowing, I wanted to install an auxiliary transmission cooler. I read a recent thread from another forum member, who used all GM factory parts. After doing some research, I decided to use a different approach.

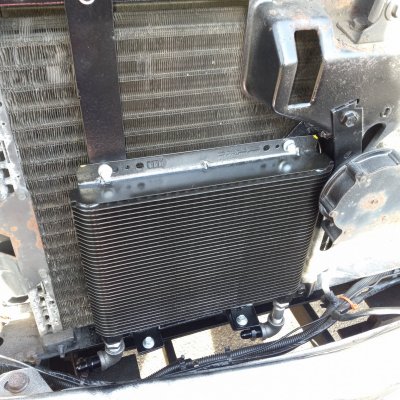
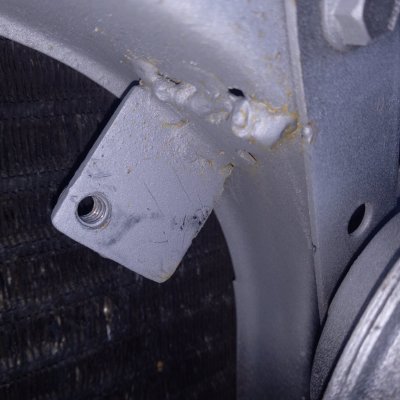
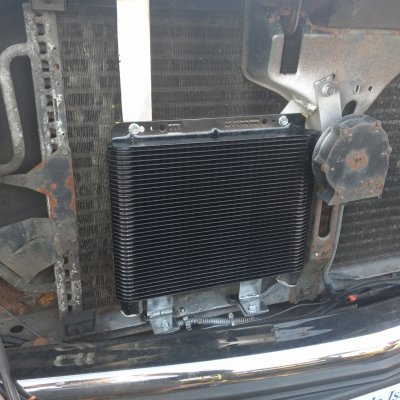
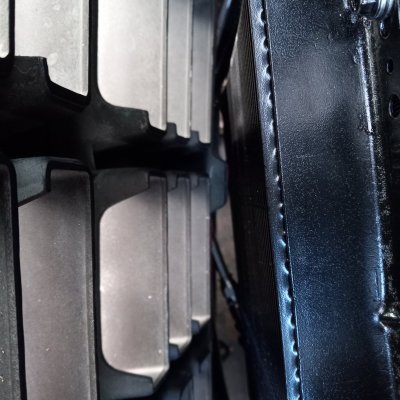
For the cooler, I chose a Tru-Cool M7B. Since I have a plasma cutter and MIG welder, I ended up fabricating my own mounting brackets, which was the most time-consuming part of the project. After removing the grille, the next step was cleaning and straightening the fins on the AC condenser, to maximize air flow. Once I decided where I wanted to place the cooler, I welded one of the upper brackets to the center support, near the horn (being careful that the cooler didn't interfere with the horn). I decided to tack weld a nut to the backside of the bracket, to make mounting the cooler easier by not having to fumble with the nuts (I ended up doing it with the other brackets - worked like a charm). The other upper bracket, on the left side, was easier, since it's a straight shot. I welded a nut to the radiator support.

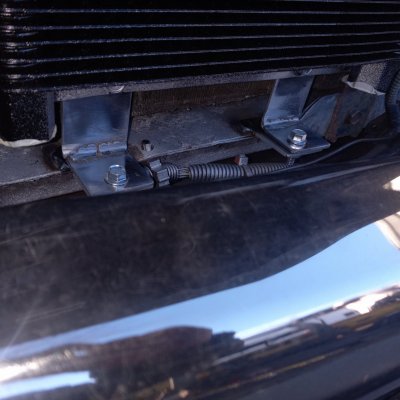
For the lower brackets, I made two angle brackets, and welded two tabs to the bottom of the radiator support. This makes the cooler easy to remove if I should need to replace the AC condenser in the future.

One minor snag: when I went to test-fit the grille to check for interference, I found that a tab inside the grill was interfering with the cooler. I simply cut the tab off, and all was well.

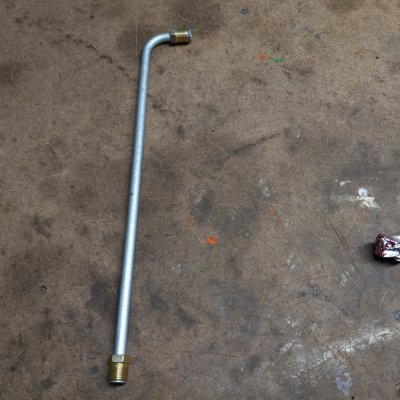
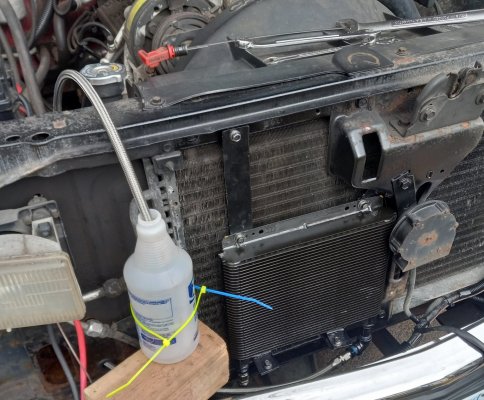
With the cooler mounted, it's time to plumb ...
 

Attachments

  • Upper mounts.jpg
    Upper mounts.jpg
    443.4 KB · Views: 24
  • Lower brackets.jpg
    Lower brackets.jpg
    318.5 KB · Views: 25
  • Welded bracket.jpg
    Welded bracket.jpg
    359 KB · Views: 25
  • Mounted cooler.jpg
    Mounted cooler.jpg
    444.7 KB · Views: 26
  • Tab on grille.jpg
    Tab on grille.jpg
    376 KB · Views: 23
Last edited:

Kens1990K2500

One Piece At A Time
Joined
Jul 1, 2021
Messages
226
Reaction score
272
Location
Rhode Island
PART 2

Time to plumb ...

So, about a year ago, I replaced my transmission cooler lines with new, stainless steel, pre-bent lines from Inline Tube (which I highly recommend). The lines go to the factory transmission cooler that is inside the radiator. I put a lot of thought and research into how I was going to plumb the auxiliary cooler. It was obvious I would need to use some kind of flexible lines. I did not want to take the easy way out and use rubber hose. I also did not want to cut into my new hard lines.

I decided to use braided stainless steel lines from Russell, along with their AN fittings. Their Powerflex lines are actually PTFE inner hose with braided stainless steel over it. I had never worked with this type of lines or AN fittings before, but after watching some YouTube videos (thank God for YouTube), I felt this was what I was looking for. Yeah, it may be overkill for a transmission fluid line, but I didn't want to worry about a leak on this critical line.

The braided line was not too difficult to work with. I found that an angled cut-off tool makes a much better cut than the tool that looks like bolt cutters, which crushes the line. It's also good to tape the line before cutting it, which keeps the stainless steel braids from untangling. I did buy the vise jaws for working with AN fittings, which was helpful.

The cooler tappings are 1/2" female pipe threads. I went to my local plumbing supply and got two 1/2" x 3/8" steel bushings. On the left side, I used a 3/8" male IPS (iron pipe size) x 6 AN straight adapter. On the right side, I used a short, 3/8" IPS nipple, a 3/8" elbow, and 3/8" male IPS x 6 AN adapter.

At the radiator, the upper trans cooler port was now going to be the supply to the auxiliary cooler. I found a short piece of 5/16" steel tubing, pre-flared both ends, with a 90 degree close bend. This was perfect, as it would keep the line close to the radiator, and connect directly to the radiator. The other end of the pre-bent tube pointed downward. I used an adapter that connected directly to the flare nut at the end of the tube, and to 6 AN braided hose. From there, the flex line went under the radiator support, and to the left port of the auxiliary cooler.

From the outlet of the auxiliary cooler (tapping on the right), I routed the flex line through a hole in the radiator support, using a rubber grommet. Once in the engine bay, I did a loop in the flex line, and connected it to the hard line returning to the transmission, again using a 1/2" female inverted flare x 6 AN adapter. I will admit it was a little nerve-wracking cutting the lines to the right length, as I only ordered 10 feet of line. Thankfully, I didn't screw up.
 

Attachments

  • Pre Bent 90.jpg
    Pre Bent 90.jpg
    485.1 KB · Views: 12
  • Mounted with fittings.jpg
    Mounted with fittings.jpg
    630.3 KB · Views: 13

Kens1990K2500

One Piece At A Time
Joined
Jul 1, 2021
Messages
226
Reaction score
272
Location
Rhode Island
Part 3

I didn't connect the return line from the auxiliary cooler, to the hard line returning to the transmission just yet, because I wanted to purge air and some of the old (and nasty) transmission fluid first. So, I put the flex hose into a catch bottle that I zip-tied to the radiator support.

Lo and behold, when I started the truck briefly, I didn't see any transmission fluid go into the catch bottle, but instead, saw a big puddle of it under my truck. It was spewing out of the hard line from the transmission. After some head-scratching, I realized that I had the lines connected incorrectly at the transmission. So, I had to crawl under the truck and switch the lines at the transmission, which was not an easy task given limited clearance for your hands. I think it took me over half an hour to thread the flare nut into the top tapping at the transmission. The bottom flare nut was easier.

With the hard lines now connected correctly at the transmission, the purging worked as it should. I mainly wanted to purge any air from the lines and cooler, plus a bit of the old fluid (I changed more of the old fluid when I dropped the transmission pan to change the filter a few days later). The hard line pumping fluid away from the transmission (let's call it the supply line) goes into the bottom of the in-radiator cooler; flows up though that cooler; out the top port of the in-radiator cooler; into the auxiliary cooler; leaves the auxiliary cooler; and connects to the hard line returning fluid to the transmission.

I topped off the transmission fluid, ran the truck and checked for leaks. No leaks! I put a few pieces of rubber hose in spots where the braided lines contacted metal.

Total cost of the project was around $350.

My truck has 182,000 miles on it, and as far as I know, has the original transmission, which shifts well. As I said, the fluid was pretty dirty, so a few days after I installed the auxiliary cooler, I dropped the transmission pan to change the filter and add more new fluid. Fluid looks much better now, and I also noticed that when the truck goes into and out of overdrive, the transition is much more smoother (it kind of clunked before).

Plowing does put stress on the transmission, and heats up transmission fluid. As we all know, heat is the number one enemy of an automatic transmission. I feel a lot better about plowing, now that I have a good auxiliary cooler. Hope this helps anyone considering installing one.
 

Attachments

  • Filling.jpg
    Filling.jpg
    394 KB · Views: 11

df2x4

4L60E Destroyer
Staff member
Super Moderator
Joined
Mar 1, 2012
Messages
11,222
Reaction score
12,864
Location
Missouri
I decided to use braided stainless steel lines from Russell, along with their AN fittings. Their Powerflex lines are actually PTFE inner hose with braided stainless steel over it.

I did the same years ago when I added a TruCool M7B to my red truck and I've been very happy with the results. None of the Russell AN lines/fittings have leaked a drop, and I used them for 100% of my transmission lines.

I used 90 degree AN fittings on the cooler as well. IMO it looks a little cleaner, but your solution was probably less expensive.

EDIT - If I had to do it again, I'd probably have some hard lines made. As I said the AN lines have been great but I'd imagine hard lines would be more durable.
 
Last edited:

GoToGuy

I'm Awesome
Joined
Sep 16, 2020
Messages
3,132
Reaction score
3,679
Location
CAL
Then they would be Taped holes. They were already in place.
Were you having overtemp problems with your transmission?
Is this the way you plumbed the cooler in?
You must be registered for see images attach
 
Top