Fuel Gauge way past Full - How to test wiring at tank?

Disclaimer: Links on this page pointing to Amazon, eBay and other sites may include affiliate code. If you click them and make a purchase, we may earn a small commission.

Lance 1992

Supporting Member
Supporting Member
Joined
Feb 1, 2024
Messages
33
Reaction score
51
Location
Texas
1992 C1500 5.7 Ext. Cab

The wires from my sending unit to the first connection (C407?) at the frame rail were crushed between the tank and crossmember. How can I test that short section of wire to see if a signal is being sent to the gauge?

My gas gauge points to 3:00, way past Full. If I ground the purple/pink wire, it goes to Empty as expected. I think the instrument cluster works fine because of this. I cleaned the connection of the black ground wire running from the top of the tank unit to the frame and the wire is in good shape. As a matter of fact, the sending unit was replaced about 12,000(?) miles ago by the dealership. They installed the tank with the wires between the tank and crossmember, crushing them when the straps were tightened. I think after a while, something finally gave out. While the diagnostic procedure indicates I should replace the sending unit, I would like to test the pigtail running from the sending unit. The power wire works as the fuel pump runs fine. I'm not sure if the other two wires are good. They look OK and I don't see any breaks in the insulation.

The sending unit is relatively new - did I just get a bad one? I hate to drop the tank or tilt/remove the bed and pull it if I don't have to. I'd like to test the wires first.
 

AK49BWL

GMT400 Forever!
Joined
Mar 21, 2015
Messages
1,812
Reaction score
2,815
Location
Longview, TX
You can test that short run by using a continuity checker, which most all multimeters come with. Barring that, a battery and a light bulb with the wire in question in between.
 

Lance 1992

Supporting Member
Supporting Member
Joined
Feb 1, 2024
Messages
33
Reaction score
51
Location
Texas
A simple continuity test would work. I would need to strip the insulation or get some connector that bites through the insulation at the tank end of the pigtail. Did I mention I don't want to drop the tank to test? I think that may happen but I'm trying to delay it.

Could I use a multimeter to test resistance (or something, continuity?) by putting one lead on the purple and the other lead on the black and white?
 

AK49BWL

GMT400 Forever!
Joined
Mar 21, 2015
Messages
1,812
Reaction score
2,815
Location
Longview, TX
If it's working, doing so should get you a resistance value of the sending unit. But doesn't rule out one or the other being bad in case of an open circuit.
 

95Noobie

Newbie
Joined
Mar 23, 2024
Messages
47
Reaction score
28
Location
Grand Rapids, MI
did you find your problem and what was the solution? My gauge also goes past full when full (but not quite to 3 oclock) I hope I don't have a pinched wire but will check for that. Maybe you found another problem?
 

Lance 1992

Supporting Member
Supporting Member
Joined
Feb 1, 2024
Messages
33
Reaction score
51
Location
Texas
I think it is the sending unit in the tank. I just got a new one (Delphi) and will install it this week (I hope). I did a continuity test on the wires using a snap on splicer that bites through the insulation and the wires seem fine. I'm not sure what those splice connection things are called.

Of course I just filled up the tank so I'm transferring the gas to my other car and my wife's car.

I'll let you know.
 

Frank Enstein

Best. Day. EVER!
Joined
Jul 15, 2018
Messages
2,020
Reaction score
3,455
Location
Canton, Ohio
The gas gauge is inaccurate by design. It stays @ full longer than it should. So when the truck is new it stays on full too long so you think you are getting better fuel economy than you do.
The pivot point is too high and the lever arm is way too short.
Here is how to fix it;
You need an ohm meter and a piece of wire the same diameter as the float lever on the sending unit (coat hanger works fine).

1) Remove the sending unit from the tank.

2) Remove the lever arm from the sending unit.

3) Bend up the new wire so it will go into the sending unit leaving it extra long.

4) Get the meter and measure the ohms empty and full. You will measure this between the sending wire (Measure this from the sending unit wire and the body of the sender) It should be 0 ohms empty and 90 ohms full.

5) Measure the depth of the tank so you know how much travel for the float.

6) Bend the arm so when it is on the top you get 90 ohms and at the bottom 0 ohms.

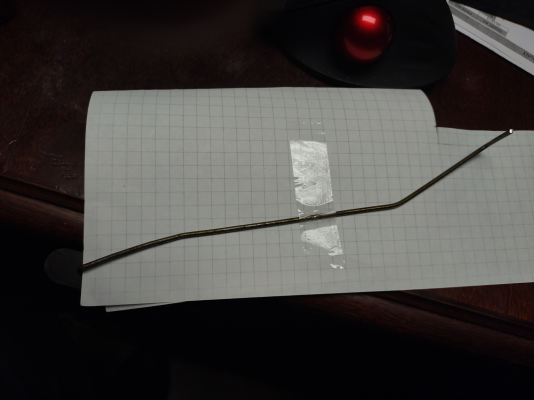
From the small 90 degree bend to fit into the pivot go

2.5" to first bend. Bend it upwards 20 degrees.

Then 4 1/4" from that bend bend it 10 degrees back down.

Then 1 3/4" from that bend bend it 90 degrees for the float.

7) Don't be afraid to make mistakes and pitch a few mistakes away.

8) Once you get the arm bent right install the float on the new arm.

Be warned. When the gas gauge reads empty you will walk!
 

Attachments

  • 1713293027606.png
    1713293027606.png
    1.4 MB · Views: 4

Lance 1992

Supporting Member
Supporting Member
Joined
Feb 1, 2024
Messages
33
Reaction score
51
Location
Texas
I have fixed the issue. It was the sending unit. A wire had become disconnected after it's connector broke off. I installed the new Delphi one. I had a bit of a scare when I filled up the tank and the gauge stayed at Empty. I got about a quarter mile from the gas station and it went up to Full. I guess the float was stuck. The sending unit I replaced only had about 10,000-12,000 miles on it but it was about eight to ten years ago. The fuel pump went bad when I was out of town and I had a dealership replace it. It was terrible. There were missing or unused hose clamps, as previously mentioned - the wires were pinched against a rail, the electrical connector was dangling where it shouldn't have been, and a couple of other little things.

I had a lot of trouble getting the filler pipe lined up with the filler door opening. I ordered a new filler hose from LMC and I'm not sure if it was wrong. I triple checked that it was installed correctly. I got it on but it is not as it was before I removed it. The guide with a hole in it that the metal vent tube runs through is very tight against the bottom of the bed.

Here is a picture with the end of the wire and where it should connect circled in yellow:

You must be registered for see images attach
 
Top