5.7 TBI to 5.3 LM7

Disclaimer: Links on this page pointing to Amazon, eBay and other sites may include affiliate code. If you click them and make a purchase, we may earn a small commission.

D-Day

Newbie
Joined
Feb 26, 2024
Messages
22
Reaction score
26
Location
Phoenix, Arizona
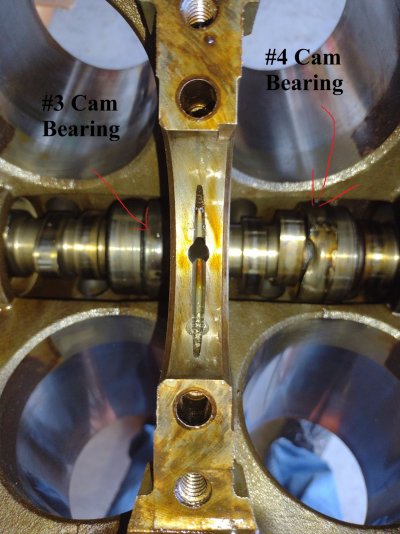
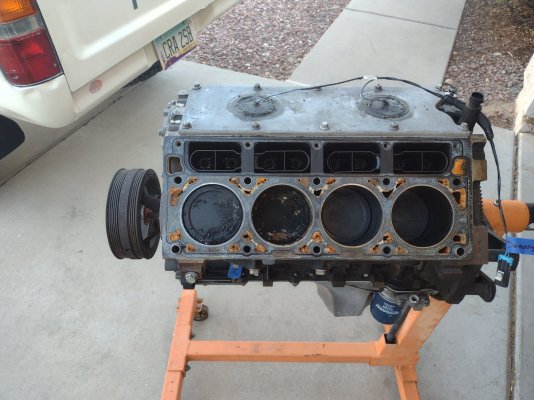
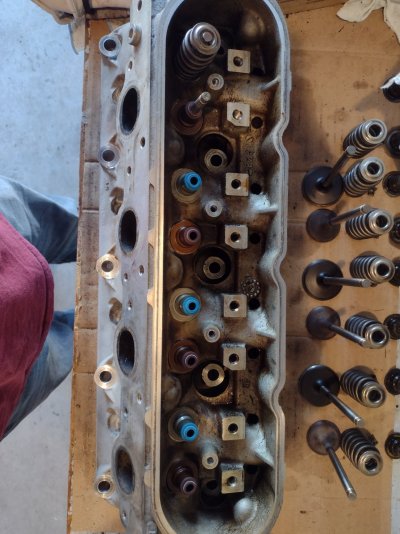
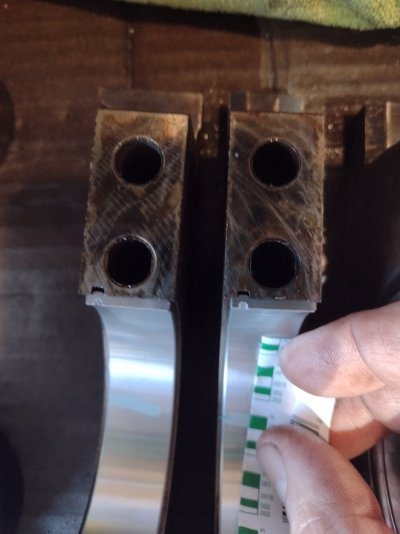
I started saving my money and working on my LS swap well before my engine took a dive. Tear down found #3 and 4 cam bearings had spun. Lucky I found a machine shop that was able to repair and install new camshaft bearings. Found some worn push rods and rock arms. The engine need some attention and timing would have it, I had it on the stand put back together slightly before my old engine spun a bearing.
 

Attachments

  • IMG_20230829_172540728.jpg
    IMG_20230829_172540728.jpg
    310.9 KB · Views: 5
  • IMG_20230708_172035787.jpg
    IMG_20230708_172035787.jpg
    332.1 KB · Views: 4
  • IMG_20230731_173648031.jpg
    IMG_20230731_173648031.jpg
    312.6 KB · Views: 4
  • IMG_20230802_162641503.jpg
    IMG_20230802_162641503.jpg
    219.4 KB · Views: 5
  • IMG_20231006_170738730.jpg
    IMG_20231006_170738730.jpg
    162.8 KB · Views: 4

D-Day

Newbie
Joined
Feb 26, 2024
Messages
22
Reaction score
26
Location
Phoenix, Arizona
Sad Day. November last year pulling my camper Phoenix to Flagstaff for a deer hunt started to hear a knocking about halfway up. Had to get it towed home. More then likely spun connecting rod bearing. FYI this is the 5.7 I've pulled out. The picture of the cloth is the what was in the oil filter housing that I strained through an old t-shirt.
 

Attachments

  • IMG_20231117_150709010.jpg
    IMG_20231117_150709010.jpg
    406.2 KB · Views: 10
  • IMG_20231117_150818798.jpg
    IMG_20231117_150818798.jpg
    366 KB · Views: 11

D-Day

Newbie
Joined
Feb 26, 2024
Messages
22
Reaction score
26
Location
Phoenix, Arizona
January 2024- Preparing for installation.
 

Attachments

  • 23097.jpeg
    23097.jpeg
    309.3 KB · Views: 3
  • IMG_20240108_175519788.jpg
    IMG_20240108_175519788.jpg
    168.2 KB · Views: 5
  • IMG_20240108_175935908.jpg
    IMG_20240108_175935908.jpg
    194.9 KB · Views: 5
  • IMG_20240109_154014625.jpg
    IMG_20240109_154014625.jpg
    242.9 KB · Views: 5
  • IMG_20240109_195229180.jpg
    IMG_20240109_195229180.jpg
    405.4 KB · Views: 4

D-Day

Newbie
Joined
Feb 26, 2024
Messages
22
Reaction score
26
Location
Phoenix, Arizona
Instead of going through the wiring harness that came with the engine I purchased one from Painless Wiring. Which was a good thing. The seller cut out the injector harnesses. Between Painless Wiring and my print outs from All Data DIY as well as a lot of patience with a voltmeter I believe the wiring portion is complete.
 

Attachments

  • IMG_20240302_162413762.jpg
    IMG_20240302_162413762.jpg
    318.7 KB · Views: 5
  • IMG_20240302_162423744.jpg
    IMG_20240302_162423744.jpg
    367.6 KB · Views: 5
  • IMG_20240302_162454945.jpg
    IMG_20240302_162454945.jpg
    392.6 KB · Views: 4

D-Day

Newbie
Joined
Feb 26, 2024
Messages
22
Reaction score
26
Location
Phoenix, Arizona
Night Bomber thanks for the ideas for installing a rheostat for the power steering EVO. I found something easier for my circumstances. Dorman makes a Steering Bypass kit. It removes the EVO and installs an adapter and tube.
 

Attachments

  • IMG_20240304_122314607.jpg
    IMG_20240304_122314607.jpg
    294.3 KB · Views: 4
  • IMG_20240304_125116656.jpg
    IMG_20240304_125116656.jpg
    302.1 KB · Views: 4
  • IMG_20240304_125124285.jpg
    IMG_20240304_125124285.jpg
    318.9 KB · Views: 3
  • IMG_20240304_174721769.jpg
    IMG_20240304_174721769.jpg
    321.2 KB · Views: 3
  • IMG_20240304_174928576.jpg
    IMG_20240304_174928576.jpg
    292.4 KB · Views: 4

D-Day

Newbie
Joined
Feb 26, 2024
Messages
22
Reaction score
26
Location
Phoenix, Arizona
Today I am back to wiring. Took 4 gauge wire to run from the alternator to the Battery bus. I used the donor car Fusible Link that went from the alternator to battery cable. That Fusible Link I soldered to the 4 gauge just prior to the Battery bus. Then ran a length of 4 gauge down to the starter, then from there is the 1 gauge wire that runs to the battery. I was on the fence if the Fusible Link was just overthinking.
 

Attachments

  • IMG_20240322_172320030.jpg
    IMG_20240322_172320030.jpg
    225.4 KB · Views: 2
  • IMG_20240322_172332630.jpg
    IMG_20240322_172332630.jpg
    256.2 KB · Views: 2
  • IMG_20240322_174026830.jpg
    IMG_20240322_174026830.jpg
    253 KB · Views: 2

L31MaxExpress

I'm Awesome
Joined
Apr 21, 2018
Messages
6,120
Reaction score
7,988
Location
DFW, TX
The fuse link is not overthinking. I wired the bus bar to the battery with 6 awg and a 10 awg fuse link and the same for the alternator output on the 87 G20 I just re-wired. Fuse link should be 4 gauges smaller than the wire it protects and be fuseible link wire. Be sure to upgrade your grounds as well. I built 2awg battery cables and went to a top post 24R on the G20 too. Not a fan of side posts and the 24R also happens to be the same case size as two Nissans and a Kubota tractor we own just in case that interchangability is needed some day.

You must be registered for see images attach

You must be registered for see images attach
 
Last edited:
Top