1993 Yukon crate motor hydraulic roller lifter cleaning and adjustment journey - (Solved)

Disclaimer: Links on this page pointing to Amazon, eBay and other sites may include affiliate code. If you click them and make a purchase, we may earn a small commission.

scott2093

I'm Awesome
Joined
Apr 23, 2023
Messages
607
Reaction score
444
Location
Florida
Work in an area where if you drop a small part you can find it afterwards.

And I see 2 lifters out. DO NOT mix up where each lifter came from. Don't care
if you put them into marked sandwich bags, or a couple of marked up of egg cartons,
but please maintain positive control over any lifters you remove. (!)
Yes I'm being really careful... I guess there's an oil hole that faces the firewall as well in regards to the orientation... Video I watched talked about using the burn marks and was opposite of what I had...
It's a jungle of info out there...
Of course the first clip went flying in my already cluttered room but was able to find it within a few minutes...

I've already found a couple small pieces of carbon in #2 exhaust and haven't disassembled it completely yet... The thing is, all of these lifters have been quiet and have been noisy so it's hard to know which ones I should leave alone... Everything is so dirty and varnished up, you don't think going through all of them is something I should attempt?
Number 2 intake had a little varnish that made it snug coming out but nothing really I saw as resistance to worry about.
 
Last edited:

scott2093

I'm Awesome
Joined
Apr 23, 2023
Messages
607
Reaction score
444
Location
Florida
Can't you remove the pan from the valley and gain a clear view of the cam? I've not had a SBC intake off in over 10 years but know I could see the cam in my BBC with just the intake pulled.
I didn't think to look down those holes under the keeper tray if that's what you mean.. I'll take a look and see what kind of view those holes give...They're pretty small...

edit////yeah I don't think there would be a good view...I have some bolts covering the holes you can see...they're pretty small


hmmm...I don't know what I'm supposed to do about this lifter's plunger...I can get a pick in a little hold inside and pull up on it but it just springs up and down. It just wants to pull against me....
I'm not proceeding until I can figure out what this is....boo
 

Attachments

  • IMG20240309105719.jpg
    IMG20240309105719.jpg
    225.3 KB · Views: 12
Last edited:

scott2093

I'm Awesome
Joined
Apr 23, 2023
Messages
607
Reaction score
444
Location
Florida
idk...guess I'll inspect and just make sure I can get the plungers moving up and down freely? This one was obviously a tiny bit sticky but nothing major....
maybe I'll give them a little shake in some denatured alcohol? Oil them before I put them back?
It's crazy that there is so much info out there but I can never find the part I'm looking for...I don't have time unfortunately....

I can see little bits of carbon down it the plunger...really would be nice to get these apart... even getting this one fished out wasn't easy and agitating in alcohol doesn't do much if anything


edit////guess it was just stuck.......got it out....
 

Attachments

  • IMG20240309113208.jpg
    IMG20240309113208.jpg
    99.3 KB · Views: 9
Last edited:

Road Trip

Supporting Member
Supporting Member
Joined
Jul 8, 2023
Messages
1,178
Reaction score
3,403
Location
Syracuse, NY
Yes I'm being really careful... I guess there's an oil hole that faces the firewall as well in regards to the orientation... Video I watched talked about using the burn marks and was opposite of what I had...
It's a jungle of info out there...
Of course the first clip went flying in my already cluttered room but was able to find it within a few minutes...

I've already found a couple small pieces of carbon in #2 exhaust and haven't disassembled it completely yet... The thing is, all of these lifters have been quiet and have been noisy so it's hard to know which ones I should leave alone... Everything is so dirty and varnished up, you don't think going through all of them is something I should attempt?
Number 2 intake had a little varnish that made it snug coming out but nothing really I saw as resistance to worry about.

Scott,

Whether or not to disassemble/reassemble all the lifters actually hinges upon the
condition of all the individual cam lobes. IF they are all in new condition, then
cleaning out all 16 lifters would be a smart idea.

But I can't see what's up with the cam lobe, because your camera focused up
on the lifter valley instead of down where the cam lobe is:

You must be registered for see images attach


If you have a camera where you can take control of the focus and get the
lobe into sharp focus then I can give you much better guidance. And if
you have no control over the autofocus (smart phone) then just back
the phone away until *everything* is in focus. (All items of interest are in the
same focus 'depth of field'.)

What we have above is an artifact of you getting closer in order to give us
remote guys a bigger picture to look at. But if you back away and everything
is now sharp I can easily blow it up on my 17" laptop display.

So for right now, if you could retake this photo, we can use it to help decide
which way you take this project.
 

Road Trip

Supporting Member
Supporting Member
Joined
Jul 8, 2023
Messages
1,178
Reaction score
3,403
Location
Syracuse, NY
Re: Cleaning up insides of lifters.

You want to get the parts strictly clean. Obviously NOT a water-based solvent.

I've found that Lacquer thinner (w/gloves and in a well ventilated area) will cut
through engine gunk & leave no residue. Currently less than $11/Qt at
Walmart. (Lacquer thinner link) If others following along have had good
results with other solvents please chime in with your favorites to use.
 

Road Trip

Supporting Member
Supporting Member
Joined
Jul 8, 2023
Messages
1,178
Reaction score
3,403
Location
Syracuse, NY
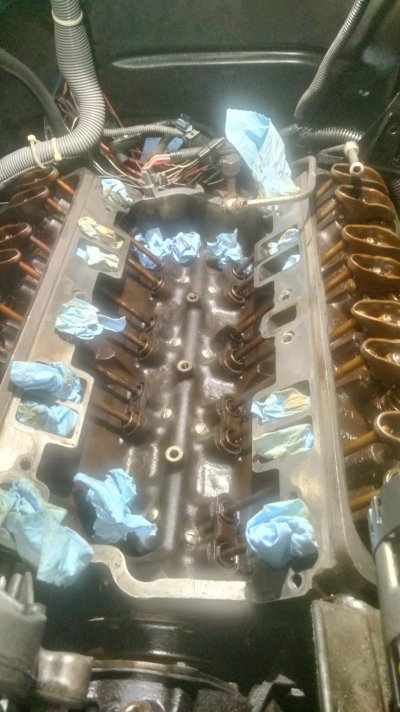
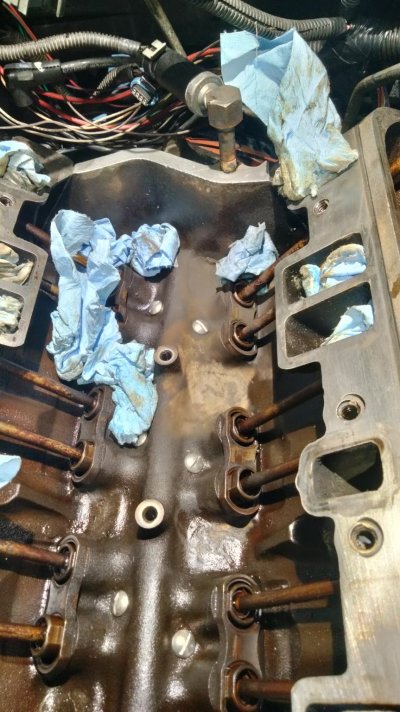
ok...when I sopped up the oil from the valley...I see gray matter......but it looks brown in lower light.... and it reflects light like metal but it's not clear if it's pieces of metal.... Whatever it is, I think it's coming from what has been caked up everywhere....but I really can't tell. When there's a little bit of oil with it, it looks more gray..... but by itself...idk...can built up carbon break down like this??? I mean I just started using synthetic oil and rislone a few hundred miles ago....I actually do see a few random bits of what looks to be shiny metal in the video ...

I can handle bad news... whatever this stuff is, it's floating around and getting places for sure....it's obviously heavy enough to settle in sitting oil....

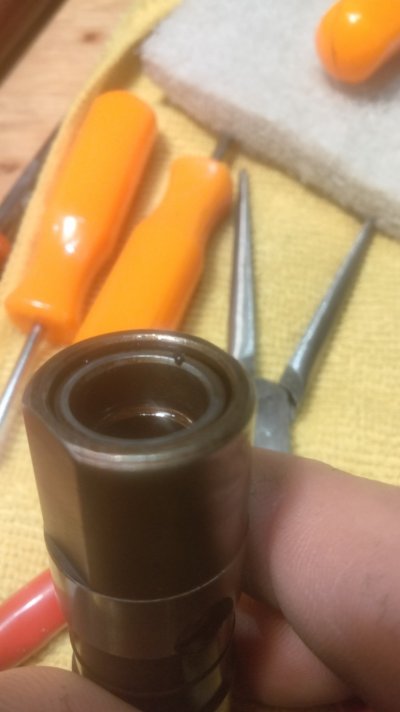
I did find literally like 5 super small specs of shiny material in my oil filter material after looking again earlier today....here's the bigger looking one in the photo......filter only has maybe 40 miles on it if that.....but there are definitely some shiny bits I found... But can count on my hand....filter could even have shed....but idk...

I don't remember seeing this kind of stuff when I did the intake gaskets a few weeks ago...But I was in a different mindset and maybe wasn't paying attention??

Here's a video...

xc_hide_links_from_guests_guests_error_hide_media

A small strong magnet can be really helpful in figuring out what is being deposited
inside your engine. IF the debris is attracted to the magnet then it's ferrous, hard,
and I'd be looking carefully at the cam lobes, lifter rollers, etc.

On the other hand, if the grayish mud is NOT attracted to the magnet, then this is
non-ferrous metals, probably from the cam, crank, or connecting rod bearings.

Of course no engine is perfectly clean inside. Even if there's no bearing or valvetrain
wear, power stroke blowby past the piston rings means that carbon from the combustion
process is deposited everywhere. As well as humidity turned into steam, past the rings
and reconstituted as water in your oil. (Which is one of the reasons why running too
low temp thermostat is bad for your engine.)

You want your coolant at 195°, but ideally your engine oil is at or above 212°F, so that this
acidic moisture in your oil is boiled out and sucked up by the PCV valve. (!)

****

In English, on a high mileage engine there will be debris from wear and combustion byproducts
to see. I've seen both pristine internals from fastidious car/boat owners as well as heavily
sludged up motors from lack of oil changes. I think you mentioned that your oil pressure is still
good, so right now we need to see if the debris is just carbon build up (non-magnetic) or if the
shiny bits are attracted to a passing magnet.

Let us know what you find. Fingers crossed the cam lobes are good, the roller rockers
pass a visual and still spin with no bad spots, and you can proceed with your project.
 

scott2093

I'm Awesome
Joined
Apr 23, 2023
Messages
607
Reaction score
444
Location
Florida
If you have a camera where you can take control of the focus and get the
lobe into sharp focus then I can give you much better guidance
Yeah my phone has the light in a weird place so I can't get further away. Really bad camera too. I ordered a cheap endoscope that should be here today. Maybe it'll be better..

This is the best I could get trying..and I had to resize to be able to upload here...tried 80% but had to go to 50%... not sure what upload limit is here......#2 intake..#1 is too close to edge to fit my phone enough to get a good pic down there....

You want to get the parts strictly clean. Obviously NOT a water-based solvent.

All i have here atm is some dna...It seems to be working. There is a good amount of hard carbon build up...Even the little spring where ball is was like filled in between the springs...the ball was crusty... I'm just finishing the first lifter..lol

I'm using a white polishing scrub pad to work stuff free... Where are the scrubby q tips? Don't think those foam ones for detailing would be strong enough...The microfiber ones maybe but the delivery is out of my self allotted time frame....

The brushes I have here have that stupid metal tip that makes the point of the brush useless to get to the bottom flats. I cut a tiny piece of pad and shoved it in there and then ran my drill with a makeup tool my wife gave me. It caught the pad at the bottom and gave it enough twirling agitation to free up all the carbon....

I'm a little versed in circuit board work and have even tackled some surface mount chips so I am seeing some stuff in there...lol

I'll wait to see what your thoughts are at this point if this picture is sufficient.
thank you!
 

Attachments

  • IMG20240309131308 50.jpg
    IMG20240309131308 50.jpg
    113.4 KB · Views: 6

scott2093

I'm Awesome
Joined
Apr 23, 2023
Messages
607
Reaction score
444
Location
Florida
so right now we need to see if the debris is just carbon build up (non-magnetic) or if the
shiny bits are attracted to a passing magnet.
I tried my magnet in the big pile of oil when it first came to my attention thinking I'd end up with some sludge but there wasn't anything...
I'll see if I can find some directly suspicious material and try again

to be clear, I didn't try the magnet in the material from the video.... I tried it in the oil catch pan when I changed the oil the other night..
I wish I would have thought of that before I cleaned the valley...but it was a quick clean. I'll see if I can find something
 
Last edited:

scott2093

I'm Awesome
Joined
Apr 23, 2023
Messages
607
Reaction score
444
Location
Florida
Jeez...I went out to try to get some material to check with my magnet and one of the fuel lines was dumping gas into the valley...
There must have been a quarter cup or more in that one back section...Don't know if any got below my rigged up bolts covering the holes...is it real bad if gas got down there or in any of the bores?the rag in back was wet...

So I scraped this area with my fingernail after I dried it and whatever that crust is seemed have plenty of magnetic material in it.... it gathered around the outside of my round telescoping pick up magnet

the sun on the back of my truck hanging out of garage may have created pressure in the fuel lines???
 

Attachments

  • IMG20240309135305.jpg
    IMG20240309135305.jpg
    288.7 KB · Views: 6

Road Trip

Supporting Member
Supporting Member
Joined
Jul 8, 2023
Messages
1,178
Reaction score
3,403
Location
Syracuse, NY
Yeah my phone has the light in a weird place so I can't get further away. Really bad camera too. I ordered a cheap endoscope that should be here today. Maybe it'll be better..

This is the best I could get trying..and I had to resize to be able to upload here...tried 80% but had to go to 50%... not sure what upload limit is here......#2 intake..#1 is too close to edge to fit my phone enough to get a good pic down there....


All i have here atm is some dna...It seems to be working. There is a good amount of hard carbon build up...Even the little spring where ball is was like filled in between the springs...the ball was crusty... I'm just finishing the first lifter..lol

I'm using a white polishing scrub pad to work stuff free... Where are the scrubby q tips? Don't think those foam ones for detailing would be strong enough...The microfiber ones maybe but the delivery is out of my self allotted time frame....

The brushes I have here have that stupid metal tip that makes the point of the brush useless to get to the bottom flats. I cut a tiny piece of pad and shoved it in there and then ran my drill with a makeup tool my wife gave me. It caught the pad at the bottom and gave it enough twirling agitation to free up all the carbon....

I'm a little versed in circuit board work and have even tackled some surface mount chips so I am seeing some stuff in there...lol

I'll wait to see what your thoughts are at this point if this picture is sufficient.
thank you!

That pic is a lot better. I am seeing some witness marks on the cam lobe from being in service,
but at the same time I'm not seeing anything that should create excessive noise. Assuming that
the matching roller for this lobe still spins freely, then this particular valve should be a quiet success
story. (!) NOTE: Although unscientific, on visual flaws the 'does it catch my fingernail' test is a good
common-sense way to evaluate high-mileage parts. On the cam lobe in the photo, no doubt that this
would pass that test easily. (!)

One more comment on the cam lobe. You can clearly see the varnish to the left and right of where the cam
lobe was touching? You didn't do anything wrong, this is typical of what you find inside high mileage engines.
But there is some welcome hidden information in this picture. The good news is that the roller lifter is running
right in the center where it should be. This tends to put the OK on how the cam was cast, where it's being
positioned front/back in the engine, was the lifter bore drilled/centered in the block boss, etc.

In English, even in the 2 varnish stripes there's good news to be inferred from the photo. IF the remaining
15 look this serviceable, the cleaning of the internals of all 16 lifters would be prudent and advisable. (If it
fits into your schedule of course.)

Keep up the progress reports. I'm in & out all day, but I am checking this string when I can. Good stuff!
 
Top