hilly101111111
Newbie
Good evening folks hope everyone is doing well.
I have a silly dilemma so I decided to upgrade my plug wires to some fancy "heavy duty" Belden ones. I must say they are very nice wires we shall see how well they hold up over time.
So long story short im not sure but I may have messed up the plug wire orientation on the cap and the may be one off. My truck has always had a miss at idle im slowly working on it as I have time off.
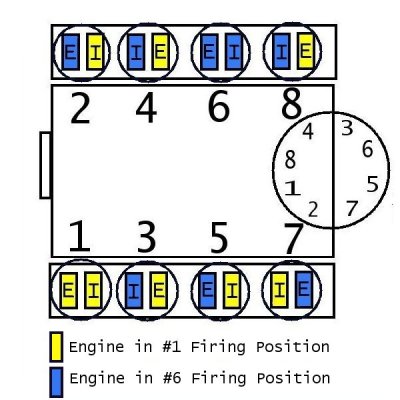
I was wondering if someone had an actual diagram of the plug wires and where each one goes on the cap. maybe im just a dummy but it seems like every diagram I look at the distributer cap orientation is perfectly straight vs the cap on my distributer sits at a different orientation than the diagram and maybe I just don't know how to read a basic diagram haha.
I would love some advice and or a proper wiring/firing order diagram.
this is on a 1990 GMC K2500 350TBI/Turbo 400 trans
I have a silly dilemma so I decided to upgrade my plug wires to some fancy "heavy duty" Belden ones. I must say they are very nice wires we shall see how well they hold up over time.
So long story short im not sure but I may have messed up the plug wire orientation on the cap and the may be one off. My truck has always had a miss at idle im slowly working on it as I have time off.
I was wondering if someone had an actual diagram of the plug wires and where each one goes on the cap. maybe im just a dummy but it seems like every diagram I look at the distributer cap orientation is perfectly straight vs the cap on my distributer sits at a different orientation than the diagram and maybe I just don't know how to read a basic diagram haha.
I would love some advice and or a proper wiring/firing order diagram.
this is on a 1990 GMC K2500 350TBI/Turbo 400 trans