P1345 code assist. Questions. 1996 GMC K1500

Disclaimer: Links on this page pointing to Amazon, eBay and other sites may include affiliate code. If you click them and make a purchase, we may earn a small commission.

Road Trip

Supporting Member
Supporting Member
Joined
Jul 8, 2023
Messages
1,164
Reaction score
3,355
Location
Syracuse, NY
now this here is by far the best and biggest help ive seen for setting these dist. thank you, good sir. as luck would have it, apperently i muffed up somehow. im throwing the 1345 also, did the process of turning the dist one tooth, and yet im stuck. as the truck runs, and the rotor points *just* before cyl1 at TDC. cam retard shows 20*. i retard one tooth, and at the same cap position the cam retard shows -28*

Greetings drifterwanb666,

Glad you found my explanation helpful. My target audience are those who are both
new to the GMT400 hobby and also wish to learn how to be a more self-sufficient
DIY owner. Thanks for the positive feedback, it's appreciated.

****

Before performing any of the following, please make sure that you have already tried to
rotate the distributor per the info in @east302's reply above (#10) and you can't get
the CMP measurement to 0° before the distributor is prevented from turning any further
due to physical interference.


****

OK then. If you are reading this I'm assuming that you find yourself stuck just like many others
have also been. BTW, good job with your clear description of the distributor phasing issue
that you are experiencing.

The problem description is:

Installed distributor is showing a +20° offset.
Retard distributor *1* tooth, now -28° offset.

OK. This is a very specific failure footprint. In order for all involved to be able
to reason through how we can fix this, I first need to do a little quick math.

First, in one full revolution of the distributor shaft the rotor travels exactly 360°.

Now here is the trick. If you pull the distributor out & count the number of teeth
on the gear, you should find an odd number: 13. (Take your time, I'll wait here. :0)

Now why do we care? Well, if they had made the tooth count an even number
(ie: 12 or 14) then when the gear was installed onto the distributor shaft, you
would end up with the same relative phasing between gear teeth and shaft no
matter which way the gear was installed.

But with 13 teeth, IF the gear is installed 180° out, then we are going to end up
with one distributor stuffing that's too far positive, and then when we retard it
1 gear & restuff, it's now too far negative?


So how much of an offset are we talking about? Well, 360° divided by 13 teeth
= just shy of 28° per tooth. And again, because we are dealing with an odd
(asymmetric relative to the roll pin) number of teeth, by removing the drive
gear, spinning it 180°, and reinstalling it, we will now have shifted the phasing
by roughly 1/2 a tooth.

And when you reinstall the distributor, now the phasing will be such that you
should be able to physically swing the distributor either positive or negative
as needed for a CMP reading of 0° *before* running out of room to rotate
the distributor assembly.

Here's the illustration in the FSM showing the gear removal/installation:

You must be registered for see images attach


And how does the distributor gear get installed wrong in the first place? We aren't sure,
but as I mentioned in my previous reply it seems that this assembly error is being
missed during the QA process by whoever is making/remanufacturing these distributors.

Another way this happens is during a camshaft change, where the new camshaft is
installed, and at the same time a new (compatible metallurgy) distributor gear is also installed
by the mechanic...but unfortunately they phase it 180° out. Followed by the P1345 code.
Fudge! :)

****

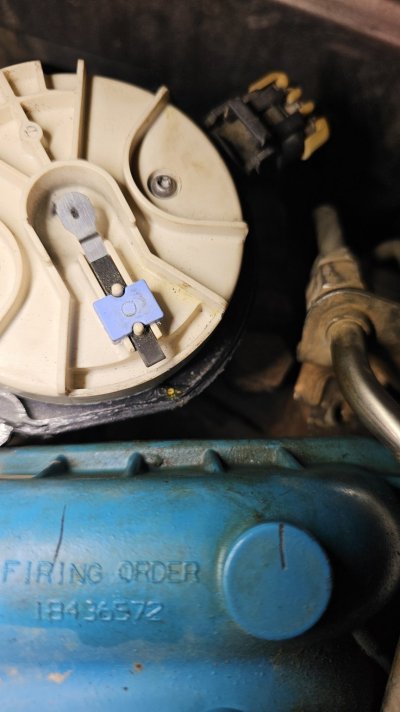
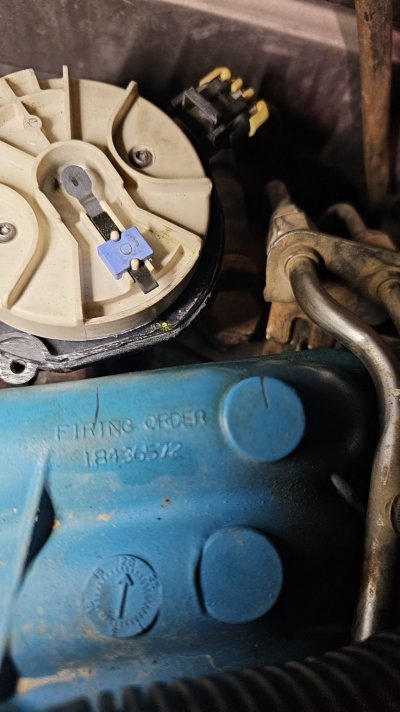
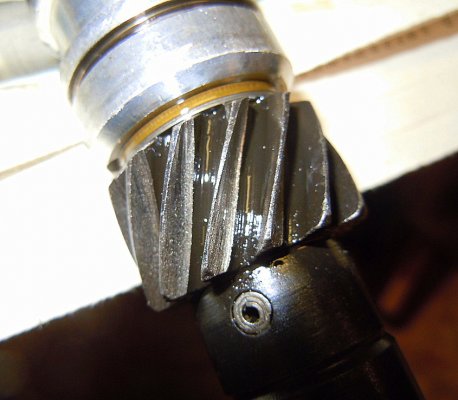
Listen, while we are in here looking for trouble, let's quickly discuss one more issue
having to do with these distributor/cam gears. Simply put, some people pull the
distributor out, and the teeth are worn to almost a knife edge. (Refer to 1st attachment.)

Some people know to look for this, find it, fix it, and away they go. But it's the other
folks who don't know to check this out, don't realize that this is a problem, and put
this back in, and experience all kinds of wiggle-waggle/spark timing scatter/weird
misfires, etc.

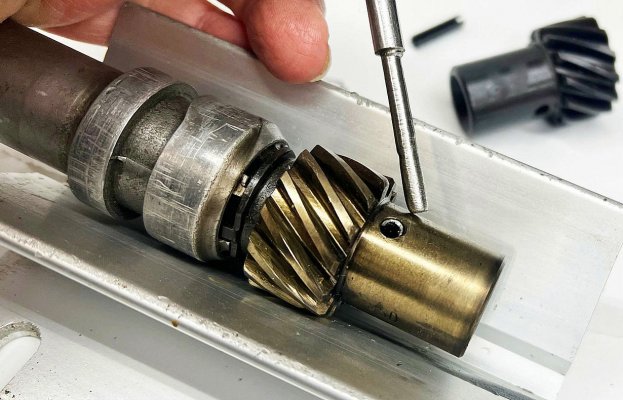
Since mom said I'm not supposed to identify a problem without also proposing a
solution, I have included the 2nd attachment showing what a new, spiffy, unworn
distributor gear looks like.

****

And that's a big-picture overview of the most popular issues surrounding the
cam drive/distributor driven gears. IF you get the phasing correct, AND your
gears are not worn, then there should be a near 100% chance of you being
able to adjust the distributor within the tight confines of where it lives.

Hope this shed some light on the misunderstood '96+ Vortec distributor setup,
especially when the CMP<>CKP signals are out of sync, and the distributor
is physically blocked from rotating far enough to make the adjustment.

If you have any follow-on questions about this please don't hesitate to ask.

And not if but when you clear the P1345 fault please report back here with what
it took so that other folks trying to sort out similar issues can benefit from
your experience.

Best of luck --
 

Attachments

  • knife edge worn distributor gear (best - corvetteforum).JPG
    knife edge worn distributor gear (best - corvetteforum).JPG
    286.9 KB · Views: 17
  • Fresh distributor gear full width teeth (opt speednik).jpg
    Fresh distributor gear full width teeth (opt speednik).jpg
    206.2 KB · Views: 16
Last edited:

drifterwanb666

OBS Enthusiast
Joined
Dec 15, 2022
Messages
57
Reaction score
61
Location
Kyle
Best of luck --
man, yall are superbly helpfull on this. i thought of rotating the gear last night as i was pulling out my last hair. as i stated in my reply to east302, the cam gear is in really good shape, no shaft play, no wobble. the cam as stated is new so no wear there. i do have my OE dist i can plop in and maybe thatll fix. im more willing to **** up a summit new part then i am an OE good part. them things hard to find.
 

Road Trip

Supporting Member
Supporting Member
Joined
Jul 8, 2023
Messages
1,164
Reaction score
3,355
Location
Syracuse, NY
this was followed, to a T. and the dist is set as such, but simply rotating the dist isnt enough to reach + or - 2* CMP offset. the dist is a summit brand with delco parts, and its been in for about a year. no abnormal play, nor gear wear.

Good to hear that you have already verified that your issue can't be solved with the
normal adjustment spec'd in the manual. Your additional info on the parts involved
really seem to support the "aftermarket part was assembled such that the 13-tooth
gear was installed 180° out, QA missed this, and into the new box it went" theory.

Unfortunately, having to be your own Quality Assurance on new parts is rapidly becoming
a part of our brave new world. :-( And amongst troubleshooters there's an old saw that
NEW = Never, Ever, Worked. (Before. :0)

Most normal folks who don't troubleshoot for a living think of all new parts as functional constants.
But as you are living with
right now, as a prudent troubleshooter you have no choice but to view a
new part as simply
adding an additional variable to the existing mix.

Buying a 'brand name' usually puts the odds more in your favor, but it's never a 100% guarantee
that a new part is fully functional -- and the more complex the component the more places that a latent
functional failure can be buried inside.

****

But all is not lost. Here are 2 ways that you can Cheat to Win, and actually look forward to digging
into a tough problem that is resisting all reasonable attempts to repair. :0)

1) Collect as many
COW parts and test equipment that you can. Know where they are at all times.
Sure, lend them out...but only if you come along with them, and maintain 100% positive control on
how they are used.

What is a
COW? Count On Working. For example, if you are supporting a fleet of old GMT400s, having
an extra 'known-good' dizzy that you can temporarily swap in after normal troubleshooting procedures
have come up short can be a game changer. Vehicle still ailing with a known-good dizzy? OK, I'll
substitute my COW black box VCM and see if I can finally solve the intermittent issue. And if the
vehicle still resists repair? Well, now we have no choice but to scour the wiring harness for a
marginal path. (But working on wiring after you have proven it's the root cause is 10x less frustrating
that working on wiring while filled with self-doubt & hoping you aren't on the troubleshooter's garden path.)


And what is COW test equipment? For example, 98% of the time any one of my well-used, battle-scarred,
good-enuf multimeters within easy reach easily gets the job done. Especially for simple go/no-go checks.

But for the remaining 2% of the time where the affordable multimeters are disagreeing with each other,
I can't get the measurements specified in the manual, and I really need to know what's occuring?

That's when I go get my FLUKE. Always used cautiously, in much the same way that you wouldn't use
a precision telephoto camera lens as a dead blow hammer. And as soon as the FLUKE clears up the
confusion, immediately back it goes into safe storage. No exceptions, for sometimes you really need

a tool that you can trust even when it's showing you counterintuitive electrical nonsense. (!)

My FLUKE is my multimeter COW. Same thing with a Tek o-scope. Sure, you can borrow them...but
it's a package deal, I come with them. :)

2) Gather as much experience as possible. Experience = the knowledge you gained after you needed it.
Simply put, once you fix this P1345, and more importantly, you understand not only physically how but
also the theory behind the fix, then you will have gained more valuable, hard-won experience.

The only good thing about experience is that thanks to the mental focus during the hunt for a fix you will
remember this repair effort for a long, long time. (This is why some old guys have all those long, boring
yarns to share...reliving the battles of yore. :0)

And you will end up learning unexpected tricks along the way. For example, I'll bet you a dollar that you
will always count the number of teeth on any gear that can be installed correctly or 180° out. And if it's an
even number, you relax a little. But if it's an odd number, you will stop & see what other visual clues are
out there so that you can verify the NEW part is actually correct? (Or do you have a COW part that you
can visually compare to the NEW part?)

****

So there you have it. As for which way to go from here,
I think that pulling your
aftermarket dizzy, spinning the
gear installation 180°, getting the CMP to read 0°, and
subsequently seeing the P1345 disappear would cement the lesson for you, and
at
the same time would be something we could share with
others facing similar problems
down the road
.

But the ultimate? After you get your new dizzy all sorted out, and your entire engine
bay is working as advertised, what if you were to then temporarily drop in the old dizzy
and see if you can get it all dialed in? If the old dizzy works for a few days, then pull it,
tag it as your COW, and stuff the new part back in.

For a troubleshooter, having a stash of COW parts & test equipment is like having money
in the bank. Especially if your time is worth money.

Looking forward to reading your documented fix here. Make it so.

Cheers --
 
Last edited:

drifterwanb666

OBS Enthusiast
Joined
Dec 15, 2022
Messages
57
Reaction score
61
Location
Kyle
Looking forward to reading your documented fix here. Make it so.
will do so, tonight ill blow this back apart, grab a vehicle from my boss to use for the next day. i agree with having a stash of known good parts, i got stashes all over the place. my boss calls it junk, but if its good, why trash it? sertenly if its OEM good. ill make sure to give info on what i do and, if or if not, it works. i did swap my PCM last night just in case it was an issue. did some rough voltage checks, but i think my 10yr old voltmeter is tryna quit. thank you, and the others that have helped me. invaluable, guaranteed.

damn computers.
 

drifterwanb666

OBS Enthusiast
Joined
Dec 15, 2022
Messages
57
Reaction score
61
Location
Kyle
well i swapped in my known good OE dist and have the same issue. +20*, one tooth retard and im at -28*

did this a couple times just to be sure. truck hardly runs at +20 and i dont feel like pushing her like that. im no brainiac but im not a complete baffoon, idk what else to do.
 

east302

I'm Awesome
Joined
Oct 4, 2013
Messages
3,442
Reaction score
3,168
Location
Jackson, MS
Do you have a picture of the distributor (cap off) when at #1 TDC compression?

Edit: for comparison, see photo below borrowed from the internet

You must be registered for see images attach
 
Last edited:

Road Trip

Supporting Member
Supporting Member
Joined
Jul 8, 2023
Messages
1,164
Reaction score
3,355
Location
Syracuse, NY
well i swapped in my known good OE dist and have the same issue. +20*, one tooth retard and im at -28*

did this a couple times just to be sure. truck hardly runs at +20 and i dont feel like pushing her like that. im no brainiac but im not a complete baffoon, idk what else to do.

Q: Were you ever able to test/adjust/verify the "OE dist" for a 0° reading prior to replacing it?

If this check was never accomplished on the original distributor, then we can't with 100%
certainty use it as a 'known-good' reference. As a troubleshooter, keep in mind that it's
been a long time since your vehicle drove off the assembly line. And as improbable as it
may sound, this wouldn't be the first time that 1 bad part replaced a similar bad part
in a GMT400 engine bay?

By the way, I don't think you ever told us the year & model GMT400 you're working on?

i did install a cam in this engine and do a top end rebuild, cam was lined up dot to dot with the crank gear at TDC like it should be.

I tend to believe this statement, for the as-found reading is positive, and then
changing the installation by 1 tooth gives us a negative reading. IF the timing chain
up front was off, then I would expect either a positive/way too positive result, or negative/way
too negative result from installing/reinstalling the distributor.

So, in order to prove/disprove the suggestion, please go ahead and spin the gear on
the aftermarket distributor 180°, install it, and tell us what you observe. IF that doesn't change
what you are seeing, then we'll have to figure out what your test setup is actually showing you?
 
Last edited:

drifterwanb666

OBS Enthusiast
Joined
Dec 15, 2022
Messages
57
Reaction score
61
Location
Kyle
Do you have a picture of the distributor (cap off) when at #1 TDC compression?

Edit: for comparison, see photo below borrowed from the internet

You must be registered for see images attach
I actually do, with the OE dist. The scratches are where the summit dist. Sat at 1 tooth apart. i know the flat spot on the dist and intake arent as they are supose to be, but thats as close as i could get it to fire up,
 

Attachments

  • Snapchat-1786537945.jpg
    Snapchat-1786537945.jpg
    162.3 KB · Views: 16
  • Snapchat-1773238692.jpg
    Snapchat-1773238692.jpg
    192.8 KB · Views: 14
Last edited:
Top