I am surprised.


You are using an out of date browser. It may not display this or other websites correctly.
You should upgrade or use an alternative browser.
You should upgrade or use an alternative browser.
Oil pressure gauge always pegged.
- Thread starter DeCaff2007
- Start date
Disclaimer: Links on this page pointing to Amazon, eBay and other sites may include affiliate code. If you click them and make a purchase, we may earn a small commission.
Hipster
I'm Awesome
It's really not that it was all that difficult, it's that they ended on there upside down. How many videos have you watched on valve train adjustment? google would have pulled 1000 pics. The fsm which you said you had probably has a pic. You tore one down previously so it was in your face at least once. The bigger issue is that it wasn't even a thought to you if you had it assembled correctly. The rocker nuts backing off probably played a big part of the last cam being beat to death and you could be very well on your way to destroying a second one. Guys that are good at engine building are meticulous, methodical, with a side of perfectionist, and re-check/verify work as they go along. The "this has got to be right without any doubt" and the time investment to make sure is missing from your mindset. Your asking question's but they are more geared to second guessing info that's been provided. I'm not an engineer so it's not for me to second guess order or proper assembly etc. Duplicating what the engineers' already sorted out is a big part of this. This is a bigger whoops than taking a hammer to the conrod assembly.It wasn't nearly as difficult as any of you may think.
All you can say is it wasn't that difficult.... effin stuff up never is. If I had to guess, I'm betting this cam is in there with all the grit left from the last one, but I hope that is not the case.
Last edited:
DeCaff2007
I'm Awesome
I am surprised.
Surprised at what?
I am surprised.
That the crimped-top nuts could be installed upside-down.Surprised at what?
I'd expect them to be at their most-crimped at the very top, least-crimped at the bottom, making them hard-to-start "upside-down" on the male threads. I suspect--without evidence--that going on upside down has permanently deformed the crimped part of the nut. Thus the reason they backed-off.
The genuine GM nuts are good for multiple lifter preload adjustments. I know--as a high-schooler dicking with a hand-me-down '66 Biscayne 283, I was adjusting the lifter preload about every month looking for "more performance"; along with replacing points and condenser three times a year, and dwell adjustments about every three weeks. None of that did any good, of course, but you couldn't tell me that at age 15.
I REALLY wish you had an on-site mentor. While these forums are enormously better than a service manual, a light to read by, and hours of study...an experienced person "right there" would save you a heap of labor, some money, and enormous aggravation and frustration.
Car clubs in the area? "Adult Education" or Community College courses on auto repair?
Well, anyway--mentor or not--you're getting closer and closer to a finished final project.
...The fsm which you said you had probably has a pic.
Out of curiosity I looked, and found this page in the '99 C/K Service Manual:
You must be registered for see images attach
There's not a lot of verbiage (tech writer assumed this is common knowledge?)
...but the 3rd illustration on this page shows what we've been discussing:
You must be registered for see images attach
As described by @Hipster and others, for a long service life engines can only
go together in a very specific way, involving lots of tiny details similar to the one
you are working to resolve at the moment.
The main reason why this is true is that the dynamics/gyrations of all the individual parts
involved is such that it's a wonder that engines don't destroy themselves within
seconds of the first firing instead of lasting upwards of 20 years before requiring a rebuild?
When you study up on valvetrain theory, it is taught that valve motion is sinusoidal in nature
so that there are no stresses related to sudden starting or stopping. But when you freeze
the motion of a valvetrain with a strobe light and slow-motion photography (LINK to 30-second video)
it's incredible all the harmonics, oscillations, and general unstable nature of a valvetrain in action.
(Yes, the video is focused on running a valvetrain way higher in rpm that you did, but this
just makes the forces at play more visible/dramatic to the viewer.)
And keep in mind that all these destructive forces are amplified once excess play develops
in the assembly & the parts are hammering hard enough that they become audible to
the driver.
Given all of the above, Hipster said it best when he stated, "Duplicating what the engineers' already sorted out is a big part of this."
****
Just so that you know I'm not pig-piling on you & your situation, in my next reply I'll share
a mistake I made on one of my first engines that was just as subtle, but at the same time it
forced me to pull out an engine I had just rebuilt in order to correct the resulting problem.
It was a lesson I still remember like it was yesterday...but it was ~45 years ago. :0)
Last edited:
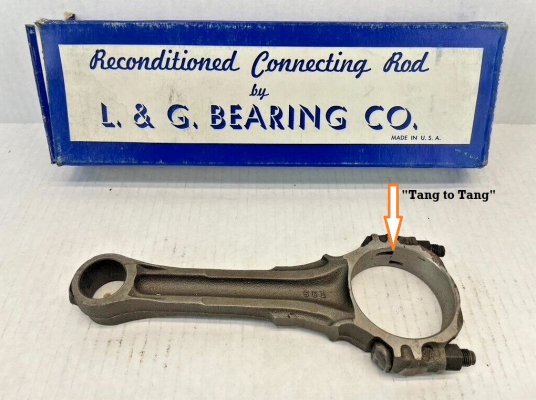
Why I recite "Tang to Tang" aloud during every connecting rod I've assembled to this day.
*******************************************************************
It's commonly known that most old guys collect a few quirky behaviors
over the years, and I am no exception. Usually a quirk is associated with
a painful life lesson, and here's a mistake I made that I never thought I'd
share in public.
****
In the late '70s I was putting together maybe my 2nd or 3rd engine solo. A
friend of the family had a '69 Chevy pickup equipped with a 292ci straight six
and a SM-465 (granny 4-speed) transmission. The truck had been worked
hard and was tired even before the family friend bought the truck, and it was burning
lots of oil/blowing blue smoke & needed a valve job.
Everyone involved was living the paycheck to paycheck lifestyle, so a new truck
or a complete engine rebuild was out of the question. So, the decision was made
to do a ball hone, new rings, bearings, gaskets, and send the cylinder head to the
machine shop for reconditioning.
I forget the total cost of the parts & machine shop bill, but I think we were able to
keep the total cost around $400? (About half for the new rings, bearings, gaskets,
carb kit, usual tune up stuff, etc., and the other half was the machine shop bill for
the valve job?)
Note: Before my 'rebuild', the engine never had a problem starting, hot or cold.
****
So, after cleaning everything up, giving the cylinders plenty of ball hone love,
cleaning it up some more, and assembling the engine, I was so happy when
the engine fired right up & ran super smoothly. During the test drive, we
did the 30-60 full throttle and 60-30 off throttle several times, and the rings
broke in pretty much right away. At the end of the test drive, when we turned
off the engine it stopped immediately. "Nice tight motor", we said. :0)
The engine always started right up cold, ran smooth, and was no longer
fogging the neighborhood for mosquitos, but it also exhibited a new & puzzling
behavior. When fully up to temp, it ran OK, but when you shut the
engine off, it would stop immediately, instead of slowing to a stop like
a normal engine.
Worse, once the warmed up engine was shut off it couldn't be turned over by the
starter until it had completely cooled off? For that matter, when hot the engine
couldn't be turned over with a breaker bar on the front of the crank? WTF?
Bad starter? No. Bad charging system or battery? Nope.
I must have checked the ignition timing a dozen times, and yet it was always
right where it was supposed to be? The friend of the family was pretty
cool about the situation, but I was beside myself.
Luckily, my best buddy's dad was my engine building mentor, and after I described
all the symptoms to him, he in turn asked me all kinds of questions about
new or original pistons, clearances, overheating, oil pressure, pinging/knocking,
ignition timing, charging system, etc. He thought for a moment and stated that there
must be an issue with the way I put the connecting rods together?
"What size bearings did you buy?", he asked.
"Stock size - the crank was in pretty good shape, so I didn't have it turned", I replied.
"How were the clearances?", he continued.
"The plastiguage looked like it was supposed to", I answered.
"Did you put the tang to tang together when you put the rod caps on?", Mr. Laramore continued.
"Uhhhh, I don't know", was all I could muster up in response.
****
Mr. Laramore proceeded to explain to me that the big end of the connecting rods were 1st
assembled, and then machined/honed into a perfect circle, and as long as you put them
back together *exactly* the same way you took them apart, then no problem. On the other
hand, if you put them together backwards you no longer had a perfect circle, but instead
you ended up with 2 'C' shapes that could be slightly offset/misaligned to each other.
He then told me that you might as well pull the engine back out and take a close look in
this area. Sure enough, with the engine out and back on the stand I discovered that I
had all 6 connecting rods assembled with the bearing tangs on opposite sides. I gave myself
an 'A' for consistency, but an 'F' for putting it back together the same way it
was before I took it apart. :-(
And all 6 connecting rod bearings looked like they had 50K miles on them instead of
just 500 or so. :0) But the crank still looked good, so with a fresh set of rod bearings
(main bearings still looked good!) and a new oil pan gasket, the engine got stuffed
back into the truck.
And this time around the engine ran smooth, didn't smoke, seemed to be a bit more peppy,
and when you shut it off the engine coasted to a stop like a normal engine did. And best of all,
it would instantly restart, hot or cold.
And no doubt thanks to how rugged those old 292 straight 6 motors are, it survived my rookie refresh,
and went on to run well. Thanks to my mentor's guidance, I was able to snatch project victory from
the jaws of defeat. :0) For all I know it might still be running somewhere out in the midwest...
****
The moral of the story? When it comes to building engines, all the little details like 'tang to tang'
really & truly matter.
Just like always, "Experience is the Knowledge you gained after you needed it."")
Never made that mistake again...but I did manage to make a few different ones along
the way since then. Over time I came to realize that the mistakes (that I learned from) was the
equivalent of paying my dues/tuition in order to eventually enjoy the engine building hobby.
****
And for those of you still reading along but haven't had the opportunity to get elbows deep
inside an engine, I've attached a photo of a properly assembled connecting rod for your
viewing pleasure. Tang to tang is the only way to go...unless of course your FSM says otherwise. (!)
@DeCaff2007, just wanted you to know that I don't have sympathy for your situation...I have empathy.
Been there. Done similar. And here's hoping that others reading this can learn from our mistakes without
having to repeat them for themselves.
That's the real goal of all this.
Cheers --
*******************************************************************
It's commonly known that most old guys collect a few quirky behaviors
over the years, and I am no exception. Usually a quirk is associated with
a painful life lesson, and here's a mistake I made that I never thought I'd
share in public.
****
In the late '70s I was putting together maybe my 2nd or 3rd engine solo. A
friend of the family had a '69 Chevy pickup equipped with a 292ci straight six
and a SM-465 (granny 4-speed) transmission. The truck had been worked
hard and was tired even before the family friend bought the truck, and it was burning
lots of oil/blowing blue smoke & needed a valve job.
Everyone involved was living the paycheck to paycheck lifestyle, so a new truck
or a complete engine rebuild was out of the question. So, the decision was made
to do a ball hone, new rings, bearings, gaskets, and send the cylinder head to the
machine shop for reconditioning.
I forget the total cost of the parts & machine shop bill, but I think we were able to
keep the total cost around $400? (About half for the new rings, bearings, gaskets,
carb kit, usual tune up stuff, etc., and the other half was the machine shop bill for
the valve job?)
Note: Before my 'rebuild', the engine never had a problem starting, hot or cold.
****
So, after cleaning everything up, giving the cylinders plenty of ball hone love,
cleaning it up some more, and assembling the engine, I was so happy when
the engine fired right up & ran super smoothly. During the test drive, we
did the 30-60 full throttle and 60-30 off throttle several times, and the rings
broke in pretty much right away. At the end of the test drive, when we turned
off the engine it stopped immediately. "Nice tight motor", we said. :0)
The engine always started right up cold, ran smooth, and was no longer
fogging the neighborhood for mosquitos, but it also exhibited a new & puzzling
behavior. When fully up to temp, it ran OK, but when you shut the
engine off, it would stop immediately, instead of slowing to a stop like
a normal engine.
Worse, once the warmed up engine was shut off it couldn't be turned over by the
starter until it had completely cooled off? For that matter, when hot the engine
couldn't be turned over with a breaker bar on the front of the crank? WTF?
Bad starter? No. Bad charging system or battery? Nope.
I must have checked the ignition timing a dozen times, and yet it was always
right where it was supposed to be? The friend of the family was pretty
cool about the situation, but I was beside myself.
Luckily, my best buddy's dad was my engine building mentor, and after I described
all the symptoms to him, he in turn asked me all kinds of questions about
new or original pistons, clearances, overheating, oil pressure, pinging/knocking,
ignition timing, charging system, etc. He thought for a moment and stated that there
must be an issue with the way I put the connecting rods together?
"What size bearings did you buy?", he asked.
"Stock size - the crank was in pretty good shape, so I didn't have it turned", I replied.
"How were the clearances?", he continued.
"The plastiguage looked like it was supposed to", I answered.
"Did you put the tang to tang together when you put the rod caps on?", Mr. Laramore continued.
"Uhhhh, I don't know", was all I could muster up in response.
****
Mr. Laramore proceeded to explain to me that the big end of the connecting rods were 1st
assembled, and then machined/honed into a perfect circle, and as long as you put them
back together *exactly* the same way you took them apart, then no problem. On the other
hand, if you put them together backwards you no longer had a perfect circle, but instead
you ended up with 2 'C' shapes that could be slightly offset/misaligned to each other.
He then told me that you might as well pull the engine back out and take a close look in
this area. Sure enough, with the engine out and back on the stand I discovered that I
had all 6 connecting rods assembled with the bearing tangs on opposite sides. I gave myself
an 'A' for consistency, but an 'F' for putting it back together the same way it
was before I took it apart. :-(
And all 6 connecting rod bearings looked like they had 50K miles on them instead of
just 500 or so. :0) But the crank still looked good, so with a fresh set of rod bearings
(main bearings still looked good!) and a new oil pan gasket, the engine got stuffed
back into the truck.
And this time around the engine ran smooth, didn't smoke, seemed to be a bit more peppy,
and when you shut it off the engine coasted to a stop like a normal engine did. And best of all,
it would instantly restart, hot or cold.
And no doubt thanks to how rugged those old 292 straight 6 motors are, it survived my rookie refresh,
and went on to run well. Thanks to my mentor's guidance, I was able to snatch project victory from
the jaws of defeat. :0) For all I know it might still be running somewhere out in the midwest...
****
The moral of the story? When it comes to building engines, all the little details like 'tang to tang'
really & truly matter.
Just like always, "Experience is the Knowledge you gained after you needed it."
Never made that mistake again...but I did manage to make a few different ones along
the way since then. Over time I came to realize that the mistakes (that I learned from) was the
equivalent of paying my dues/tuition in order to eventually enjoy the engine building hobby.
****
And for those of you still reading along but haven't had the opportunity to get elbows deep
inside an engine, I've attached a photo of a properly assembled connecting rod for your
viewing pleasure. Tang to tang is the only way to go...unless of course your FSM says otherwise. (!)
@DeCaff2007, just wanted you to know that I don't have sympathy for your situation...I have empathy.
Been there. Done similar. And here's hoping that others reading this can learn from our mistakes without
having to repeat them for themselves.
That's the real goal of all this.
Cheers --
Attachments
Last edited:
DeCaff2007
I'm Awesome
@DeCaff2007, just wanted you to know that I don't have sympathy for your situation...I have empathy.
I appreciate that. At least it's empathy and not apathy, lol.
Hipster
I'm Awesome
Not only the cap, nuts on some rods only are supposed to go on one way, some washers are directional, snap rings only go on one way, etc. Crimped nuts from the hardware store are not rocker arm nuts. I would like to see him get through it as well..... without a larger looming disaster 500, 1000, 1500 miles from now. When dealing with a mentor or instructor and they tell you "because this is the proper way" the only thing that needs said is "ok" A good mentor will be explaining why as he goes along as many here are doing.Why I recite "Tang to Tang" aloud during every connecting rod I've assembled to this day.
*******************************************************************
It's commonly known that most old guys collect a few quirky behaviors
over the years, and I am no exception. Usually a quirk is associated with
a painful life lesson, and here's a mistake I made that I never thought I'd
share in public.
****
In the late '70s I was putting together maybe my 2nd or 3rd engine solo. A
friend of the family had a '69 Chevy pickup equipped with a 292ci straight six
and a SM-465 (granny 4-speed) transmission. The truck had been worked
hard and was tired even before the family friend bought the truck, and it was burning
lots of oil/blowing blue smoke & needed a valve job.
Everyone involved was living the paycheck to paycheck lifestyle, so a new truck
or a complete engine rebuild was out of the question. So, the decision was made
to do a ball hone, new rings, bearings, gaskets, and send the cylinder head to the
machine shop for reconditioning.
I forget the total cost of the parts & machine shop bill, but I think we were able to
keep the total cost around $400? (About half for the fresh engine bits, carb kit,
tune up stuff, etc., and the other half was the machine shop bill for the valve job?)
Note: Before the rebuild, the engine never had a problem starting, hot or cold.
****
So, after cleaning everything up, giving the cylinders plenty of ball hone love,
cleaning it up some more, and assembling the engine, I was so happy when
the engine fired right up & ran super smoothly. During the test drive, we
did the 30-60 full throttle and 60-30 off throttle several times, and the rings
broke in pretty much right away. At the end of the test drive, when we turned
off the engine it stopped immediately. "Nice tight motor", we said. :0)
The engine always started right up cold, ran smooth, and was no longer
fogging the neighborhood for mosquitos, but it developed a puzzling
behavior. When fully up to temp, it ran OK, but when you shut the
engine off, it would stop immediately, instead of slowing to a stop like
a normal engine. Worse, once the engine was shut off it couldn't be
turned over by the starter until it had completely cooled off? For that
matter, when hot the engine couldn't be turned over with a breaker bar on the
front of the crank? WTF?
Bad starter? No. Bad charging system or battery? Nope.
I must have checked the ignition timing a dozen times, and yet it was always
right where it was supposed to be? The friend of the family was pretty
cool about the situation, but I was beside myself.
Luckily, my best buddy's dad was my engine mentor, and after I described
all the symptoms to him, and he in turn asked me all kinds of questions about
new or original pistons, clearances, overheating, oil pressure, pinging,
charging system, etc., he stated that there must be an issue with the way
I put the connecting rods together?
"What size bearings did you buy?", he asked.
"Stock size - the crank was in good shape, so we didn't have it turned", I replied.
"How were the clearances?", he continued.
"The plastiguage looked like it was supposed to", I answered.
"Did you put the tang to tang together when you put the rod caps on?", Mr. Laramore continued.
"Uhhhh, I don't know." was all I could muster up.
****
Mr. Laramore proceeded to explain to me that the big end of the connecting rods were
assembled, and then machined/honed into a perfect circle, and as long as you put them
back together exactly the same way you took them apart, then no problem. On the other
hand, if you put them together backwards you no longer had a perfect circle, but instead
you ended up with 2 'C' shapes that were ever so slightly offset to each other.
He then told me that you might as well pull the engine back out and take a close look in
this area. Sure enough, with the engine out and back on the stand I discovered that I
had all 6 connecting rods assembled with the bearing tangs on opposite sides. I gave myself
an 'A' for consistency, but an 'F' for putting it back together the same way it
was before I took it apart. :-(
And all 6 connecting rod bearings looked like they had 50K miles on them instead of
just 500 or so. :0) But the crank still looked good, so with a fresh set of rod bearings
(main bearings still looked good!) and a new oil pan gasket, the engine got stuffed
back into the truck.
And this time around the engine ran smooth, didn't smoke, and when you shut it off the engine
coasted to a stop like a normal engine did. And best of all, it would instantly restart, hot
or cold. And no doubt thanks to how rugged those old 292 straight 6 motors are, it
survived my rookie refresh, and went on to run well. For all I know it might still be running
somewhere out in the midwest...
****
The moral of the story? When it comes to building engines, all the little details like 'tang to tang'
really & truly matter.
Just like always, "Experience is the Knowledge you gained after you needed it."
Never made that mistake again...but I did manage to make several others along
the way since then. Over time I came to realize that the mistakes I learned from was the
equivalent of paying my dues/tuition in order to eventually enjoy the engine building hobby.
****
And for those of you still reading along but haven't had the opportunity to get elbows deep
inside an engine, I've attached a photo of a properly assembled connecting rod for your
viewing pleasure. Tang to tang is the only way to go...unless of course your FSM says otherwise. (!)
@DeCaff2007, just wanted you to know that I don't have sympathy for your situation...I have empathy.
Been there. Done that. And here's hoping that others reading this can learn from our mistakes without
having to repeat them for themselves.
That's the real goal of all this.
Cheers --
I mess with different stuff, usually there is a service manual and a spiral notepad there and I start taking notes, sketch a diagram, etc. when the teardown starts, Moreso if it's something I've never been into. Almost impossible to keep all the little details in one's head if you get called away, interrupted, or hit a stop. Writing stuff down helps with memory but it's there if you need to refer back to it.
Last edited:
DeCaff2007
I'm Awesome
Hmmm. Well the new parts came in yesterday. Installed just today.
New ARP rocker studs:
Rockers aren't new, but the new locking nuts came with new rocker balls (lol), so I put them on and saved the old ones.
I have to say.... when putting the locking nuts on correctly, things went a lot easier. Every nut went on with the same amount of effort this time.
I have 1/2 turn of preload. Do I need to go to 3/4 turn?
I checked the timing again. Thanks to @Schurkey I can safely say the timing is ~5 degrees ADVANCED, with the timing wire on the firewall plugged in.
I'm going to turn the key tonight when the Wife gets off work so I can have a second person there during break in.
If a rocker arm backs off this time, I'm at a loss. If the headers glow this time, I'm again, at a loss. At least this damn thing starts no problem. We'll see if it continues to have hot start problems.
OH! Questions I have thought of while waiting on parts: When I tore the original, dilapidated exhaust off this thing (the V6 exhaust), the O2 sensor was on the PASSENGER side down pipe. Everything I've seen in the service manual says that the O2 sensor should be on the DRIVERS side down pipe. Will this make any difference in A/F ratio, and thereby making the headers glow?
Will hotter/colder spark plugs affect glowing headers?
Would the vast change in emissions equipment change the A/F ratio enough to result in glowing headers? None of the 89 emissions equipment is equipped anymore, except for the vapor canister. Everything is now equipped for the 94 model year, because, that's what year the engine is. ECU, however, I believe is from a 1990.
Ok, let's see what happens tonight.
New ARP rocker studs:
You must be registered for see images attach
Rockers aren't new, but the new locking nuts came with new rocker balls (lol), so I put them on and saved the old ones.
You must be registered for see images attach
I have to say.... when putting the locking nuts on correctly, things went a lot easier. Every nut went on with the same amount of effort this time.
I have 1/2 turn of preload. Do I need to go to 3/4 turn?
I checked the timing again. Thanks to @Schurkey I can safely say the timing is ~5 degrees ADVANCED, with the timing wire on the firewall plugged in.
I'm going to turn the key tonight when the Wife gets off work so I can have a second person there during break in.
If a rocker arm backs off this time, I'm at a loss. If the headers glow this time, I'm again, at a loss. At least this damn thing starts no problem. We'll see if it continues to have hot start problems.
OH! Questions I have thought of while waiting on parts: When I tore the original, dilapidated exhaust off this thing (the V6 exhaust), the O2 sensor was on the PASSENGER side down pipe. Everything I've seen in the service manual says that the O2 sensor should be on the DRIVERS side down pipe. Will this make any difference in A/F ratio, and thereby making the headers glow?
Will hotter/colder spark plugs affect glowing headers?
Would the vast change in emissions equipment change the A/F ratio enough to result in glowing headers? None of the 89 emissions equipment is equipped anymore, except for the vapor canister. Everything is now equipped for the 94 model year, because, that's what year the engine is. ECU, however, I believe is from a 1990.
Ok, let's see what happens tonight.
With most lifters, preload is not critical as long as you have "some" but don't have so much that the lifter is collapsed.I have 1/2 turn of preload. Do I need to go to 3/4 turn?
Lotsa guys prefer 1/2 turn. GM used to recommend a full turn. I don't know what GM suggests now.
STOP!I checked the timing again. Thanks to @Schurkey I can safely say the timing is ~5 degrees ADVANCED, with the timing wire on the firewall plugged in.
With the timing connector plugged-in, I'd expect there'd be 12--15 degrees of advance at idle, if the initial timing with the connector UN-PLUGGED is at GM spec of TDC (zero).
If you have only 5 degrees of timing advance at idle, when the connector is plugged-in, you're WAY short on advance. This is almost certainly why the headers glow.
With 5 degrees of extra advance (5 advanced from zero with the connector unplugged) you'd likely have close to 20 degrees of advance at idle with the connector plugged-in. This will not hurt anything during cam break-in; you might want to re-set the ignition timing to spec once the engine is running nicely and the cam is happy.
Realistically, adding 5 degrees of advance probably wouldn't hurt anything long-term. I ran more than that for awhile on my '88 K1500 5.7L; but backed it down later.
Shouldn't. Both the driver's bank of cylinders, and the passenger bank of cylinders have two cylinders running off the left injector, and two cylinders running off the right injector. Both injectors are averaged-out and corrected no matter which bank is being monitored.OH! Questions I have thought of while waiting on parts: When I tore the original, dilapidated exhaust off this thing (the V6 exhaust), the O2 sensor was on the PASSENGER side down pipe. Everything I've seen in the service manual says that the O2 sensor should be on the DRIVERS side down pipe. Will this make any difference in A/F ratio, and thereby making the headers glow?
The only question is whether the O2 sensor is far enough downstream to not get hot enough. Is this a one-wire (not electrically heated) sensor, or a three-wire (electrically heated) sensor?
No.Will hotter/colder spark plugs affect glowing headers?
No. I'd expect the emissions equipment to be very similar from '89 to '94. Perhaps not identical, but similar.Would the vast change in emissions equipment change the A/F ratio enough to result in glowing headers? None of the 89 emissions equipment is equipped anymore, except for the vapor canister. Everything is now equipped for the 94 model year, because, that's what year the engine is. ECU, however, I believe is from a 1990.
And at any rate, the O2 sensor is the final judge of A/F ratio, not the emissions equipment.
If what you've said in the previous post is right, you need to advance the timing before firing the engine.Ok, let's see what happens tonight.
Similar threads
- Replies
- 0
- Views
- 378
- Replies
- 3
- Views
- 1K
Staff online
-
 df2x44L60E Destroyer
Members online
- GMC Burbalade
- Scooterwrench
- 2blue4you
- aaronb
- 89joechevy
- seenbean
- alaraine
- Road Trip
- blackcherry90
- Canadian Rust Bucket
- G1kon1wheel
- EpicColours
- Club_Sierra
- Vic327
- MCLMM
- Spareparts
- skylark
- WojTec
- framedbba
- df2x4
- Supercharged111
- 95YardArt
- skinnyrock
- termite
- 89RCLB
- sethdm02
- Wh4t3v3rs
- bluex
- cdone
- Duramax-LLY-05
- Drunkcanuk
- biker
- EcuaTahoe
- Remodelmaster
- Chefman43223
- Wheeler454
- bretcopsey
- Keeper
- Rwood881
- 99xcss4
- Grthrawn
- johnny_162
- shamusshanahan
- RQ Jay
- iz_lesa
- nickc2500
- Danimal08
- Dantheman1540
- Erik E
- Ivang4342
Total: 1,693 (members: 71, guests: 1,622)