My 454 Rebuild

Disclaimer: Links on this page pointing to Amazon, eBay and other sites may include affiliate code. If you click them and make a purchase, we may earn a small commission.

BeXtreme

I'm Awesome
Joined
Jan 13, 2020
Messages
400
Reaction score
417
Location
Salem, OR
I took the cap/rotor off. I could not see a thing wrong with the cap. It's a summit blue cap with bronze contacts. Less than a year old. The rotor was a new one but i can't remember the brand. I put a new AcDelco rotor on it and it did help. Probably 50% better.
I would have changed the cap also but had to order it and im not so sure that will change anything
Most cylinders get random misfires but #7 was pretty consistent. The other cylinders are way better also but still a few.
Over all just changing the rotor and adding dielectric grease helped but did not fix it totally. I think im on the right track to fixing it.
The wires are 8MM Taylor wires and they are in the factory looms but i'm also going to separate them further where possible.
The only physical way for a single cylinder to get fired when it isn't supposed to be is for an internal crossfire inside the cap. You won't see it, the traces are internal to the cap and it is a well known problem with the vortec caps. It's the primary reason I decided to bite the bullet and go CNP on my swap, I didn't want to have to deal with Vortec cap problems.

I'm surprised no one had a Vortec V8 cap in stock near you. NAPA has an Echlin one in stock near me: https://www.napaonline.com/en/p/ECH...2y2tBh2HEw8UEAQYASABEgJQlvD_BwE&gclsrc=aw.ds&

Autozone has an AC Delco one, Duralast and duralst gold ones all in stock.
https://www.autozone.com/ignition-t...V2y2tBh2HEw8UEAQYAyABEgKEp_D_BwE&gclsrc=aw.ds
 

Road Trip

Supporting Member
Supporting Member
Joined
Jul 8, 2023
Messages
1,190
Reaction score
3,465
Location
Syracuse, NY
I have not mentioned it for a while cuz i just had better things to work on and am tired of it anyway but just in chase ANYONE has a suggestion im listening.
Yup the misfire and rough idle.

Greetings Spareparts,

Reading through your saga, I *feel* your pain. And it sounds like your
belief system is similar to mine: "If there's spark, fuel, & compression, is *has* to fire."

Whether it's a small 3.5 hp Tecumseh on an old lawnmower or the 454 under your hood,
an engine not adhering to this maxim would irritate me no end -- double if I was the one
who put it together. (!)

In honor of your tenacity (plus I own a new {to me} truck with an L29 in it) I decided to
read through this thread & look for a recognizable pattern. Armed with my notes, I have
3 areas of interest where you haven't already eliminated all of the variables. (1 is low
probability, 1 is possible but not probable, and 1 is probable given your recent troubleshooting
observation in #804 above.)

Q: Then why bring up all 3? A: Because there may be an interaction between
these 3 different areas, further muddying up the troubleshooting waters.

****

OK, let's start with the most probable area first. And while you read the following, please
keep this in mind: If we had coil on plug, or even coil near plug on the L29, then we wouldn't have
to worry about the firing order. (!)

But since we have 1 distributor feeding 8 cylinders, we have a couple of places in the firing order
where the sequencing stresses the spark distribution system more than others. Here are the
2 instances: 1-8-4-3-6-5-7-2. (NOTE: For the purposes of this discussion, I am going to posit
that when a cylinder is fired via it's spark plug wire, and the following cylinder is on the opposite
bank, then due to physical wire routing there's little or no interaction {aka inductive coupling/"crossfire"}
that occurs.)

Given this, the following 6 sequences in the firing order (1>8, 4>3, 3>6, 6>5, 7>2, and 2>1)
are low/no interaction at the spark plug wire level, and we can safely disregard them in a
crossfire troubleshooting discussion.

On the other hand, depending upon how the spark plug wires have been loomed together,
when cylinder 8 is fired, if the #4 wire is loomed tight to the #8 (allowing inductive coupling to occur)
then the #4 plug may spark a little in time with #8 (90° early) and then get it's regular spark
when the distributor rotor lines up and it is it's regular turn to fire.)

Guess what? Nearly nobody worries about the 8-4 issue, because the normal way we run our wires
(combined with the fact that #8 is so close to the distributor) the #8 & #4 spark plug wires don't run
alongside each other for a long enough distance that inductive coupling rears it's ugly head.

But what about the spark plug wires for #5 and #7? In the old days with the old distributor caps,
these wires ran alongside each other all the way from the distributor cap to the adjacent spark plugs!

Depending upon how the spark plug wires were constructed (straight wire, carbon/graphite core, or
wire-wound) and how close the wires ran alongside each other, the situation can occur where the #7 plug
is stimulated to fire in time with the preceding #5 cylinder, 90° too early! (Depending upon timing
advance, it could actually be anywhere from ~100°-125° BTDC.) And then, #7 spark plug will
fire shortly afterwords at full strength at the normal ~10°-35° BTDC.

Again, if the L29 had coil on plug/coil near plug spark distribution architecture, we would not care
about the firing order at all. And some look at spark plug wires strictly in the DC (direct current)
domain. (ie: Ohmmeter measures open vs. a specified DC resistance for troubleshooting purposes.)

But in reality, we drive each spark plug wire with pulsating high KV DC, which means that we now
have to use AC theory, and include the expanding/contracting magnetic field theory when
thinking about all this.

Q: Do I think that you are suffering from inductive coupling from the 5-7 spark plug wires?
A: Possibly. IF it was happening, this would certainly explain the 'too many sparks' (more
correctly, too many flashes) as seen on your inductive timing light? (It *is* a clamp on unit?
I haven't seen the old school in-circuit timing lights since forever ago.)

To be perfectly honest, I am also thinking about those unknown valve springs, but as a
troubleshooter I decided that we need to explain why you are seeing too many timing light
flashes before we go down that path. And, more to the point, it will be relatively easy for you
to prove/disprove this wire theory. All you have to do is temporarily physically separate the
#5 & #7 wires, and then recheck the timing light. IF #7 now looks like all the others, GREAT!
If no change due to the re-routing of the #7 wire, then don't load up the parts cannon with
yet another spark plug wire swap & continue to follow this symptom wherever it leads you.

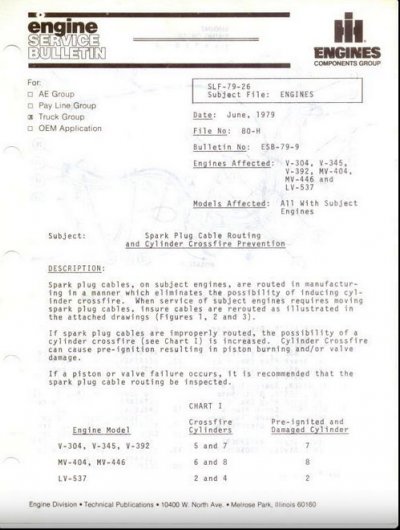
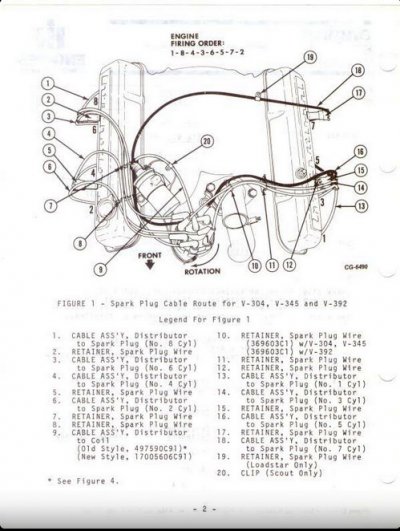
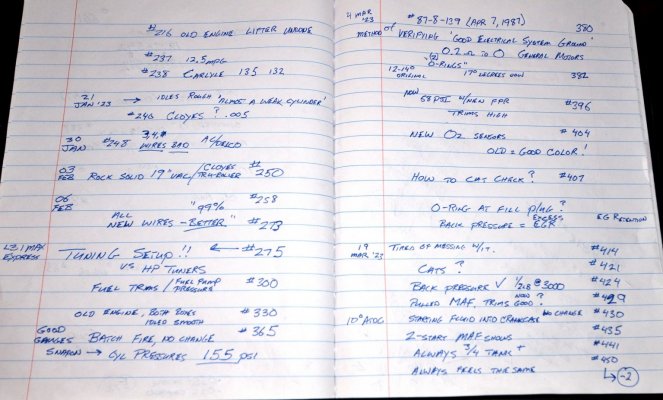
Check this out -- while researching all this, I discovered that the old International Harvester
V8 engines have the same firing order, and back in '79 they put out guidance to their dealership
mechanics in the field to be sure to route the #7 wire well away from the #5 wire (like it was done at
the factory) in order to avoid engine damage. And if they were repairing a burnt
valve or damaged piston after the fact then make sure & verify that the spark plug
wiring is done as shown on page 2. (Please see attached.)

NOTE: IH V8s have the same cylinder numbering method & firing order, but differ in
the fact that the distributor is in the front, so that is what makes the diagram look
a bit funky as compared to what we normally stare at.

FWIW, I've read about race engine failure analysis where they were trying to figure out
what went wrong in the #7 hole in the heat of battle. Some would argue that firing the
#7 spark plug that far ahead of TDC shouldn't make a difference, but we all know that
between BDC and 90° BTDC the piston rapidly accelerates from 0 to max speed during
that time, we're on the compression stroke with a combustible charge, and if all the
variables line up exactly wrong, that spark will initiate a burn way too soon. (Think
negative torque, for the charge being lit too soon will tend to (try to) push the piston
backwards down the hole.) And that negative torque (even at the tiny idle charge level)
would feel like a miss to the driver. (!)

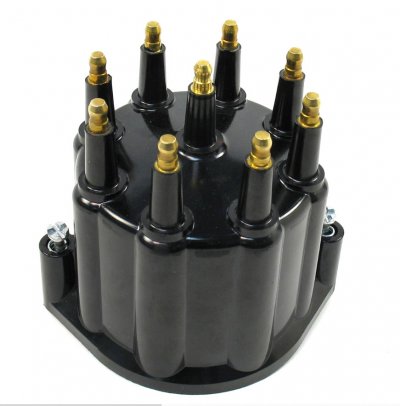
And to prove that this isn't just an off-road/race track issue, I've attached 2 photos. The
1st is the classic Chevy distributor cap, where the wires are connected in proper firing
order, sequentially, in a clockwise circle and serviced in a timely fashion by the spinning
rotor that's mounted on top of a shaft geared directly to the camshaft.

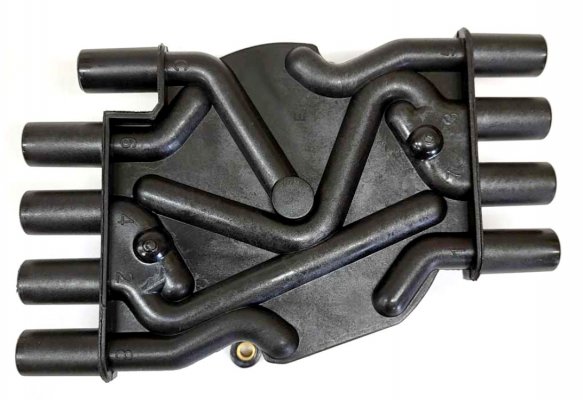
And the 2nd photo is the redesigned Chevy Vortec distributor cap, where the engineers
made sure that the #5 & #7 electrical paths at their closest are facing each other at a 90°
angle, which is how we minimize inductive coupling in wiring carrying AC (or pulsating DC)
high voltages. EDIT: The Vortec cap redesign also physically separates where the #5 & #7 wires
connect to the cap with the #3 wire in-between, which, IF you maintain that much distance
through the loom, will all but eliminate this crossfire concern for the engine builder/owner. (!)

(Note: For those readers who don't play with distributors on a daily basis,
when looking down on them (bird's eye view) the rotor spins in a clockwise direction.
Knowing this, you should be able to see the 1-8-4-3-6-5-7-2 firing order in the Vortec cap.)

****

Give this some thought, experiment with moving that #7 wire away from the #5 wire, and
see if you can't get your timing light to look the same on all 8 cylinders. Either this will
lead to a fix, OR it will be one more thing that we can add to the proven-good pile during
the Process of Elimination.

Happy hunting!


From watching the timing light flashing there is definitely extra sparking going on compared to other cylinders that are not misfiring.
Im sure i have a ignition problem but every single part is new and not fixed a thing.
 

Attachments

  • IH -- Cylinder 5 and 7 crossfire prevention tech bulletin pg 1.jpg
    IH -- Cylinder 5 and 7 crossfire prevention tech bulletin pg 1.jpg
    69.9 KB · Views: 48
  • IH - Cylinder 5 and 7 crossfire prevention tech data pg 2.jpg
    IH - Cylinder 5 and 7 crossfire prevention tech data pg 2.jpg
    83.1 KB · Views: 44
  • Classic sequential Chevy V8 distributor cap.jpg
    Classic sequential Chevy V8 distributor cap.jpg
    89.7 KB · Views: 47
  • Vortec 7.4 distributor cap firing order visible-.jpg
    Vortec 7.4 distributor cap firing order visible-.jpg
    124.9 KB · Views: 45
Last edited:

Road Trip

Supporting Member
Supporting Member
Joined
Jul 8, 2023
Messages
1,190
Reaction score
3,465
Location
Syracuse, NY
2 Sets of new plug wires. AcDelco stock style, Second set Taylor 8MM. No real change.

Re: Spark plug wire construction. Assuming that your wires are working
as originally designed, here's a short list from worst to best:

1) Solid wires. Super RFI transmitters, completely tears up radio reception on old
points/condenser vehicles. Same/worse interference for computer-controlled
cars, not recommended despite being robust & lasting a long time. Note:
Rarely seen anymore, no need for this nonsense given the availability
of #3 below.

2) Carbon or carbon/graphite core spark plug wires. Affordable, relatively quiet
due to higher resistance/lower amperage in circuit, and combined with
resistor spark plugs would deliver plenty of 'quiet' performance for
millions of customers. Countless cars popped off the assembly line
wearing these. (Note: They are considered a wear item, and require
periodic replacement so that the owner doesn't have to become a
meteorologist due to moisture.)

You must be registered for see images attach


3) Best of both worlds. Solid, wire-wound spark plug wires provide robust
construction, but at the same time minimum RFI thanks to inductive/magnetic
core design properties:


You must be registered for see images attach
(credit: chevyhardcore.com LINK)


****

Don't know what you are currently running, but I know that in reply #248 that
you had to replace a couple of bad wires? And more recently you mentioned
moving from AC/Delco to Taylor 8mm wires & no change? I *think* Taylor
offers both carbon core (more affordable) & wire-wound versions?

Nothing definitive at this point, but just another variable to consider.
Also, we have to decide if the extra flashing is just a false positive
on a 'too sensitive' piece of test equipment, or if this extra flashing
is over the threshold required to give your engine the shake, rattle, & roll?
 
Last edited:

Road Trip

Supporting Member
Supporting Member
Joined
Jul 8, 2023
Messages
1,190
Reaction score
3,465
Location
Syracuse, NY
I have not mentioned it for a while cuz i just had better things to work on and am tired of it anyway but just in chase ANYONE has a suggestion im listening.

OK. In our 1st scenario, I feel confident that we really wallowed around in all
things having to do with the ignition system distributing sparks, GMT400 style.

And we decided to check this area out 1st mainly because we could easily
prove/disprove the troubleshooting theory for no money spent. So, just in
case you don't find anything wrong in your truck's ignition system, then let's
move on to the 2nd area that we need to prove to ourselves that it is NOT the
root cause of your misfire:

Scenario #2: Unknown valve springs from donor motor -- Good Enough? And are all 16 equally healthy?
(Q: At some point in time did the donor motor sit for years without turning over?)

I should explain. I've bought used vehicles that were rough-looking, but the PO had driven them
every single day. The vehicle was worn-in, not worn out. And without any real effort on my
part, the car would just give & give, thankful that I saved it from the boneyard. :0)

On the other hand, I've bought used cars that were very easy on the eyes. Way less miles on the
odo. A barn find. A diamond in the rough. As a matter of fact, the car hasn't budged in years.

So I bring it home, get it running, and then the real fight begins. So flaky, such erratic performance,
I'm pulling my hair out, & rue the day that I ever crossed paths with this used car prima donna.

Alright, now that the stage is set, here's the punchline. In the first car that was 'worn in' thanks
to daily usage? IF you were to pull all 16 valve springs, I'll bet you a dollar that all 16 stand
equally tall when lined up next to each other. And if you were to measure the spring pressure
at both the installed height & the max cam lift height, the numbers would all match.

Meanwhile, remember that barn find, low-mile, cream puff? Well, sure after cleaning up the
fuel system, a full tuneup, a fresh battery, etc., well of course I got it to run. But guess what?

Let's say that engine sat for a dozen years without ever being cranked over once? It was
frozen in place, just like the odometer. What a lot of people don't realize is that most (but
not ALL) of the valves were closed, and those springs stood tall. BUT at the same time there
were a handful of valves that stood wide open or close to it (because of where the associated
cam lobe stopped previously) the whole time the car sat pre-barn find!

And if you took all 16 valve springs off of the heads & lined them up side to side, you would see
2-3-4 of the valve springs that would stand shorter than their brothers & sisters. (!)
And if you are working in a detail-oriented machine shop, those same shorter springs would
measure with less spring pressure than the taller ones.

And here's the kick in the head -- you were hot onto this troubleshooting path as you
documented in reply #657...but you hit a showstopper on the 4th valve spring & had to
unwind this repair attempt. That sux:

Tried to change the valve springs last weekend and can't do it.
I had 3 changed but when i got to the 4th pictured the spring retainer would not clear the exhaust valve guide. Was pretty bummed and had to change the other 3 back to the old springs

Listen, if the machine shop was working as the owner no doubt expects it to,
they would have checked all 16 valve springs carefully on a tester, and would
have thrown up the flag if they discovered what I described above.

But, given the 6 upside-down springs, I agree that the new guy/apprentice/trainee
must have omitted this test step & just threw it together?

Q: Is is possible that you could remove all 16 springs and they ALL test good?
A: Absolutely. In the land of computers, we would state that we could not
predict if the machine was reliable. Or that it was unreliable. Given the
circumstances, in it's current state, it is simply an unknown.

But by the same token, your original motor that ran so smooth? I bet that
those springs might measure a little weak...but that they would all measure the same. (!)

****

And the thing about valvesprings is that they do not behave in a linear fashion. As
a matter of fact, they can go from stable to oscillating wildly when you hit their
resonant frequency. And while the tiny valves in a 4-valve DOHC Honda require
relatively light, low-stressed springs, the pushrod big block Chevrolet has big
heavy valves for big heavy breathing, and you need some righteous springs in
order to keep all that reciprocating valve train in control.

Now some would argue that normally you are at/above the recommended RPM
limit before the valve springs break into oscillation, but in this barn find scenario,
maybe 12 valves are still OK...but the remaining wounded soldiers that have
taken a new set could possibly act up & create valve bounce (ie: erratic misfires
in primarily 1 or 2 cylinders) when it shouldn't be happening?

****

In another thread I was talking about Spintron this and shimmy shake that
when it came to the secret world of pushrod valvetrains, so instead of
repeating all that, I'd like to ask you to instead follow this link and at the
very least watch the strobe light/super slo-mo videos of what we ask
our valve springs to do for us thousands a time per minute. (LINK)

****

Summary / Recommendation:

Keep all this in the back of your mind as Plan B while you sort out
the ignition system & find the root cause over there. And then try
to forget that you ever read all this. :0)

But what I learned as a troubleshooter is that if whatever I was
currently trying on a balky beast (and it was the *only* working theory that I had)
...then I was crushed when it didn't solve the problem.

So now, I always have Plan A (the best plan), Plan B (defensible from
casual scrutiny) ...and Plan C. (blue sky Hail Mary special!)

And 'D' stands for Dynomite!

****

Please treat the above purely as food for thought, and if necessary we'll
revisit it if/when Plan A doesn't pan out.

Cheers --
 

Attachments

  • Valve spring tester Rimac1000.jpg
    Valve spring tester Rimac1000.jpg
    134.8 KB · Views: 4
Last edited:

Spareparts

Supporting Member
Supporting Member
Joined
Aug 12, 2021
Messages
1,139
Reaction score
1,557
Location
North Idaho
I could have gotten a cap but not from my favorite parts store. I would rather wait for one from Orilley's then buy one from Autozone. Road construction between me and Napa and i did not want to deal with it waiting in traffic.

Lots of food for thought here but let's go with valve springs first. The core engine i bought had only been sitting less than a week.

Cranking compression is good so at least then the valves are closing properly. Thought about weak springs but the misfires should get worse as rpm rises i would think and at 5.2k rpm i can't feel any valve float. I don't believe it's a compression or valve problem.

I can do and have done a injector balance test twice. They all preform within gm spec, ± 4lbs IIRC. FP does not bleed off so not leaking either. So i have to believe they are operating properly.

All that i have done has not really changed the misfires much at all and it's been a LOT.

The only real solid clue is watching the light flash on the timing light. it is NOT steady flashing like it should be. Some cylinders are worse than others and #7 is nearly flashing constantly.

I have an inductive style and clamps over the wire. I tried and it will not flash unless it is clamped on to the wire fully.
The wires are Taylor 8MM spiro something or other. Im pretty sure they are working as intended.


Progress is being made.
After changing the rotor i can say without a doubt the engine is running better than it ever has (YEAH).
I really think just changing the cap with another new one for the 4th time will not change the problem but what the heck i have it now.
Interesting thing is 2, 4, 6, 8 are just laying everywhere they want without being in the wire holders cuz i got lazy and there are a few random misfires.
1, 3, 5, 7 are in the wire loom and has more misfires for sure.
Im going to take the wires out of the holders and just let em lay where they want like the other side and see what happens.

Sorry if i missed something but after working nearly 12hr a guy gets kinda tired.
 

Scottm

I'm Awesome
Joined
Aug 24, 2021
Messages
305
Reaction score
231
Location
AZ
What would happen if you clipped the timing light on the coil wire? It should flash every 90 deg on the damper, but also let you know that the coil is firing every time.
 

Schurkey

Supporting Member
Supporting Member
Joined
Jan 14, 2018
Messages
11,379
Reaction score
14,435
Location
The Seasonally Frozen Wastelands
1, 3, 5, 7 are in the wire loom and has more misfires for sure.
Im going to take the wires out of the holders and just let em lay where they want like the other side and see what happens.
As said previously, #5 and #7 are the critical pair. KEEP THEM SEPARATED.

Lotsa guys run them next to each other in the loom, 'cause is looks organized and pretty. GM puts at least one other wire between 5 and 7 in the looms.
 

L31MaxExpress

I'm Awesome
Joined
Apr 21, 2018
Messages
6,225
Reaction score
8,283
Location
DFW, TX
As said previously, #5 and #7 are the critical pair. KEEP THEM SEPARATED.

Lotsa guys run them next to each other in the loom, 'cause is looks organized and pretty. GM puts at least one other wire between 5 and 7 in the looms.
I mentioned that to him on a post he has in HP Tuners forum. The GM service manual has a diagram of the wire routing and it needs to be followed. The aftermarket wire looms I just put on the van have the wires routed correctly and they have 2x the spacing of stock. It definitely runs more smoothly between that and the shimmed up distributor.
 

Spareparts

Supporting Member
Supporting Member
Joined
Aug 12, 2021
Messages
1,139
Reaction score
1,557
Location
North Idaho
I went out and separated them, see how it works tomorrow on the way to work.
Trying to keep the two threads separate more or less but i keep checking in over there as Sirius has been trying but tuning is not the solution i was hoping for.
Wanna keep here all about my truck and all the info i discover, problems, solutions as a record for anyone here to use for what ever they see fit.
Until i get this problem ironed out tuning is little help. I have the stock tune loaded back up now until this problem is finally solved and tuning can do some actual good.
 

Road Trip

Supporting Member
Supporting Member
Joined
Jul 8, 2023
Messages
1,190
Reaction score
3,465
Location
Syracuse, NY
I could have gotten a cap but not from my favorite parts store. I would rather wait for one from Orilley's then buy one from Autozone. Road construction between me and Napa and i did not want to deal with it waiting in traffic.

Lots of food for thought here but let's go with valve springs first. The core engine i bought had only been sitting less than a week.

Cranking compression is good so at least then the valves are closing properly. Thought about weak springs but the misfires should get worse as rpm rises i would think and at 5.2k rpm i can't feel any valve float. I don't believe it's a compression or valve problem.

I can do and have done a injector balance test twice. They all preform within gm spec, ± 4lbs IIRC. FP does not bleed off so not leaking either. So i have to believe they are operating properly.

All that i have done has not really changed the misfires much at all and it's been a LOT.

The only real solid clue is watching the light flash on the timing light. it is NOT steady flashing like it should be. Some cylinders are worse than others and #7 is nearly flashing constantly.

I have an inductive style and clamps over the wire. I tried and it will not flash unless it is clamped on to the wire fully.
The wires are Taylor 8MM spiro something or other. Im pretty sure they are working as intended.


Progress is being made.
After changing the rotor i can say without a doubt the engine is running better than it ever has (YEAH).
I really think just changing the cap with another new one for the 4th time will not change the problem but what the heck i have it now.
Interesting thing is 2, 4, 6, 8 are just laying everywhere they want without being in the wire holders cuz i got lazy and there are a few random misfires.
1, 3, 5, 7 are in the wire loom and has more misfires for sure.
Im going to take the wires out of the holders and just let em lay where they want like the other side and see what happens.

Sorry if i missed something but after working nearly 12hr a guy gets kinda tired.

Good reply. And for what it's worth, the more careful someone is with
their troubleshooting, the more I want to read & learn from it.

So, the fact that I not only read the entire reply string...but also started taking notes
like the old days when trying to revive an old Cann bird that was repopulated
with one or more mystery Bad Actor parts from halfway around the world?
Take that as a tip of the hat.

By the way, if you check out the snapshot of the notes I took you'll
see stuff that I really liked. (19" of steady vacuum/Cloyes tru-roller in #250,
old engine both boxes idled smooth in #330, verifying grounds in #380,
58psi FPR in #396, exh backpressure check in #424, new crank sensor
in #452, new distributor & fuel injector balance check in #538, etc., etc.)

****

Anyway, I just read your last...and as you can see, this thread reads as a
detailed troubleshooting diary. And I think that between the combined
talent/experience in this forum the problem will be solved AND we will
know *why* it occurred for future reference. (!)

FWIW...
 

Attachments

  • Spareparts extended L29 troubleshooting highlights (sml).jpg
    Spareparts extended L29 troubleshooting highlights (sml).jpg
    252.9 KB · Views: 17
Last edited:
Top