Missing parking brake cable > heat-cracked brake shoes > crusty diff cover = old truck rabbit hole!
So as you all know, you can start working on one specific problem requiring
a fix, and then it just morphs into a semi-related 2nd area, and before you
know it you're working on a functionally unrelated yet geographically adjacent
3rd area.
****
It all started innocently enough. Time to get the annual NY state safety inspection
sticker. The CEL is still out thanks to sorting out the ignition system, so that's a big
hurdle out of the way. Slid underneath just to give a quick visual & make sure that
I'm not going to fail for something stupid/obvious.
And there it was, conspicuous in it's absence -- the parking brake cable to the RR
brake assembly is completely MIA? Hmmm...there's no fresh witness marks showing
recent removal? it's all crusty like it's been like this for many moons? How did the PO
get this thing past inspection for x number of years?
So that's problem #1. When I removed the axle & RR drum, I was surprised to see
that the friction material on the shoes were badly heat cracked between the rivets.
(10.5" 14 bolt FF, 13" drums)
Surprised only because the brakes were so smooth & quiet that I didn't think there
was any latent issues with the brake system? That's problem #2.
Alright, while I'm back there it looks like the rear diff cover has zero signs of being
disturbed? You know, no excess goo ringing the cover, the bolts all match & look like
they were undisturbed, etc.
That's no showstopper, I'll just service the diff with fresh fluid while I'm under here.
But the amount of scaly rust made me lose confidence in the integrity of the cover.
It had never leaked, so the amount of rust was impressive. (Here in the rust belt we
actually see engine oil pans start to weep oil from pinholes in the sheet metal from the
rust. (!) So sourcing a new cover was problem #3.
****
So I've got a few photos that cover the deep hole I ended up digging for myself in the
brake system, but tonight's show & tell is only about the rear diff cover.
Purely out of curiosity I took a brief look at the aftermarket diff covers. Even though
some of them are pretty spendy.
Then I found the Gale Banks diff cover videos on YouTube, and via a custom clear plexi
see-through cover he gave me some interesting insight on gear lube dynamics under the
cover at highway speeds. (LINK)
Especially what happens when the $$$ flat-faced aftermarket covers don't guide the gear
oil back up to where the ring/pinion intersect?
After it was all said & done, it reminded me that when you make changes to a part of the
truck that's contrary to what the factory part delivers by design...you better have a really
good reason why. (!)
Given the above, I decided that I'd like to replace the too rusty cover with a new one (made
to OEM specs) ...or maybe a NOS part, or even a clean, rust-free used one I could swap in?
Some sellers threw a coat of black paint on covers that were as rusty as the one I had, and
then had the cajones to ask $50+ for it? I seriously considered new & be done with it, but I
couldn't tell if they were made with as thick a gauge of steel as the one the truck originally had?
Good news -- I found a used rust-free 14 bolt diff cover from a ebay seller in Cali for $14?
Sure, it was a bargain because it had a cosmetic dent in it, but it looked like it was finesseable?
Of course, with shipping & NY sales tax it was closer to $30 to the door...but I consoled myself
that it was a fraction of the price of admission for the big ticket aftermarket covers. :0)
OK, without further ado, here are the photos that you have been waiting for:
Dented diff cover. It looks exactly the same in person that it did on the ebay auction. Here in the rust belt this is a rust-free gem!
A couple of minutes with the ball end of a ball-peen hammer, working the dent out backwards from how it was made. (outside in, not the center 1st)
Note: The trick that I read about that works best for me is to visualize how the dent was made, and then try to hammer it back out as if you were watching the dent creation video being played in reverse. (All those times that I used to go right for the highest point in the dent first was exactly wrong!) In English, I circled the periphery of the dent with the ball peen hammer until it was all but gone. Then I switched from ever tighter circles to long, sliding hammer blows in order to honor the curvature.
Maybe not good enough for the center of the hood, but not too shabby under the 8' bed of a chore truck. :0)
Of course I proceeded to toss the cover into the blast cabinet, where all surfaces were cleaned up:
The interior surface post blast cabinet. The gasket/sealer should adhere plenty alright. Who knows -- maybe surface micro-dimpling = better gear oil toss? ;0)
The outside looked good enough to paint. And I did, which would explain the paint seen on either side of the ring gear relief. But there was a tiny shadow of the original
dent still visible...not from a normal person's perspective, but of course the camera made it look like the Grand Canyon -- so I decided that a little more free practice cosmetic diff cover bodywork was in order. (What can I say? @johnckhall has really raised the underbody bar with his extremely tasty frame resto, so I have no choice but to bring this cover repair up a notch. :0)
Straight Bondo has no strength. JB Weld is overkill. But as Goldilocks would say, aluminum filler is just right. Here it has dried, and ready for sanding.
De-dented Cast Blast painted Cali cover on left. Original cover after 24 winters in upstate NY on right. NOTE: Oil residue is from the removal process, not a leak.
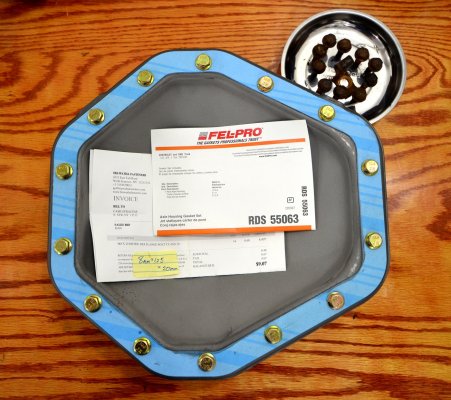
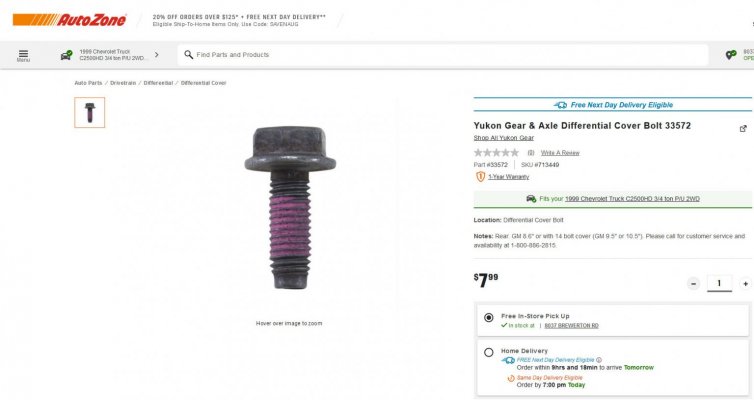
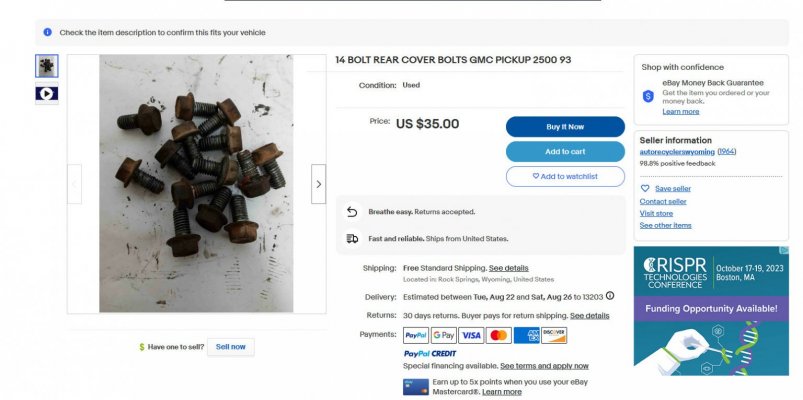
I also have a fresh Fel-Pro gasket, plus 14 new factory-style flange bolts. (The old bolts were pretty crispy.)
Anyway, I don't know if in the long run I actually saved any money by buying a dented
original cover...but I just look at working the dent out as a free practice session where
I could bust some rust off of that skill in an out of the way area. And if it doesn't hold up?
I'll take pics & rework it with the really good stuff: JB Weld, the time-honored 2-part epoxy
New Truck in a Tube! :0)
Besides, being an original part the Cali cover is robust and is confidence-inspiring. I'll get
that cover installed...and then know that I can now place this area into the 'no worries' pile.
More on the brake stuff in a following post. Got some good info & photos on setting
the rear wheel bearings up for success.
For what it's worth. Cheers --
So as you all know, you can start working on one specific problem requiring
a fix, and then it just morphs into a semi-related 2nd area, and before you
know it you're working on a functionally unrelated yet geographically adjacent
3rd area.
****
It all started innocently enough. Time to get the annual NY state safety inspection
sticker. The CEL is still out thanks to sorting out the ignition system, so that's a big
hurdle out of the way. Slid underneath just to give a quick visual & make sure that
I'm not going to fail for something stupid/obvious.
And there it was, conspicuous in it's absence -- the parking brake cable to the RR
brake assembly is completely MIA? Hmmm...there's no fresh witness marks showing
recent removal? it's all crusty like it's been like this for many moons? How did the PO
get this thing past inspection for x number of years?
So that's problem #1. When I removed the axle & RR drum, I was surprised to see
that the friction material on the shoes were badly heat cracked between the rivets.
(10.5" 14 bolt FF, 13" drums)
Surprised only because the brakes were so smooth & quiet that I didn't think there
was any latent issues with the brake system? That's problem #2.
Alright, while I'm back there it looks like the rear diff cover has zero signs of being
disturbed? You know, no excess goo ringing the cover, the bolts all match & look like
they were undisturbed, etc.
That's no showstopper, I'll just service the diff with fresh fluid while I'm under here.
But the amount of scaly rust made me lose confidence in the integrity of the cover.
It had never leaked, so the amount of rust was impressive. (Here in the rust belt we
actually see engine oil pans start to weep oil from pinholes in the sheet metal from the
rust. (!) So sourcing a new cover was problem #3.
****
So I've got a few photos that cover the deep hole I ended up digging for myself in the
brake system, but tonight's show & tell is only about the rear diff cover.
Purely out of curiosity I took a brief look at the aftermarket diff covers. Even though
some of them are pretty spendy.
Then I found the Gale Banks diff cover videos on YouTube, and via a custom clear plexi
see-through cover he gave me some interesting insight on gear lube dynamics under the
cover at highway speeds. (LINK)
Especially what happens when the $$$ flat-faced aftermarket covers don't guide the gear
oil back up to where the ring/pinion intersect?
After it was all said & done, it reminded me that when you make changes to a part of the
truck that's contrary to what the factory part delivers by design...you better have a really
good reason why. (!)
Given the above, I decided that I'd like to replace the too rusty cover with a new one (made
to OEM specs) ...or maybe a NOS part, or even a clean, rust-free used one I could swap in?
Some sellers threw a coat of black paint on covers that were as rusty as the one I had, and
then had the cajones to ask $50+ for it? I seriously considered new & be done with it, but I
couldn't tell if they were made with as thick a gauge of steel as the one the truck originally had?
Good news -- I found a used rust-free 14 bolt diff cover from a ebay seller in Cali for $14?
Sure, it was a bargain because it had a cosmetic dent in it, but it looked like it was finesseable?
Of course, with shipping & NY sales tax it was closer to $30 to the door...but I consoled myself
that it was a fraction of the price of admission for the big ticket aftermarket covers. :0)
OK, without further ado, here are the photos that you have been waiting for:
Dented diff cover. It looks exactly the same in person that it did on the ebay auction. Here in the rust belt this is a rust-free gem!
You must be registered for see images attach
A couple of minutes with the ball end of a ball-peen hammer, working the dent out backwards from how it was made. (outside in, not the center 1st)
You must be registered for see images attach
Note: The trick that I read about that works best for me is to visualize how the dent was made, and then try to hammer it back out as if you were watching the dent creation video being played in reverse. (All those times that I used to go right for the highest point in the dent first was exactly wrong!) In English, I circled the periphery of the dent with the ball peen hammer until it was all but gone. Then I switched from ever tighter circles to long, sliding hammer blows in order to honor the curvature.
Maybe not good enough for the center of the hood, but not too shabby under the 8' bed of a chore truck. :0)
Of course I proceeded to toss the cover into the blast cabinet, where all surfaces were cleaned up:
The interior surface post blast cabinet. The gasket/sealer should adhere plenty alright. Who knows -- maybe surface micro-dimpling = better gear oil toss? ;0)
You must be registered for see images attach
The outside looked good enough to paint. And I did, which would explain the paint seen on either side of the ring gear relief. But there was a tiny shadow of the original
dent still visible...not from a normal person's perspective, but of course the camera made it look like the Grand Canyon -- so I decided that a little more free practice cosmetic diff cover bodywork was in order. (What can I say? @johnckhall has really raised the underbody bar with his extremely tasty frame resto, so I have no choice but to bring this cover repair up a notch. :0)
Straight Bondo has no strength. JB Weld is overkill. But as Goldilocks would say, aluminum filler is just right. Here it has dried, and ready for sanding.
You must be registered for see images attach
De-dented Cast Blast painted Cali cover on left. Original cover after 24 winters in upstate NY on right. NOTE: Oil residue is from the removal process, not a leak.
You must be registered for see images attach
I also have a fresh Fel-Pro gasket, plus 14 new factory-style flange bolts. (The old bolts were pretty crispy.)
Anyway, I don't know if in the long run I actually saved any money by buying a dented
original cover...but I just look at working the dent out as a free practice session where
I could bust some rust off of that skill in an out of the way area. And if it doesn't hold up?
I'll take pics & rework it with the really good stuff: JB Weld, the time-honored 2-part epoxy
New Truck in a Tube! :0)
Besides, being an original part the Cali cover is robust and is confidence-inspiring. I'll get
that cover installed...and then know that I can now place this area into the 'no worries' pile.
More on the brake stuff in a following post. Got some good info & photos on setting
the rear wheel bearings up for success.
For what it's worth. Cheers --
Last edited: