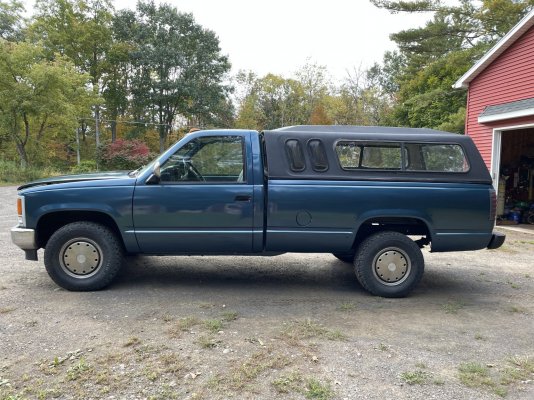
Bang for the buck Functional Renewal of rust belt '99 C2500

Disclaimer: Links on this page pointing to Amazon, eBay and other sites may include affiliate code. If you click them and make a purchase, we may earn a small commission.

Road Trip

Supporting Member
Supporting Member
Joined
Jul 8, 2023
Messages
1,117
Reaction score
3,185
Location
Syracuse, NY
Beautiful thread and a beautiful truck!
Thanks for sharing! Am I correct to assume there’s some photography going on here? These don’t seem to be typical cell phone pictures.
My pleasure -- this is all fun stuff! As for cheating with a camera, guilty as charged.
I'm running an older D7000 with 3 lenses I saved up for. Lots of times I'm guilty
of just taking a quick photo on full auto for documenting progress...but once in
awhile I'll take the time to compose a proper shot. Thanks for noticing!

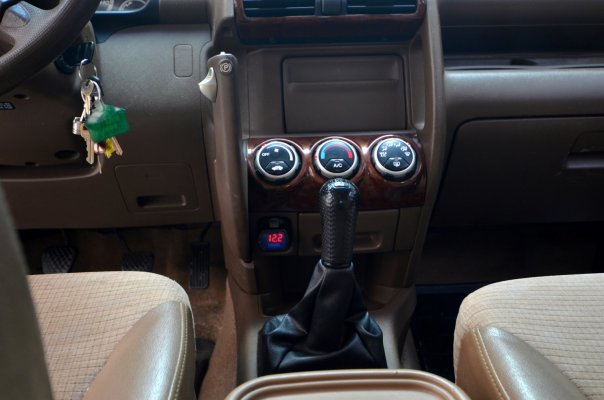
I like the idea of having two “old” vehicles too. Makes me want to find another old Honda. Maybe an awd wagon? Or first gen cr-v. I don’t hate my 2012 Tahoe, it just doesn’t have much soul and I’m not excited about it. I did love all the old Hondas I had though.

In order to fund other hobbies (audio, photography, and of course my daughters :0) ...I've been guilty of
driving as cheaply as possible in order to honor my 'stay out of debt/pay as I go' quality of life strategy.

Enter the used Honda as DD. Drove a couple of '89-'90 Civic hatchbacks, always with treasure yard suspension
upgrades stolen from Integra donor cars. (Large hollow sway bars, etc.) Always a hoot on the cheap.
Found a '92 Civic VX, 56mpg highway EPA rating, got it up to just over 60mpg after minor mods. Also
bought a high-mileage '01 2-seater all-aluminum Insight. Wore a bag over my head on the road while
enjoying a full 70mpg.

Back in '19, my then 30-year old Civic hatchback was finally rusting in a can't save way, and it needed
to be retired. Enter the '02 CR-V, an AWD w/factory 5-spd manual & K24A engine with all kinds of
power + economy tech inside. After adding a larger rear sway bar from a Honda Element & misc.
bushing upgrades, it drives much nicer than one would expect.

My DD. How I get 24city/30highway out of my 454ci '99 C2500 (And also protect it from as much salt as possible :0)
You must be registered for see images attach

NOTE: Best MPG seen to date is just over 30MPG from southern NH to Syracuse, NY. (See attached)

So, yeah, don't expect me to steer you away from a used Honda, especially if you've owned them
before. I know that between this & the chore truck I feel like all my bases are covered. :0)

Enjoying driving slightly different...
 

Attachments

  • 5-speed in 5th (sml).jpg
    5-speed in 5th (sml).jpg
    186.1 KB · Views: 35
  • 30mpg NH to Syracuse (sml).jpg
    30mpg NH to Syracuse (sml).jpg
    174.7 KB · Views: 36
Last edited:

Orpedcrow

I don’t know what I’m doing
Supporting Member
Joined
Aug 20, 2022
Messages
2,407
Reaction score
6,106
Location
East Texas
I love it! I have a xt100 with a handful of “cheap” lenses. (Lenses were the unexpected enormous expense for a hobby) but it’s fun. The goal mostly being bring-a-trailer ad quality photos.
Link to thread with edited photos
You must be registered for see images attach

There just isn’t the depth in cell phone photos, and the artificial bokeh bothers me.

I looked for a civic vx for a long time. I ended up with 3rd gen civics. An 86 hatch (1.5l, Weber, 5spd) averaged 38 mpgs , 87 crx (1.3l Weber and 4spd) averaged 42 mpgs and my favorite was the 86 civic wagon. It got a full 1st gen integra swap, 1.6 DOHC, fuel injection, 5spd. The earlier Hondas also used torsion bar front suspension and a live axle in the rear so the wagon got the stiffer integra components from the donor as well. It was a blast to drive but wouldn’t rotate around the front like the crx did.

(WARNING: Flip phone photos incoming)
You must be registered for see images attach

You must be registered for see images attach


Yes that is a very rare folgers coffee can being used as a heat shield for my “CAI” :Moon: And a lawn mower battery… because racecar
 

Road Trip

Supporting Member
Supporting Member
Joined
Jul 8, 2023
Messages
1,117
Reaction score
3,185
Location
Syracuse, NY
I love it! I have a xt100 with a handful of “cheap” lenses. (Lenses were the unexpected enormous expense for a hobby) but it’s fun. The goal mostly being bring-a-trailer ad quality photos.
Link to thread with edited photos

There just isn’t the depth in cell phone photos, and the artificial bokeh bothers me.

I looked for a civic vx for a long time. I ended up with 3rd gen civics. An 86 hatch (1.5l, Weber, 5spd) averaged 38 mpgs , 87 crx (1.3l Weber and 4spd) averaged 42 mpgs and my favorite was the 86 civic wagon. It got a full 1st gen integra swap, 1.6 DOHC, fuel injection, 5spd. The earlier Hondas also used torsion bar front suspension and a live axle in the rear so the wagon got the stiffer integra components from the donor as well. It was a blast to drive but wouldn’t rotate around the front like the crx did.

Small world, ain't it? I was looking for a clean used CRX as a commuter, and had to settle for
a standard Civic hatchback. You were looking for a Civic VX, and had to settle for a standard Civic
hatchback. And we cross paths while choosing to hang out on the far side of the 4-wheeled
continuum...the GMT400 forum. Good stuff!

****

FWIW, here's 3 images I have left from when 2 friends & I were experimenting with 3 VXs that we
brought back to VT in order to commute to the airbase. The first item is the window sticker for
a VX that my friend Steven had purchased. This is what I show people that don't believe that
Honda made a lean-burn '92-'95 Civic hatchback that got 47mpg city / 56mpg highway. (!)

And since they lightened up the car as much as possible, the 90hp VTEC-E motor (D15Z1) was
actually a lot of fun when you weren't busy chasing the elusive lean-burn mode.

You must be registered for see images attach


Because the only VX I could find was a high mileage unit in rough shape down in FL,
not too long after I started driving it I decided to pull the motor, freshen it up with
new oversize pistons, rings, bearings & gaskets. I also reworked the cylinder head in
order to try to get the small lean-burn window to work a little higher up the torque/hp
curve before reverting to the conventional A/F ratio mode.

You must be registered for see images attach


The Civic VX took to tweaking well. Without any more effort than steady inputs it was
easy to sustain 60+ mpg on the interstates & state highways. And low 50s around
town. (Shown here with an arduino-based MPG calculator.) These were fantastic cars -- never understood why they didn't catch on?
You must be registered for see images attach


Here's my 1.5L/4-speed manual '90 Civic hatchback when I was living up in the Bolton Valley ski area. With (4) Hakkapeliitta snow tires
& a good e-brake the morning descent & evening ascent was the highlight of my daily commute. :0)
You must be registered for see images attach


You must be registered for see images attach

2156 lb curb weight, riding on Eibach springs, KYB struts, Integra large diameter hollow sway bar front, Civic Si rear sway bar, ultralight Enkei Civic VX wheels,
and Insight aluminum rear brake drums all combined for go-kart handling & decent ride (due to minimal unsprung weight) on a no-frills budget.
Low-key stock-appearing handling sleeper.

Of all the Hondas I've owned, the rational Road Trip would want one more pristine EF hatchback with a Civic VX lean-burn engine installed.
50-60+mpg along with those huge windows. (Including the rear ones that pivot open & pull such great ventilation through the car.)
NOTE: The stock motor for a '90 hatch was only 70hp, so imagine having a 20hp increase & a 50%+ increase in economy. Ahh, the
wonders of the 5-wire O2 (wideband A/F) sensor & dual-CPU ECU setup!

****

Speaking of revisiting an old favorite, if anyone is taking those old Civic wagons & putting the newer K24 motor in it, that is
something that you should consider. In CR-V tune, the K24a is good for 160hp at 6000rpm + 162 ft/lbs of torque at 3600rpm!
Over 200hp in higher states of factory tune -- all natuarlly aspirated...they would give that old Folger's can something to do! :)
And all that & still good gas mileage. That old Civic wagon must have turned heads! Very cool.

****

Again, pleasure to cross paths with a fellow old Honda devo. And also photography geek...I would have bet real money that I'd never
read the word 'bokeh' here in the GMT400 forum. :0)

Cheers --
 
Last edited:

Road Trip

Supporting Member
Supporting Member
Joined
Jul 8, 2023
Messages
1,117
Reaction score
3,185
Location
Syracuse, NY
'99 C2500 'JD7' rear drum brake re-assembly wrap up (picking up from reply #79)

Just to show that I didn't lose interest in the rear brakes after I took them apart, here
are some photos showing it all going back together. Photos please:

As promised, new oil seals were installed on both left & right brake drums. (National #2081, same as what I removed. Nice fitment, no install drama.)
You must be registered for see images attach

A couple of tips for first-timers. Be sure to lightly grease this seal lip & corresponding axle surface so that the rubber lip doesn't rotate dry & burn up during initial use. Second, after
the truck is all put back together I'll be sure to do a short series of full left & full right turns in a parking lot in order to get some 90-wt sloshed down the axle tubes to
these wheel bearings. Possibly overthinking this, but just want to be sure that these fellas are happy & living that 'well-oiled machine' lifestyle. :0)

Backing plate reinstalled & torqued. New wheel cylinder. New parking brake cable. Laying that solid foundation for all the moving bits...
You must be registered for see images attach


Went with AC/Delco shoes. I liked the look of the friction material, everything fit together as one would hope. (!)
You must be registered for see images attach


When you are forced to take something apart that is *really* running super smooth, give yourself some breadcrumbs in order to put it back exactly the same way.
You must be registered for see images attach

This is such a simple trick, but I had to learn to do this by not doing it & suffering the vibration troubleshooting consequences afterwards.

Sometimes the PO was not a dufus, but instead had spent some quality time indexing everything
for total overall minimal vibration and/or runout over the entire system -- either by trial & error on
the road, or possibly even using a dial indicator like the Service Manual shows us? The proof is in
the pudding...so whenever I test drive something I'm going to work on, and it is *that* smooth, I
always leave myself a few engraver breadcrumbs to follow for good measure.

NOTE: Also handy if the vehicle is going to be apart for awhile -- tiny hints you leave your future self
are sometimes a real blessing weeks/months later. Who'da thunk? :0)

Of course, if during the pre-fix test drive the truck dog tracks down the road shivering at speed from
all the bent parts & accumulated imbalances stacking up, then engraving arrows to put it all back exactly
the way you found it is nonsense. But my problem was the exact opposite -- the chore truck ran way
more smoothly than it had any right to.

And after all this rework back here I didn't want to put it all back together, only to have a brand new vibration
to troubleshoot -- one that I had inadvertently installed since the parts could legally go together any number
of ways.

Fingers crossed the truck plays just as nice post repair as it did before I opened it all up. :0)


View of the completed rear drum brake assembly from the tire/wheel perspective. 100% 'as new' functionality, from drum friction surface through backing plate.
You must be registered for see images attach

The easiest place to do the hard work in in your own garage/shop/backyard. The hardest place? On the side of the road w/traffic whizzing by. :-(

Given this, our plan to go get the occasional rust-free vehicle from down south & trailer them back using this chore truck, it just makes sense
to put the brakes together so that they are as close as possible to the same functionality/capacity/reliability as when they were originally made.

****

In my next posting I'd like to focus on how to set up the rear bearings so that they remain smooth & quiet.
There seems to be more than the normal amount of misinformation out there surrounding these, so I'll try
my best to reason through it all.

Thanks for checking in on the status of my old chore truck...
 
Last edited:

Road Trip

Supporting Member
Supporting Member
Joined
Jul 8, 2023
Messages
1,117
Reaction score
3,185
Location
Syracuse, NY
The Wrong Way...and then the Right Way to Pre-load the Tapered Roller Wheel Bearings in your Full Floater (A cautionary tale)

(Note: The target audience for the following would be someone new to GMT400-era repair, and grew up never having to set up front or rear bearings like this before.)

****

Alright, I've got a couple of agendas I want to service here.

#1) Before doing any repair work on your truck, first read through the applicable section of
the GM Service Manual for comprehension. And if the hand-drawn illustrations don't give
you everything you need (guilty) ...then go right ahead and watch one or more YouTube
videos for a demo.

#2) Trust but Verify. And IF the supremely confident youtuber mechanic is telling you the same story that the GM
Service Manual does, then you should be good to go. But IF their story deviates from the manual, and especially if
they don't make specific mention why they deviated, then Caution! Caution! (remembering Bitchin' Betty :0)

****

So I'm going to lay out the rest of this 'How To' in the following sequence.

* The Wrong Way first -- just so we all know what to watch out for.
*
The Right Way per the bearing manufacturer. (Timken)
* The Right Way per the GM Service Manual. (And take note how these 2 will match.)

Without further ado, here's the 1st YouTube video.

xc_hide_links_from_guests_guests_error_hide_media


Ask yourself, how many ft/lbs of torque did he finally end up with?
And ask yourself, where *exactly* where does all this torque (multiplied by
the mechanical advantage that the thread pitch provides) end up being
concentrated?

That was the very 1st video I found. And I was scratching my head, for
this didn't seem to jibe with what the service manual was describing?

So I went looking for a 2nd video. And this guy seemed very confident
that he was sharing the good stuff with the viewer:

xc_hide_links_from_guests_guests_error_hide_media

Yikes! Another 'If some is good, Then more is gooder' dude. According
to the Timken video AND the GM Service Manual below, this guy is
extra-confidently sharing bad guidance.

****

In order to better understand what those 2 previous videos were doing, I
want to show you *exactly* where a lot of that pressure is being concentrated:

Vehicle Wt + load is on face of tapered rollors to race. Excess preload only adds to this workload, and will be enough to squeeze
the lubricating film out & cause the roller/race interface to run dry > overheat > fail. (Watch Timken video below.)
In addition, excess force will also be concentrated where scribe is pointing.

You must be registered for see images attach

Note: This is one of the used Timken bearings I found in the chore truck. They looked as new & spun smooooth, so back in they went.

Now, maybe someone like @GoToGuy can do the math & figure out what 35+ ft/lbs x the thread pitch
will give us for clamping force...and then further figure out how many square inches of roller face + roller shoulder
contact points are available to spread all that clamping force out on?

But I'm telling you, if you spend a few moments at this web page...if you are
like me the hair on the back of your neck will be standing up. (Clamp Force calculator)

In English, the PSI loadings between the individual roller contact points & the bearing race from setting the preload to 35+
ft/lbs are way too high! And here's a screen snap from the Timken video below that shows you what you will end up with:
You must be registered for see images attach


And judging from all the viewer comments under those first 2 videos, folks are confused
because of all the conflicting info they are seeing.

****

OK, after the first 2 erroneous videos I finally found some good stuff. As a matter of fact,
since my chore truck came with bearings made by Timken, I wanted to see if maybe the company
that made my bearings had any guidance that also happened to agree with GM's Service Manual?

Now *THIS* is the video I really wanted to share. Hopefully you can better appreciate it after what
the 2 well-meaning but inaccurate dudes above told us:

xc_hide_links_from_guests_guests_error_hide_media


OK, for the punchline, here's what the '99 GM C/K Service Manual has for guidance:

NOTE: This procedure is actually under the "11 Inch Ring Gear" section. The "10 1/2 Inch Ring Gear" section
is similar, gives you the same result, but omits the ' .001" to .010" ' final cross-check? Instead of wondering why,
I'll leave this as an exercise for the reader to follow up & sort out for themselves to their satisfaction.

You must be registered for see images attach


So there you have it. Apologies for the length -- I realize a purely cookbook-style answer
takes a lot less reading/typing...but what I'm trying to achieve here is for the newer mechanic
coming up to speed to be able to reason through the process...so that if/when they
encounter mechanical guidance that's potentially destructive, they'll know that right away
thanks to having used the RTFM (Read That Fine Manual) method.

I watch as many youtube videos as anyone, but watching them after reading through the
Service Manual procedures makes for a better use of my prep time. Especially when dealing
with the precision stuff like adjusting these tapered roller bearings for a long service life.

Safe Travels via setting up your Tapered Roller Bearings for Success --

And as always, thanks for stopping in and checking in on how the Chore Truck is coming along. :0)
 
Last edited:

Road Trip

Supporting Member
Supporting Member
Joined
Jul 8, 2023
Messages
1,117
Reaction score
3,185
Location
Syracuse, NY
Now that we've slogged through all the bearing setup theory, here's a few
photos for your viewing pleasure.

Parts involved with adjusting/securing the 14-bolt FF rear wheel bearings laid out in order of assembly. (Plus the gasket for the axle.)
You must be registered for see images attach


Wheel bearing adjusting nut after setting it finger tight. Pretty close. Yes!
You must be registered for see images attach


Wheel bearing nut then backed off slightly until the nearest slot in the adjusting nut lined up with the matching slot in the axle. Key slides in as neat as you please.
You must be registered for see images attach


Now the locking ring is installed to preserve this exact adjustment until the next time the axles are removed. (Hopefully a long ways down the road! :0)
You must be registered for see images attach

NOTE: Just the barest wiggle-waggle clearance with this setup -- so close that I didn't bother to break out a dial indicator. (feels like a .001"-.002" total?)

By the way, both left & right rear wheel bearing assemblies easily passed the .001" - .010" clearance
per the GM Service Manual. And also within the tighter window specified by Timken in their video. (001"-.005")

Furthermore, back when the dinosaurs roamed the earth, I used to clean/repack the front wheel bearings in
countless cars using pretty much the same technique. And they always worked as advertised.

Last but not least, I am a true believer that ALL 4-wheeled vehicles are 4-wheel steering,
not just the GM Quadrasteer trucks. (LINK)

What I mean by this is that I've troubleshot 'loose steering' on a few cars (with
completely rebuilt front steering/front suspensions & still no joy) all the way back to the looseness
in the rear suspension (IRS cars) or excess play in the rear bearings in trucks like ours!
Like a boat with a bad rudder, excess play in the rear suspension means that the front
steering/suspension has nothing solid to pivot against down at the tire contact patch
level. (!)

Given this, I am predisposed to setting the rear bearings (if adjustable) as close to the
minimum side of the allowable window as possible -- but at the same time I'm not willing
to trade off service life via setting them too tight.

And the closer you get all this to correct, the wider the lanes feel when you are behind
the wheel & tooling down the local Interstate.

Hopefully the last couple of postings will help persuade those reading this to check their FF
rear bearings for play (easy, raise the tire/wheel just off the ground & feel for excess play/see
how much you can rock all this back & forth) ...and if necessary, bring this adjustment into the
specified window.

Hope this is helpful --
 
Last edited:

Road Trip

Supporting Member
Supporting Member
Joined
Jul 8, 2023
Messages
1,117
Reaction score
3,185
Location
Syracuse, NY
Ensuring the spare tire holds air & can actually be retrieved if needed

There's differing levels of bringing one of these trucks back. Mechanically
speaking, probably the easiest is to clean one up & make it the occasional
show & shine special. There's no shame in this at all, but at the same time
this allows you to relax just how robust you have to make each of the
mechanical subsystems function.

Probably the next level of difficulty is to make the truck a reliable daily driver.
The battery & charging system need to be 100%, and the drivetrain must
be just as ready to deliver on the promise as a new vehicle is.

And IMHO the highest level of a functional restoration is to expect an older
truck to be able to tow/haul the same way now that it did when it was
first manufactured. For me, this means that I'll (eventually) expect the
truck to pull a single car trailer down south & successfully return home
with a clean, rust-free vehicle riding aboard.

So, with that in mind I'm methodically going through the chore truck, with
the focus that anything I will be counting on during a road trip like this will be
ready for duty.

****

Alright, one guess at the state of inflation that I discovered the spare tire
was post truck purchase? Yup...it was exactly *zero* psi. And this wheel was the crustiest yet.

Obligatory blast cab In Process shot. Note that even the 'face' was corroded on this wheel thanks to years of being in the salt zone down below the bed.
You must be registered for see images attach


POR-15 Party. Note smooth 'internal to the tire' surfaces -- tire beads seal 100% & stay inflated when mounted onto rust-free steel wheel mounting surfaces.

You must be registered for see images attach


PO had kept spare tire crank assembly lubed, still works perfectly! Up, up, & away!
You must be registered for see images attach


New LT265/75 R16 spare tire was a freebie when neighbor decommissioned his SUV. Mounted/balanced on freshly restored wheel. 100% ready for roadside emergency.
You must be registered for see images attach

Note: Checked spare tire pressure a few months later, didn't lose a single pound. Fingers crossed Ready for Duty spare = won't be needed during future road trip(s)?

Keep this view in mind for my next (& final) photo of this round of repair...
 
Last edited:

Road Trip

Supporting Member
Supporting Member
Joined
Jul 8, 2023
Messages
1,117
Reaction score
3,185
Location
Syracuse, NY
Q: How do you eat an elephant?

A: One bite at a time.


Current status as of 23-Aug-2023. New shocks, 100% new rear brakes, new 90wt/new diff cover added to refreshed spare assy seen in previous post.

You must be registered for see images attach


By the way, with the new rear shoes adjusted for a light drag & the brake system bled,
the pedal was firm & confidence inspiring. And thankfully, during the extended test
drive the brakes were very smooth, and no new vibrations had been added by yours
truly during the teardown/rebuild of this area of the truck.

NOTE: The truck came with these LT265/75R16 tires. What a bonus...for almost any
used vehicle in my price range normally the tires are worn through all the way down
to the cords. :0)

****

Where do we go from here? I'm going to change the transmission fluid & try to read the
tea leaves in the bottom of the pan. Fresh antifreeze for the cooling system, possibly replace
the burned out bulbs
renew all the bulbs in the instrument cluster, and I think we're set for the
upcoming winter's tasking of treasure yard trips & also sitting 24x7 Alert in case my DD fails
to proceed.

Man, the longer this truck is around the more I like it. And yes, I absolutely look back at
the beast standing proud while walking towards the treasure yard with a big goofy grin
on my face. :0)

Same as it ever was...
 
Last edited:

Road Trip

Supporting Member
Supporting Member
Joined
Jul 8, 2023
Messages
1,117
Reaction score
3,185
Location
Syracuse, NY
List of known-good parking brake parts to fit a '99 C2500 with a 8-lug 14 bolt FF (or equivalent)

Alright, closing the loop on the rear parking brake renewal thread-within-a-thread with a list
of AC/Delco or GM part numbers. (Referring back to post #84.)

For what it's worth, I had less than no desire to learn any/all of the following -- I much prefer
working on engines & cylinder heads over sorting out the parking brake subsystem that had
been a victim of benign neglect for many moons. But that NY safety sticker is the prize...

I'm going to share the punchline first:

These parts all fit/worked as advertised. And if you live in the rust belt, this covers everything except the forward cable to the pedal assy -- I didn't need it.
You must be registered for see images attach


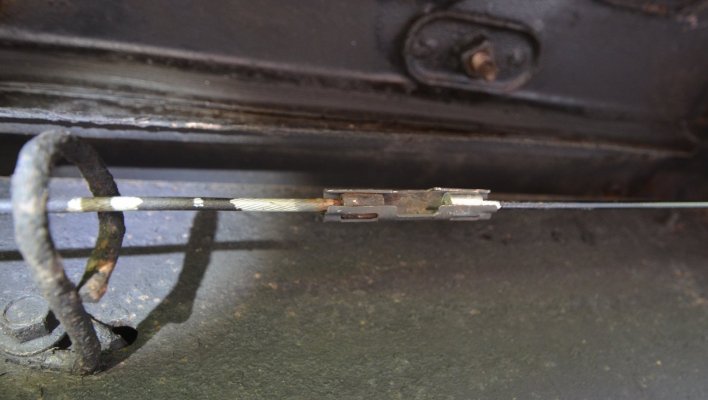
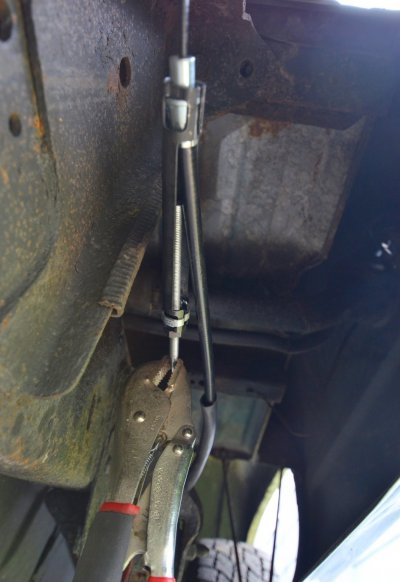
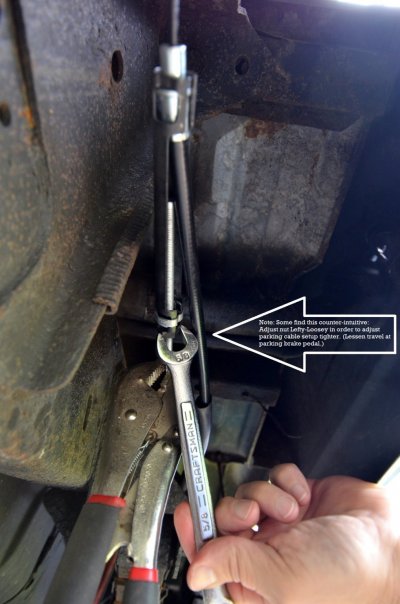
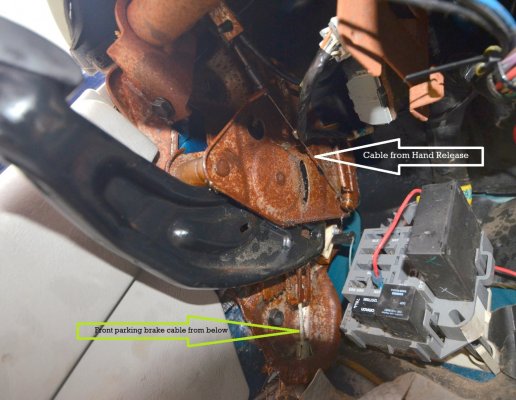
I've also attached 4 additional photos to help anyone trying to sort out their
parking brake cables to supplement the hand-drawn illustrations in the C/K
Service Manual titled "Park Brake Cable Replacement - Rear (1500 and 2500 Series)".
{'99 C/K Service Manual, Vol. 1, pp. 5-158}

NOTE: Once I adjusted the equalizer assembly properly, and then lubricated/exercised the partially-seized/rusty-from-disuse
parking brake pedal assembly in the cab, the springs at the ends of the new cables (inside the drums)
made the pedal assembly return to the home position when you pulled the hand release,
exactly as you would expect.

Works like new! Shoot, if I ever decided to upgrade from the 4L80-E to a NV4500,
I think I just fixed the hardest part of that upgrade -- a working parking brake for a stick! :)

Hope this proves helpful to anyone out there who's been stalled by conflicting listings when ordering these parts.
The AC/Delco stuff fit perfectly, but you really have to pay close attention to your truck's GVW ratings
to get the right parts in hand.
 

Attachments

  • stamped steel cable connector (sml).jpg
    stamped steel cable connector (sml).jpg
    160.3 KB · Views: 32
  • Equalizer for parking brake as installed (sml).jpg
    Equalizer for parking brake as installed (sml).jpg
    193.7 KB · Views: 32
  • adjusting e-brake cables (arrows sml).jpg
    adjusting e-brake cables (arrows sml).jpg
    220 KB · Views: 32
  • parking brake pedal assy (arrows sml).jpg
    parking brake pedal assy (arrows sml).jpg
    287.7 KB · Views: 32
Last edited:

JDGMC

Supporting Member
Supporting Member
Joined
Jul 20, 2022
Messages
54
Reaction score
96
Location
NY
Greetings fellow GMT400 enthusiasts,

Just about a year ago I heard through the motorhead grapevine that
an unusually clean (for upstate NY) older Chevy pickup was being
offered for sale.

I didn't get my hopes up, because it seemed that other people's
definition of 'clean' didn't seem to jibe with my own...by a long
shot! FWIW, my personal Prime Directive for buying my next
ride can be simply stated in 2 simple rules:

1) Don't care about the miles or the current state of the
mechanicals, but it has to be rust free.

2) it has to have a manual transmission!

Rust is bad juju. While I've been fortunate in buying
a series of low-cost vehicles that have given me more than they
have gotten...I eventually lost every single one of them
to rust. Not the outer surface cosmetic issues, but
the no-kidding showstopper stuff. (ie: the unibody where
the lower control arm is supposed to connect to is MIA.)

Of course, getting rid of a car that broke your piggy
bank and gave you nothing in return is always pure
joy to jettison. But when you lose a faithful
traveling companion that would run for you even
when it shouldn't have...that is the very definition of
sadness. (No doubt anyone reading this in an old
truck forum is picking up what I'm putting down. :0)

...but I digress. If you go here you can see a brief
description of the '99 C2500 drivetrain in my
Introduction thread.

But when I saw the truck in person, the truck just exuded
a quiet, heavy duty minimalism...the zen of a proper
work truck. (!) When the big block fired right up and
rumbled like Niagara Falls, I knew that this was going to
follow me home. :0)

Like my favorite aircraft (F-106 & SR-71) the GMT400
series has the same kind of classic 'form follows function'
styling that never gets old -- I actually prefer this less
busy look to today's offerings?

Finally -- enough of the setup. First, here's the truck after
a good cleaning / wet-sanding / machine polishing using
the Meguiar's Mirror Glaze product line:

You must be registered for see images attach


But in order to truly appreciate what a (relatively) rust-free unicorn
that this truck is here in Salt City, take a look at three other trucks
still on the road that I picked at random, all within 5 minutes of where
I'm typing this in:

Mechanic's daily driver at my favorite tire store. (Note: Photo taken late November '22 -- a frosty commute)

You must be registered for see images attach


Local Plow Truck:

You must be registered for see images attach


(Neighbor's newer lashed-up pickup)

You must be registered for see images attach


The Moral of the Story? Anything > 10 years old in Syracuse
is rarely seen. And almost always, if seen they aren't clean.

So...if my following posts seem to show successful old truck
ownership as an unrelenting focus on stopping rust before it turns steel to dust...
remember that I have no fear of mechanical issues, but at the same time these photos
definitely keep me up at night. :0)

Who'da thunk? Neil Young was right...
Lots of work and certainly a very detailed write-up. Very kind of you to take the time. I’m from the same area in Update NY and went through a 91 GMC C2500 that spent its entire life here. Went through it all - Frame, Cab bed, etc. You definitely did a much better job than I did resurrecting these rusty souls.
 

Attachments

  • IMG_5505.jpeg
    IMG_5505.jpeg
    554.1 KB · Views: 19
Top