'91 K1500 restoration...

Disclaimer: Links on this page pointing to Amazon, eBay and other sites may include affiliate code. If you click them and make a purchase, we may earn a small commission.

Hammack

Newbie
Joined
Apr 18, 2010
Messages
8
Reaction score
0
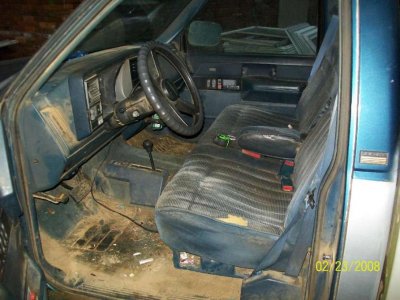
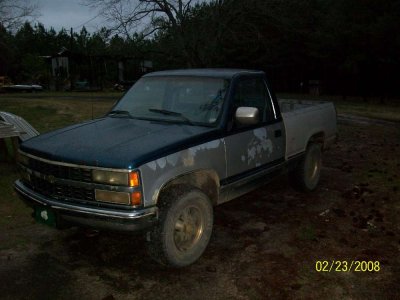
I posted this over on FSC but was invited by a member to this forum so I thought I would add it here as well. Hope all enjoy seeing the progress. This was my first truck and after many years and well over half a million miles I figured it was time to do some work to her. I haven't driven it much over the past few years except around the farm and when I was hunting or fishing. A year or so ago I built the motor,had the tranny rebuilt, rebuilt suspension, and replaced brakes rotors pads, and hub assemblies. So mechanically speaking it's in pretty good shape. Less than 6,000 miles on it since all of that was done. This is going to be mainly a cosmetic rebuild, and probably add a 14 bolt rear end as it is the last part on the truck that really needs overhauling. Here is the truck as it was when I started.
 

Attachments

  • truck3.jpg
    truck3.jpg
    94.6 KB · Views: 49
  • truck2.jpg
    truck2.jpg
    97.7 KB · Views: 43

Hammack

Newbie
Joined
Apr 18, 2010
Messages
8
Reaction score
0
Well I am probably doing this backwards from what would be ideal but I am working on what I can as I can get parts, but hopefully the end result will turn out nice. I started by removing the carpet, and then I founds some nice seats from a tahoe and decided to go ahead and get the new holes drilled, and modify the riser to fit.
You must be registered for see images
[/IMG]
You must be registered for see images
[/IMG]
You must be registered for see images
[/IMG]
 

Hammack

Newbie
Joined
Apr 18, 2010
Messages
8
Reaction score
0
Then I started pulling the rest of the interior. I had some surface rust on the passenger side floor pan from a leaking heater core a few years ago so I went ahead and sanded it down and sprayed with rust converter and painted.
You must be registered for see images
[/IMG]
You must be registered for see images
[/IMG]
 

Hammack

Newbie
Joined
Apr 18, 2010
Messages
8
Reaction score
0
Then more cleaning and removing...
You must be registered for see images
[/IMG]
 

Hammack

Newbie
Joined
Apr 18, 2010
Messages
8
Reaction score
0
I'll get back on tonight and try to get the thread caught up to where I currently am.
 

Hammack

Newbie
Joined
Apr 18, 2010
Messages
8
Reaction score
0
Ok, well after getting the interior cleaned and removed it was time to start going back. All of my interior was faded so I decided to paint them before going back in. Started with the dash.
You must be registered for see images
[/IMG]
I used SEM paint as I could get it locally, and from what I have seen it is the best product out there. I also had grown kind of tired of the solid blue so I figured I would break it up with a little grey to give it a difference look.
You must be registered for see images
[/IMG]
 

Hammack

Newbie
Joined
Apr 18, 2010
Messages
8
Reaction score
0
Then time to start installing it again.
You must be registered for see images
[/IMG]
You must be registered for see images
[/IMG]
You must be registered for see images
[/IMG]
You must be registered for see images
[/IMG]
They grey is actually a little darker in reality than it shows in the pics. It was a good compliment I thought.
 
Top