1993 Yukon crate motor hydraulic roller lifter cleaning and adjustment journey - (Solved)

Disclaimer: Links on this page pointing to Amazon, eBay and other sites may include affiliate code. If you click them and make a purchase, we may earn a small commission.

Road Trip

Supporting Member
Supporting Member
Joined
Jul 8, 2023
Messages
1,199
Reaction score
3,504
Location
Syracuse, NY
Jeez...Trying to get this thing going and , don't know what I'm doing wrong and don't want to mess something up.
Had everything ready to fire up and test this morning. Distributor all set up at #1 tdc compression I'm sure...but ...

Fired the truck up...Heard scary light knocking sounds... Maybe it was diesel sounds....shut it down after a couple of seconds....
truck had been through the lifter cleanings and all that so I figured maybe it was getting settled in... Fired it up again....
Lots of clattering...All lifters were noisy.... Truck was running ok though..... I walked around and listened.... I'm not sure I would say they were all clacking but really loud ticking?..

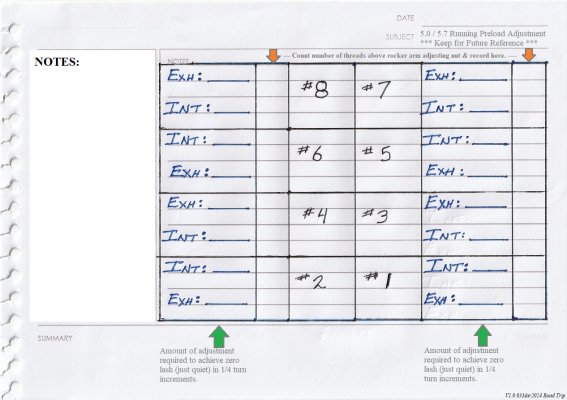
Turned it off. I had done 1/4 turn past zero lash using Schurkey's method. I mean, everything looked about where I thought it should be after finding zero lash and adding a quarter turn. That's where I had it before starting the project and it actually fired up noise free right before I committed to going in....

So I gave everything another quarter turn. Started truck and it was quieter... Was walking around listening where noises were and truck idled down a bit. I assumed it was going into closed loop but temp didn't seem high enough but I didn't have scanner hooked up.

So I shut truck off to set timing. Unplugged timing connector and fired truck up..... ran a little rough but I expected it a little...looked at timing and it was maybe 10 degrees advanced.... ..I went to turn distributor and turned wrong way and advanced it more....Truck sounded good...idled higher..woke up..... but I went back the other way to set to 0 and when I got to zero, the truck died...Now it won't start....

well, if I advance it a little it'll start....and lifters were getting quiet....but as soon as I turn distributor it'll die..

I've checked distributor and made sure I was on tdc #1 compression and the rotor is pointing to number 1 plug on the cap as far as I can tell....

I've heard of people setting in distributor 180 off but don't know what that looks like... I assume the rotor would not be pointing to number 1?
Tempted to shift wires 1 over but it really doesn't look right...
I'm tired so maybe I'm missing something obvious....

Obviously a little cautious because of all the lifters being cleaned and all....

hmm... sound like I'm off on the cap?

The last time I tried starting, I got cranking and then a little backfire out of the throttle body... Nothing big...Just a little pss...

Going to look again but I'm pretty sure it's going to be sitting at # 1 when I get tdc compression again....

is it possible that, because I started at tdc compression when doing Schurkey's method of zero lash, that I rotated 180 degrees to finish and forgot to put another 180 to get back to compression #1 ?

Alright, glad it started right up for you. That's a positive sign.

Re: diesel-like sound. Especially with engines with some miles on them, on a cold start the
pistons will make a discernible diesel-like knocking sound until they grow from combustion heat
to better fit the cylinder bores. According to GM this is not an issue requiring repair. Common
sense tells us that this is yet another reason to drive an engine we care about gently until it's
fully up to operating temps. This is expected behavior, and careful listeners will pick up on this
where most people don't notice anything out of the ordinary?

Re: The concern about the distributor being 180° out? The short answer is that it wouldn't have
started. A dizzy that's set correctly fires the plug towards the top of the compression stroke with
a combustible mix surrounding it. A dizzy that is 180 out (cam degrees, 360 crank degrees) fires
the spark plug towards the top of the exhaust stroke. Unburned mix + exhaust valve open + spark
usually results in backfire out the exhaust pipe. So your running engine confirms that the distributor is
correct, and within a few degrees of optimum?

Re: Preload setting. For everyday operation on the street, year-round, the 1/2 turn setting is the best
overall.

Re: Best initial spark timing. The factory setting is a good starting point. If you want to fine tune to
your engine, the fuel it's being fed, how hard the truck is being used, it's OK to add a couple degrees of
advance and then monitor for signs of spark knock. Depending upon how much carbon is in the combustion
chambers and how well your cooling system is functioning, you could safely add 2-4 degrees and enjoy
more responsive behavior & improved manners. Just don't get greedy.

Put some miles on it and let the ECM relearn what it needs to in order to harmonize the engine bay. (Remember
that you disconnected the battery to redo the intake.)

My hope is that you are close to crossing the finish line with this.

Best of luck --
 

scott2093

I'm Awesome
Joined
Apr 23, 2023
Messages
625
Reaction score
449
Location
Florida
Distributor was cocked wrong I guess. I moved wires around a few times in the last several minutes so maybe I was a plug off....
Fires right up...Real bad tick on passenger side...

Shut it off ...
Going back out there...Just wanted to update....


Just seeing your post RT....
I'll update how it goes from here.....

That's the thing, the truck never made any weird sounds at startup or anything until several weeks ago after I did the intake gaskets and attempted my first valve adjustment.
It always started strong and just normal...Quiet I guess....

These weird sounds are all new to me....
 

Road Trip

Supporting Member
Supporting Member
Joined
Jul 8, 2023
Messages
1,199
Reaction score
3,504
Location
Syracuse, NY
Distributor was cocked wrong I guess. I moved wires around a few times in the last several minutes so maybe I was a plug off....
Fires right up...Real bad tick on passenger side...

Shut it off ...
Going back out there...Just wanted to update....

If you decide to fine tune your setup via a running preload, it would be
interesting to collect the data as before. Did your cold adjustment put
everything exactly right, or was there a bell curve where some were a bit
loose (ticking) and others were a bit tighter than your goal?

I know that they only did the cold preload on the assembly line, but that's
a different animal than a used engine. If you make any adjustments then
please capture the data so that we can better understand what's going on?

Good luck --

PS: If you pulled an all-nighter, now that you have it running again, go get some
sleep, and when you return all this will be 10x less stressful. (Based on my own
personal experience. :0)
 

Attachments

  • Hydraulic Lifter running preload results data worksheet (v1dot oh) .jpg
    Hydraulic Lifter running preload results data worksheet (v1dot oh) .jpg
    378.1 KB · Views: 2

scott2093

I'm Awesome
Joined
Apr 23, 2023
Messages
625
Reaction score
449
Location
Florida
Will do...
I just need to figure out what in the world is going on with my timing.....

Good news is, it fired up with one clack...I think it's going to be great...

With timing wire disconnected, it will stall with anything below 15 degrees btdc....
I shut the truck off and it just so happens the rotor is pointing to Number 1 on the cap but balancer is coming up on 15 degrees btdc....

I don't understand. When I turn crank to see 1 e and I open and close, then bring around to the balancer mark... The rotor is pointing at number one on the cap....
...arrgghh..
Sounds like I need to put number 1 plug where number 8 is and go from there? Confused what I'm doing.... Tired..lol..pic was 6pm last night looks like........

I totally planned on doing a running preload...I took video I need to compare the cold to previous...do my screenshots........ Haven't done that....and will see what the running does too...
Just need the truck to warm up...For timing and adjustments...ha

Going to take a break and redo the distributor again....
 

Attachments

  • IMG20240312190017.jpg
    IMG20240312190017.jpg
    342.9 KB · Views: 6
Last edited:

Road Trip

Supporting Member
Supporting Member
Joined
Jul 8, 2023
Messages
1,199
Reaction score
3,504
Location
Syracuse, NY
Will do...
I just need to figure out what in the world is going on with my timing.....

Good news is, it fired up with one clack...I think it's going to be great...

With timing wire disconnected, it will stall with anything below 15 degrees btdc....
I shut the truck off and it just so happens the rotor is pointing to Number 1 on the cap but balancer is coming up on 15 degrees btdc....

I don't understand. When I turn crank to see 1 e and I open and close, then bring around to the balancer mark... The rotor is pointing at number one on the cap....
...arrgghh..
Sounds like I need to put number 1 plug where number 8 is and go from there? Confused what I'm doing.... Tired..lol

I totally planned on doing a running preload...I took video I need to compare the cold to previous...do my screenshots........ Haven't done that....and will see what the running does too...
Just need the truck to warm up...For timing and adjustments...ha

Caution -- 360° divided by 8 terminals = 45° change. Moving wires to chase a 15°
adjustment shouldn't be done unless you are also trying to fix an unwanted 30° distributor
twist too?

Q: What was the timing set to before all this started? Is it possible that the timing mark
on the harmonic balancer may have shifted? If it was me, I would try to verify that the
balancer is correct. But for right now I would let the engine tell me what it likes best.
Carefully advance the timing a little, drive the truck, watching the Knock Sensor count.

If all is well, repeat the process. It should run better as you add timing, but at some point
I would expect that the Knock Sensor count takes off. If you always drive the truck the
same way that you tested it, then back off the timing a couple of degrees from the last
setting and you should be good.

On the other hand, if after testing you attach a heavy trailer and start climbing grades,
then you may encounter more issues with spark knocking. Advancing the spark timing is
best done in small increments with a premeditated plan. (Ideally you verify the harmonic balancer
timing mark accuracy using the 'positive stop' method.)

If all of the above makes sense then proceed with caution. Be sure to write down the changes as
you go, for it is easy to lose track and then it becomes a mess. If you get lost, put the timing
back to factory and start over. NOTE: Heavily carboned up engines might need 89 or 91 octane
fuel in order to run stock timing. (referred to as increased 'octane appetite'.) Some mechanics
may instead elect to retard the timing in order to get the carboned up motor to run on 87 octane,
but the vehicle now drives sluggishly and you increase the risk of overheating.

The whole point of this explanation is to emphasize that spark timing is critical, should be changed
in small increments, and requires live data monitoring (at least periodically) to make sure that all
is still cool & copasetic. And also listening for pinging heading towards knocking?

In English, it may take a little playing with/fine tuning to maximize the return on your time/effort investment,
but take your time in order to get the most learning out of this opportunity.

Keep us updated. Best of luck --
 
Last edited:

tayto

I'm Awesome
Joined
Nov 11, 2020
Messages
776
Reaction score
817
Location
Canada
would have been a good idea to prime the oil system with a drill before you put intake back on. i have a feeling its still got air in it since everything was dry.

pull #1 plug and stuff a paper towel in spark plug hole. bar engine over by hand until paper towel pops put. align the balancer line with 0* on the timing markings. #1 on the distributor should point @ #1 cylinder when fully seated.
 

Schurkey

Supporting Member
Supporting Member
Joined
Jan 14, 2018
Messages
11,407
Reaction score
14,472
Location
The Seasonally Frozen Wastelands
With timing wire disconnected, it will stall with anything below 15 degrees btdc...
I shut the truck off and it just so happens the rotor is pointing to Number 1 on the cap but balancer is coming up on 15 degrees btdc...
Chevy has had multiple positions for timing pointers, and timing marks on the damper.

Moderate chance you've got a mis-matched timing pointer/damper combo. Or a plain ol' ordinary damper inertia ring that's spun on the hub due to age and rotted rubber elastomer.

The way I remember it, it's common for the dampers to be 13 degrees different from one another.

Find TRUE TDC with a piston stop or other visual reference, see if the mark on the damper lines-up with "0" on the timing indicator.
 

scott2093

I'm Awesome
Joined
Apr 23, 2023
Messages
625
Reaction score
449
Location
Florida
Yeah timing was set, I think, before everything.....
But number one on cap was always pointing to the middle and I wanted to go for the GM look... jeez....

Trying to get the oil drive lined up....finally found a good nesting spot to see and get at it good enough so I'd like to try that if it's better to set in the distributor that way.....

Still can't seem to get it right... I'll figure it out......

Good news is the lifters are dead quiet afaik...no clacking...even at startup, with all my abusive timing adjustments.... sounds strong...killing me not getting why It's fighting me.... I'm so excited to hear it run....

I thought just finding tdc with spark plug hole was ballparkish.... It's what I've usually used in the past though...... I do think this balancer is off....

So you're saying if I use an extension in number one hole on compression and mark the balancer right where #1 stalls for a bit when extension is fully out, that should get me close enough? I know it won't be on the balancer mark....have to make new one...


I was using the intake and exhaust stroke then turning to balancer mark before this and it seemed fine afaik.....
 
Last edited:

tayto

I'm Awesome
Joined
Nov 11, 2020
Messages
776
Reaction score
817
Location
Canada
it will get you close enough so you can figure out if your dampener and timing marks are matched. i'm thinking maybe the outer ring on your dampner moved which is not uncommon. if you want to find exact tdc you need a piston stop. a degree wheel makes things easier but i have done it without
 

Road Trip

Supporting Member
Supporting Member
Joined
Jul 8, 2023
Messages
1,199
Reaction score
3,504
Location
Syracuse, NY
I thought just finding tdc with spark plug hole was ballparkish.... It's what I've usually used in the past though...... I do think this balancer is off....
EDIT x 2:

Ever have a brain cramp? Understand something completely until you try to write about it, and then it just sounds wrong?

The bottom line is that you rotate the crank by hand in the normal direction (CW as viewed from the front) until the piston just
kisses the stop, and then mark where the balancer mark is in relation to the timing cover mark. Then you rotate the crank in the
opposite direction until the piston once again just stops, and again mark where the balancer mark is in relation to the front cover
mark.

And the spot inbetween these 2 marks IS your actual TDC. (Top Dead Center) With luck, it confirms that your factory timing
mark is correct. IF it is in disagreement, then this tells you how much the balancer's outer ring has slipped compared to
the inner hub. It the disagreement is large, then the slipped balancer should be replaced asap. (First they slip, then they sling.)

Mental note to self : Do this for real on the chore truck, take careful photos, and post for others to help newcomers to the hobby
get familiar with this ignition timing mark verification cross-check.

****

NOTE: This is a piece of cake to accomplish during an engine build with the heads still off. And once you're been burned
by chasing a tune using a wacky timing mark you always verify your timing mark from then on. :0)

With the engine assembled, this may take a little creativity to implement. But if you are trying to really nail all this down
then a timing mark that you can trust is a big help. It if sounds like I trust very little at face value (to include timing marks
on a harmonic balancer) ...you would be correct.

Keep fighting the good fight. Success comes to those who persevere.

Cheers -
 
Last edited:
Top