My '95 RCLB C1500

Disclaimer: Links on this page pointing to Amazon, eBay and other sites may include affiliate code. If you click them and make a purchase, we may earn a small commission.

Canadian Rust Bucket

I'm Awesome
Joined
Jul 19, 2021
Messages
168
Reaction score
334
Location
Canada
You must be registered for see images attach

You must be registered for see images attach

Got the seat upholstery finished, brackets bolted back on, new wire between the slides, belt buckles installed, tilt bracket reassembled and the seat installed in the truck today.

Had some trouble with the seat, as I went into this with not a lot of knowledge or experience and managed to screw it up a few times. Long story short, if you order an upholstery kit, make sure it matches the year of the seat frame you end up using.
I had to trim down and shape the foam of the '91 seat bottom to match the '95 upholstery. Big headache, lots of fussing and a bit of extra work on fitment. Didn't do a perfect job but for an amateur it's not too bad.
 

Canadian Rust Bucket

I'm Awesome
Joined
Jul 19, 2021
Messages
168
Reaction score
334
Location
Canada
You must be registered for see images attach

First test fitting for my template of the sun visors today. They lock in position by themselves as required by the safety checklist. I'll finish riveting them together and wrapping them in the fabric this week. Should be nice and durable, and they'll match the rest of the truck interior when done.
 

Canadian Rust Bucket

I'm Awesome
Joined
Jul 19, 2021
Messages
168
Reaction score
334
Location
Canada
So as usual I was delayed by unexpected complications; this time it was the truck not starting. After some help from the forum and a few evenings of electrical diagnosis, got her figured out and running again.

Then back to my custom interior fun stuff!
My initial idea was to leave the foam on the upper portion of the visor to disguise the swivel bracket and hardware. I trimmed the foam down everywhere else to slim the visor down and make finishing the edge easier.
You must be registered for see images attach

Yuck. First prototype not successful. It ended up coming out a little lumpy in spite of my best efforts, and oozed enough adhesive through the holes that there was no way it was going to look right. It might have worked with a plain black vinyl, but I want these to match the headliner.

Onwards and upwards! I have another 3/4 yard of this stuff to play with, and I'm too stubborn to quit here.

Second go, I laid it out a little differently. Cutting a groove in the centre foam of the sheet to allow the fabric to wrap tightly around the top of the pivot arm, and trimming back 3/8" of foam right at the edge to make the edge banding slip on more easily.
You must be registered for see images attach

A generous amount of contact cement later...
You must be registered for see images attach

Very happy with how this turned out. I had a bit of difficulty fitting the edge banding in place and had to stretch it's internal metal "teeth" to make it fit. I'll give it a pass with the sheet metal bending pliers to give it a solid and even crimp.
You must be registered for see images attach

This is what it looks like in the truck. Works like it's supposed to, and looks good to me. Now just have to do the driver's side to match. Should go faster now that I know what I'm doing.
 

Canadian Rust Bucket

I'm Awesome
Joined
Jul 19, 2021
Messages
168
Reaction score
334
Location
Canada
Busy couple months! Finished the sun visors to complete the interior trim.
You must be registered for see images attach

Pretty spiffy!

I had a mobile glass company come out and swap the busted rear slider glass for a solid piece. Only cost $200, and no more plastic blocking my rear view.
You must be registered for see images attach

You must be registered for see images attach

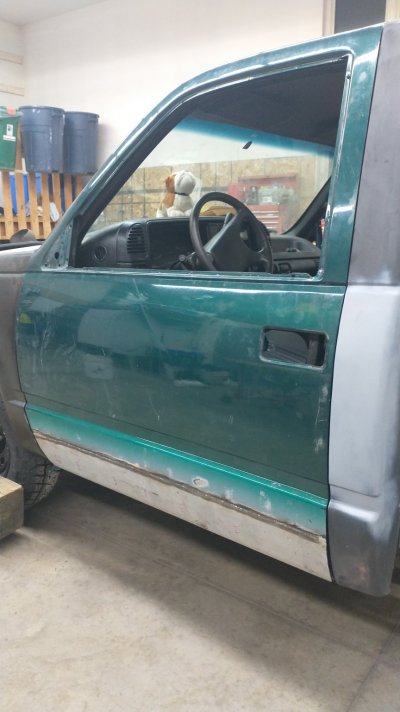
I am buying every half-decent driver's door in southern Ontario to repair and hoard, since they are mostly rusted trash.
I paid $150 for this one:
You must be registered for see images attach

Picture is after I cut out the rust and have begun patching the inner door. I have a sheet metal brake to fab up the outer skin, but the inner makes a lot of bends in opposite directions in really short order. It's quite a lot tougher. I'm trying to avoid an excessive bondo situation. Luckily this one just needed a 3/4" tab on the very bottom and the fresh outer skin.

Also, after a bit of tinkering, I am reasonably certain I've solved my no-start situation. My distributor magnet was cracked.
You must be registered for see images attach

No cracks to be seen in this picture, though. I only spotted them after I disassembled the distributor entirely. The crack was only visible on the underside of the magnet. A new distributor from United Motor Products and a Delco module fixed the issue.
I looked into other options; this combo seemed the most cost-effective way to get the quality I want. So far, it seems to be working. I've never heard the engine run so smoothly before.

Also finished out my four month notice at my job and the truck will now be my full-time job until it's done.

To do:
-Metal patch driver's door
-Body filler on cab corners and doors
-Body filler on truck box
-Interior cab light
-Prime cab and box
-Polish and square up front bumper
-Fab or buy new sill plates
-Finish paint
-Reassemble doors
-Reinstall box and associated components
- Rust repair on tailgate
-Reinstall hood insulator pad
-New intake ductwork to fender
-Paint touch ups on frame


Lots to do!
 

Canadian Rust Bucket

I'm Awesome
Joined
Jul 19, 2021
Messages
168
Reaction score
334
Location
Canada
Trucking along, making progress.
A few frame paint touch-ups, before the box goes on and I can't get to it as easily.
Cab corner is basically done. Just a little glazing putty to fix a few small imperfections, then the back of the cab can get its coats of finish paint.
You must be registered for see images attach


Finished welding the inner door patch panel in.
You must be registered for see images attach

Made a template off my good door so I can bend the outer skin to match, and made a small metal gauge to double check the curvature.

You must be registered for see images attach


Bent the outer skin on the sheet metal brake. Got a nice crisp bend for the bottom fold, which is nice. It needs some planishing to smooth out the curve still.
You must be registered for see images attach
 

Canadian Rust Bucket

I'm Awesome
Joined
Jul 19, 2021
Messages
168
Reaction score
334
Location
Canada
Patch panel welded in
You must be registered for see images attach

Curvature seems to match ok. 90% happy, it's low right at the weld. That will make it easier to taper the body filler away from it, though.
You must be registered for see images attach

Lines up nicely on the cab, too.
You must be registered for see images attach

I still have to close and spot weld the crease at the bottom, but it's almost done.
 

Attachments

  • IMG_20240511_012857712.jpg
    IMG_20240511_012857712.jpg
    170 KB · Views: 2

Canadian Rust Bucket

I'm Awesome
Joined
Jul 19, 2021
Messages
168
Reaction score
334
Location
Canada
Got my first coat of finish paint on the cab rear and box front. Trying to get these two back together for the last time. I think another coat or two and they'll be ready to go.

You must be registered for see images attach

Spend most of the day doing other small things + paint prep so I ended up spraying around 9pm.

You must be registered for see images attach

Redneck light setup. Bright as hell, though.

You must be registered for see images attach

Had some issues with my first pass, as you can see. I think it was a tiny piece of crud that worked its way through causing a sputter. After I cleaned the tip it was much improved.

You must be registered for see images attach

Much more even colour after the second pass.

I'll check them both out in the daylight tomorrow and see if they are worth touching up or if I can just assemble the truck pieces, since 90% of this is hidden anyway.
 

Drunkcanuk

I'm Awesome
Joined
Jul 22, 2021
Messages
1,957
Reaction score
5,479
Location
Alberta, Canada
Got my first coat of finish paint on the cab rear and box front. Trying to get these two back together for the last time. I think another coat or two and they'll be ready to go.

You must be registered for see images attach

Spend most of the day doing other small things + paint prep so I ended up spraying around 9pm.

You must be registered for see images attach

Redneck light setup. Bright as hell, though.

You must be registered for see images attach

Had some issues with my first pass, as you can see. I think it was a tiny piece of crud that worked its way through causing a sputter. After I cleaned the tip it was much improved.

You must be registered for see images attach

Much more even colour after the second pass.

I'll check them both out in the daylight tomorrow and see if they are worth touching up or if I can just assemble the truck pieces, since 90% of this is hidden anyway.
If it was me....I'd try and get the hidden areas done as good as possible, using it as practice for the areas that will be scene.
Practice makes perfect.
 
Top