Just acquired an abandoned 92 sierra 2500 with the 7.4L. Looking for info and resources

Disclaimer: Links on this page pointing to Amazon, eBay and other sites may include affiliate code. If you click them and make a purchase, we may earn a small commission.

TylerSteez

Newbie
Joined
Nov 24, 2023
Messages
46
Reaction score
111
Location
Connecticut
had a great weekend getting things done on the truck.

got it dropped off to my shop friday night and immediately dropped the fuel tank. the lines along the frame rail by the tank were rotted and started leaking as i disturbed them so i ended up just using fuel pressure hose until the new lines i ordered arrive. the tank was absolutely disgusting inside, glad i bought new everything. changed the filter as well and got the fuel all squared away

i then pulled the tbi off and changed all the gaskets and cleaned it up with brake cleaner. the idle air control screws broke off in the housing so i tig welded some material to the ends of them and turned them out with vice grips. if anyone ever needs the thread size for the iac screws, they’re m4-.07.

i then changed the cap, rotor, plug wires, and plugs. every single plug wire fell apart instantly. the plugs themselves didn’t look bad at all. while i had the plugs out i put some lubricant in the cylinders, let it sit for a few mins, then turned the engine over till it all shot out.

once everything was buttoned up i primed the pump and checked for fuel line leaks and then fired it up. the engine started right up and didn’t miss a single beat. sounds like it was only parked a week ago. absolutely zero valve train noise, no knocks, not even a single stumble. the idle may be a tad high but i’m sure there’s a broken vacuum line somewhere i haven’t seen yet. revs freely as well.

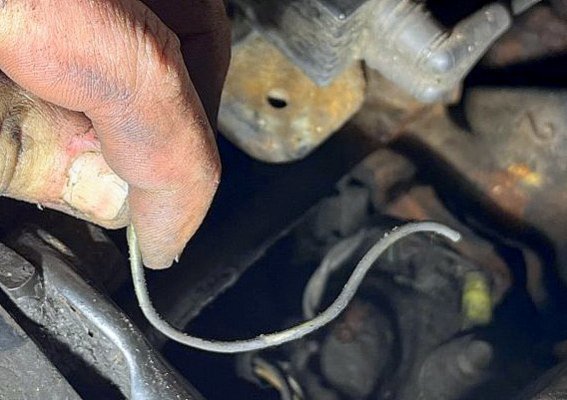
i then started messing with the brakes. the rear brake section of the master cylinder was empty so i filled it and then pumped the pedal, right to the floor. turns out the brake line for the rear is also rotted and leaking along the frame in a couple spots. i’m gonna bend up and flare some line tomorrow and hopefully get all the brakes squared away. then i’ll see how the transmission is.

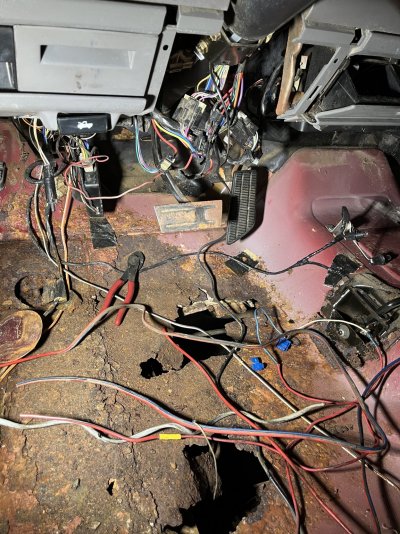
to wrap it up, i pulled out the absolutely disgusting seats and carpet. this truck smells absolutely horrible inside so it was nice getting the moldy fabric out. unfortunately the floor pans are a lot worse than i thought. i’m going to be ordering some new floor pans and welding them in asap. i’m dying to take the dash off and get the new interior in. i’ll have some pictures for the thread tomorrow night
 

TylerSteez

Newbie
Joined
Nov 24, 2023
Messages
46
Reaction score
111
Location
Connecticut
anyone know where this green wire (assuming ground) is supposed to land? found it hanging around by the coolant temp sensor between the intake and AC compressor
You must be registered for see images attach
 

TylerSteez

Newbie
Joined
Nov 24, 2023
Messages
46
Reaction score
111
Location
Connecticut
i started today replacing the brake lines to the rear, i replaced about 6’ of line from the beginning of the bed all the way to the rear different T fitting. i then hit the brakes and saw another leak under the firewall area. i ran out of fittings and the parts stores were closing so i plan on finishing that up tomorrow. gonna replace the front calipers and soft lines as well for peace of mind, im sure they’re cooked anyways.

i then replaced the oil pressure sensor since it was leaking and figured why not change the coolant temp sensor as well, one less thing to go wrong.

i then started removing all of the hack job wiring from the trailer hitch all the way to the dash. pictured below is only half of what was removed. it turns out all of the hacky wiring is for an old alarm system as well as trailer wiring. i still haven’t finished, i need to make sense of how the alarm box is tapped into the harness more before i go and remove it.

you can also see how bad the floors are. when i first looked at the truck i figured “oh just a small patch” but as always with floor pans, what you see underneath the vehicle is never as bad as what’s under the carpet. i ordered two floor pans, i was surprised to see that the holley site had the drivers side for $65 and the passenger for $13 lol, must be a pricing error but i took advantage of it.
 

Attachments

  • IMG_4426.jpeg
    IMG_4426.jpeg
    573.6 KB · Views: 13

Road Trip

Supporting Member
Supporting Member
Joined
Jul 8, 2023
Messages
1,117
Reaction score
3,185
Location
Syracuse, NY
anyone know where this green wire (assuming ground) is supposed to land? found it hanging around by the coolant temp sensor between the intake and AC compressor
You must be registered for see images attach

According to the Air Conditioning section of the '91 C/K Wiring Manual, green wires (Light and Dark)
are used, both for the A/C compressor clutch & (low) pressure cycling switch:
You must be registered for see images attach


In order to determine if the color of the wire insulation near your fingers
was light or dark green, I zoomed in and blew it up, but couldn't tell for
sure. If I had to guess, it's light green, so that would narrow it down to
the pressure switch? (See attached.)

As for the ground wires on the GMT400, actually they are normally black,
and are always considered part of "Circuit 150". (If you look carefully at
the schematic you will see a '150' written in the connector location where
a ground wire is attached.) If you haven't already downloaded the wiring
diagram for your year, it's highly recommended. The General did a pretty
good job of documenting the electrical system, and with the searchable .pdf
file versions it's even easier to sort this kind of stuff out.

NOTE: The green wiring color code isn't reserved exclusively for the HVAC
system, so the above may be off target. But the odds are pretty good
that the A/C system is needing what you discovered.

Let us know what you find. And it sounds like your 220K mile 454 is
just as quiet and ready to work as the 220K mile 454 in my '99 C2500.
My personal theory is that the factory set them up with such solid cooling
and overdrive transmissions that these motors just loafed along at a
low rpm/relatively low duty cycle in the higher gears, instead of beating themselves
up in the lower gears trying to keep up with the driver demands.

FWIW there's folks in this forum that have racked up lots & lots of miles on these
big blocks over the years...and they just keep rumbling along.

Best of luck on your odyssey to bring this truck back to life.

Cheers -
 

Attachments

  • mystery green wire detail 2x mag.jpg
    mystery green wire detail 2x mag.jpg
    204.9 KB · Views: 14
Last edited:

TylerSteez

Newbie
Joined
Nov 24, 2023
Messages
46
Reaction score
111
Location
Connecticut
thanks a ton for all of that, will take a look at the schematic and sort it out later today.

that’s a very solid theory. i’m used to the firebird/camaro world where every 305/350 small block has been absolutely abused and beaten the snot out of by 150k miles so a 454 big block with 225k seemed blasphemous lol
 

TylerSteez

Newbie
Joined
Nov 24, 2023
Messages
46
Reaction score
111
Location
Connecticut
another question, seeing as it’s an obd1 with the jb7 brakes in the rear, am i gonna run into any annoying abs module issues when i go to bleed the brakes?
 

TylerSteez

Newbie
Joined
Nov 24, 2023
Messages
46
Reaction score
111
Location
Connecticut
here are the RPO codes incase anyone sees anything interesting/desireable. my untrained eye just sees a decently set up work truck but i don’t know these trucks that well. what i find weird is that it has the U16 rpo code for a tachometer but the truck does not have a tachometer
You must be registered for see images attach
 

TylerSteez

Newbie
Joined
Nov 24, 2023
Messages
46
Reaction score
111
Location
Connecticut
Started the driver side floor pan rust repair. way worse than I anticipated. the front cab mount was nearly rotted off so I had to remove it and patch where it mounts to. The little inner cubby behind the kick panel was filled with mouse nest and super gummed up seam sealer.
You must be registered for see images attach


Here's nearly all of it cut out. Still have a lot more trimming and such before the new pan goes in. The replacement pan isn't big enough to cover all the rot spots so I will have to recreate 50% of it.
You must be registered for see images attach


It seems like my super saggy drivers side door is misaligned off the gaskets and letting water in, it's also missing the drivers side mirror. I'm hopeful this is where all the water is getting in but would love to hear about where others had water coming in. The passenger side with a tighter door and mirror isn't nearly as bad. I saw a few threads about the cowl drains getting clogged.
 

TylerSteez

Newbie
Joined
Nov 24, 2023
Messages
46
Reaction score
111
Location
Connecticut
Got both floor pans patched and finished. Tidied up the seam sealer and painted the entire floor after this pic was taken. I'm pretty happy with how it came out, I would have drilled the spot welds and replaced the whole thing if this was anything more than a beat up work truck but I really want to get going on the dash swap. Next step is finding all the places the water is coming in from and making it water tight
You must be registered for see images attach
 

TylerSteez

Newbie
Joined
Nov 24, 2023
Messages
46
Reaction score
111
Location
Connecticut
still trying to solve a low brake pedal issue that seems very common with these trucks. i’ve only driven the truck 50 feet so far but it also took a lot of foot pressure to make it stop as well. i replaced all soft lines and every hard line except the ones right off of the master cylinder and across the k member. also replaced rear shoes, calipers, and pads.

i adjusted the rear multiple times, even tried adjusting them to the point of very obvious drag, still a low pedal. when i was looking at part numbers, it appears i accidentally ordered JB6 front calipers instead of JB7, would this create a low pedal scenario?
 
Top