Truck is a 1990 k1500 with the 5.7. Goal for this project was simply to help out the A/C while stationary when the coolant temp is between 195 and 210 (thermal clutch engages). You'll need:
GM Aux Fan GM GENUINE 158686
Pigtail, GM OE PT723
30A relay
20A inline fuse holder
Buttsplices, terminals, Loom, (4) bodybolts or self tappers
First step, let's test this fan...
Inrush current: 15A
Operating: 8A
20A circuit should be fine with #12 wire.
Now the install. Took about 2.5 hours from start to finish. Couple phone calls mixed in.
The only 'special' tool I needed was a right angle impact to make the lower fan mounting holes. Due to the tight clearance, I used a large self-tapper to make the hole then used the bodybolt to secure the fan.Those Nextec batteries are from 2007 and still going strong. Without a tool such as this, you'd probably have to remove the front bumper to drill.
Remove the front grille. Hold the fan in place and mark your holes. I used one existing hole and drilled the other three. Secure the fan with some body bolts. The clearance is about 1/4" from the fan shroud to the evap, so a great fit.
Last is wiring. I used the existing parking light loom to run the fan power and ground along the front bumper and through the radiator support. Bring your fan + into the relay and ground the fan - at the battery (I piggybacked the factory accessory ground off the - battery cable). Load power to the relay comes off the main distro block fused through a 20A inline and weatherproof cover.
On the control side, relay control - went to a ground on the relay mount, and relay control + went to the + side of the AC low pressure cycling switch pigtail. On my truck this is the light green wire coming off the dryer. So now, whenever I call for A/C, the little fan will turn on. Have to wait for some heat to see if it helps.
GM Aux Fan GM GENUINE 158686
Pigtail, GM OE PT723
30A relay
20A inline fuse holder
Buttsplices, terminals, Loom, (4) bodybolts or self tappers
You must be registered for see images attach
You must be registered for see images attach
First step, let's test this fan...
Inrush current: 15A
Operating: 8A
20A circuit should be fine with #12 wire.
You must be registered for see images attach
You must be registered for see images attach
Now the install. Took about 2.5 hours from start to finish. Couple phone calls mixed in.
The only 'special' tool I needed was a right angle impact to make the lower fan mounting holes. Due to the tight clearance, I used a large self-tapper to make the hole then used the bodybolt to secure the fan.Those Nextec batteries are from 2007 and still going strong. Without a tool such as this, you'd probably have to remove the front bumper to drill.
You must be registered for see images attach
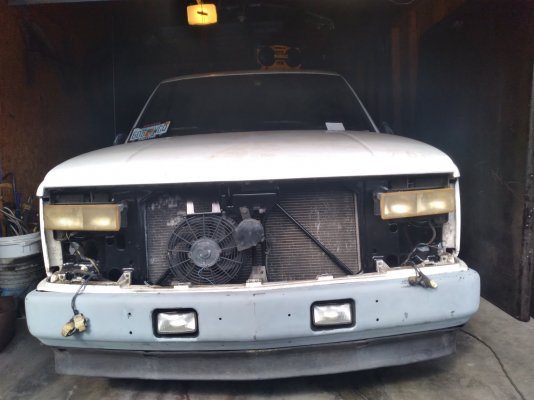
Remove the front grille. Hold the fan in place and mark your holes. I used one existing hole and drilled the other three. Secure the fan with some body bolts. The clearance is about 1/4" from the fan shroud to the evap, so a great fit.
You must be registered for see images attach
You must be registered for see images attach
Last is wiring. I used the existing parking light loom to run the fan power and ground along the front bumper and through the radiator support. Bring your fan + into the relay and ground the fan - at the battery (I piggybacked the factory accessory ground off the - battery cable). Load power to the relay comes off the main distro block fused through a 20A inline and weatherproof cover.
You must be registered for see images attach
On the control side, relay control - went to a ground on the relay mount, and relay control + went to the + side of the AC low pressure cycling switch pigtail. On my truck this is the light green wire coming off the dryer. So now, whenever I call for A/C, the little fan will turn on. Have to wait for some heat to see if it helps.
xc_hide_links_from_guests_guests_error_hide_media