Hello again MYF,
We have yet to touch on this, but I decided to take quick look and see if we couldn't use your test
results to help illustrate how to troubleshoot an issue like this using the wiring diagrams in the FSM.
****
First of all, I decided that with my luck using a '99 manual to assist with your '97 vehicle just sets
us up to trip over any differences between the models. And navigating through electrical wiring
diagrams is already tough enough without further clouding the issue. So I've switched to using
the '97 FSMs, and I recommend that we standardize on them for this repair effort.
So the first thing I wanted to find out was more about the BAT fuse. From previous experience I
know that on the '96+ models the Battery is first connected to the Underhood Fuse & Relay block
prior to being fed to the IP fuse block & elsewhere.
So I needed to know which fuse in the Underhood Fuse Panel is the 'BAT'?
You must be registered for see images attach
So the Battery Fuse looks to be in position #7. (Keep this in the back of your mind for later.)
So when I'm working an electrical issue, I always like to start at the page where the battery is drawn,
and trace the circuit all the way from there. So here's the first page where I found both the 12v
battery as well as the BATTERY fuse:
You must be registered for see images attach
Putting these 2 diagrams together, now when you unplug/plug the BATTERY fuse in the Underhood
Fuse Block now you can see which fuses in the fuse panel are involved in the parasitic drain you
discovered. Don't know as of yet whether the draw is a feature or a fault. Once you track the current
draw down to a specific I/P fuse or load we'll have a better idea. Possibly we will decide to switch from
a test light to quantifying the size of the current drain with a multimeter.
But the point is, if we treat the wiring diagrams like a road map, then since we're primarily dealing with
straightforward +12v DC we should be able to get this figured out.
By the way, while we are here I'd like to take a little mystery away from the way these wiring diagrams
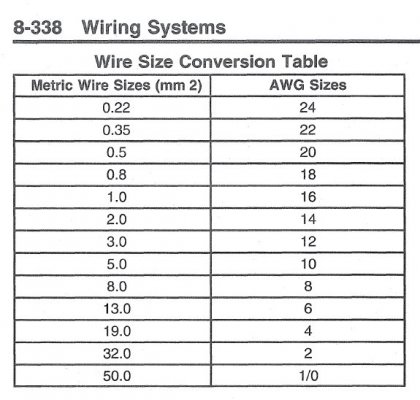
are marked up. For example, the wire coming from Battery Fuse #7 has "5 Red 142" written next to it.
The '5' is the size of the wire in metric-speak, the Red is the color to look for, and 142 stands for unique
electrical circuit #142. Having spent a lifetime working with classic wire gauge numbering, if you tell me
to look for a 16 gauge wire vs a 4 gauge wire, I can easily visualize one is a lot larger than the other.
By the same token, I still have difficulty with taking a metric size & being able to visualize it. For me,
the attached translation table is a huge help when I'm reading the wiring diagram and trying to find
the matching physical wire in the vehicle.
****
No doubt at the outset that all this looks to be a huge grind, but once you fix a couple of electrical
issues and start to get the hang of navigating through the diagrams it's not nearly as bad as it
initially seemed.
One last thing. No worries about how you tested the headlight bulb. It just means that all we
need to do is verify that +12v is being sent to the bulb connector, and also verify a near-zero
resistance between the bulb and G113.
Best of luck with your hunt.


demonspeed.com
www.joesracing.com