Stumble at idle

Disclaimer: Links on this page pointing to Amazon, eBay and other sites may include affiliate code. If you click them and make a purchase, we may earn a small commission.

clutterhead

Newbie
Joined
Aug 23, 2023
Messages
18
Reaction score
11
Location
Earth
"I" would dump a bottle or two of Chevron Techron Complete Fuel System Cleaner in the tank, and buy only Top Tier fuel. See if the injectors clean themselves with some added detergent in the gasoline.
Thats a good idea. I'll start there and update. I came across an interesting thread where someone had somewhat of the same issue I had. The response he got from a few people was that they also have that issue, but it's because of the ethanol in gasoline today. That the TBIs weren't designed to run on the concentration in modern fuel. Seems plausible, but I think I may be onto something that's showing it might just be slightly dirty injectors.

I know a lot of people are quick to dismiss the injectors being at fault saying they "almost never go bad", but that doesn't mean they don't get a bit dirty. Especially with the ethanol in fuel today. I know a lot of people forget that tiny circular screen on the side of those injectors when rebuilding the TB on these engines. I remember mine being clogged with that "ethanol film" that gets left over when the fuel evaporates. Maybe, maybe not.


True on a system where the fuel pressure regulator is vacuum-regulated. Not true on TBI where the fuel pressure regulator has no vacuum signal.

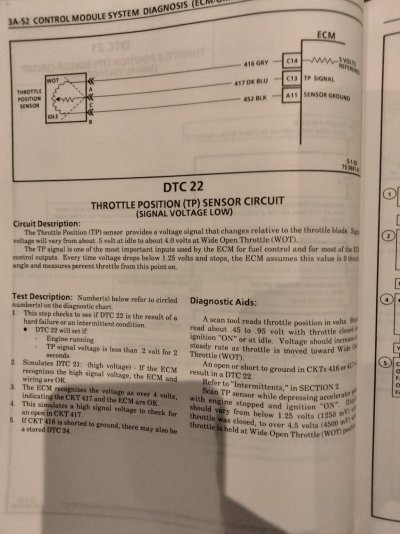
But 7 psi is low. Spec is 9--13, and "everyone" seems to think the higher-end of that spec is better.
Yeah I've heard the same. I might try some of the old tricks to bump it. I made an adjustable one at one point on another car. Might just try the quarter stacking for this one. Those aftermarket springs are priced ridiculously. I've seen a thread where someone compared various springs so I might do that later on and look for some mcmaster springs.

What is no-load battery voltage?
No load is around 12.6V
Or swap relays. I get extras from the Treasure Yard.

A voltage-drop test with the relay engaged would tell that tale, too. Excess voltage drop = failing relay contacts. But that assumes that the battery voltage is sufficient.
Now that I think about it, I did do a voltage drop across the contacts and there was none, so I concluded that the drop must be somewhere in the harness from the relay to the first connector. I sort of followed where it went into the main engine harness and concluded I was not about to tear into that. Mainly because I get charging voltage when it runs.

It's just a weird scenario seeing that it gets full voltage when the car runs. Made me wonder if that was some sort of "priming voltage" the computer sends out on KOEO, but I didn't read into the theory that much to see if something like that exists. Never heard anything like that mentioned before though. The wiring diagram to the relay doesn't suggest anything like that either. The other wires are "ECM sense" and so on. I assume it's just that. The scan tool has a PID for fuel pressure voltage so I figure that is where that PID data is measured at. The likely scenario is there's resistance in the wire that is overcome when a higher voltage is present. Checked the ground at the connector and it was good. No evidence of overheated wires/connectors leading all the way to the pump. I guess I could do a current draw, but I'm erring on the side of leave it alone
That's gotta change.

Put a brass tee in the block, route the OEM switch and wire harness to one outlet of the tee, put the aftermarket pressure gauge into the other outlet of the tee. Simple, easy, cheap.
I felt I should too. Eventually I'll get it back on.
 

scott2093

I'm Awesome
Joined
Apr 23, 2023
Messages
517
Reaction score
380
Location
Florida
.6 seems high. "1" I don't know about.
From my 93 Electrical manual..
Mine was reading like .7 on multimeter.......AC delco.... Probably shouldn't have but I wallered out the holes to get to .525 and I swear it took away a bit of delay off the line but maybe it was something else....
 

Attachments

  • 93 TPS DTC22.jpg
    93 TPS DTC22.jpg
    254 KB · Views: 10

clutterhead

Newbie
Joined
Aug 23, 2023
Messages
18
Reaction score
11
Location
Earth
From my 93 Electrical manual..
Mine was reading like .7 on multimeter.......AC delco.... Probably shouldn't have but I wallered out the holes to get to .525 and I swear it took away a bit of delay off the line but maybe it was something else....
Mine is still around .6V even with all the dremelling I've done to the bolt holes. I don't seem to have a hesitation off the line, just an annoying stumble when I sit for ~10 seconds at a stop. I'm beginning to think I have a slight exhaust valve leak, but I know I've done a leakdown test before and nothing really stood out. hard to say though, the exhaust does have a few small holes around the muffler so I might have missed it.

For now, putting the old injectors back in did a lot to improve the symptoms, and I was able to pass smog. It's on the backburner for now, but I won't forget to update this thread when I find it in me to look into it a bit more.
 

scott2093

I'm Awesome
Joined
Apr 23, 2023
Messages
517
Reaction score
380
Location
Florida
1993 Yukon 5.7
Did the intake manifold gasket this weekend. I'd been getting a random sewing machine/marbles in a can sound from the top of the motor on passenger side as best I can tell. Didn't get to go as far as finding help to really narrow it down and the noise would only appear randomly so I'm only fairly certain the noise was from the motor.
Already removed bellhousing cover and checked for loose bolts and cracks as best I could. New starter looks like it is where it should be and doing fine.
Anyway, I thought it would be a good time to replace the leaky intake gasket and peek in the valve covers.

At one point I attempted to set the lash and preload on the valves.First time......
The factory manual obviously says 1 turn after zero lash but, after I got going, I remembered that, although this crate motor is stock, I have no idea how stock. And my buddy I bought the truck from over a decade ago doesn't think it totally is but he doesn't know at all.So I just did a half turn from what I thought was zero lash. I did the GM fsm method with finding tdc compression #1, doing the set of valves it says, then rotating 360 and doing the other set.

Could barely get the truck to start. Guess I dropped dizzy in a little off which still confuses me but whatever. Got it timed and truck is running. But loping real bad like I have a giant cam.. Thinking feels like a missfire but it's very wump wump wump.....
Revs good enough. Stays running.

When I put it in gear, it really loped hard and I hear knocking from motor... Shut off truck...

While idling, Noticed no o2 sensor cross counts...no O2 sensor activity....stuck around .7 to .9v unless I revved...it would start oscillating..blm 90.....
Everything else normal afaik.....even in closed loop....same behavior...

I thought a half turn past zero lash would be safe enough if I went to far setting zero since manual calls for 1 turn but, I'm not 100% what I'm dealing with.
Should I just pull the covers and adjust from there as a check?
That knocking or heavy tapping didn't sound good..
Even thinking flex plate sound but everything was fine before goofing with this stuff....
no codes....

Any advice?
:(


edit...
I pulled the valve covers and did a couple of preload adjustments with engine running. Seems like this may be the area causing issues judging from the way it changes the running... Very messy. A few of the rockers are streaming oil over the head as opposed to what the others look like where it pumps down the rockers...is this a sign of something? It stops when I loosen the rocker..need to verify...
Afraid to start a fire... have some cardboard now deflecting most of it.....
Guess I'll give it another go. Truck was semi warm but not up to temp so I guess my idle is a little high... No breather either obviously.....
I think I'll just do 1/4 turn for now. It seems to run better and bogs a bit at half turn like it was??idk
definitely over my head here... literally I guess too...

edit edit....
so it looks like the quarter turn past clacking has resolved my issue... will verify... seems like not enough if fsm says full turn past zero? obviously I can't know if everything is stock but I feel pretty sure it is...
Lost a quart of oil before I got the hang of it.... Still feel nothing is precise...

What do you do when you hear the clacking but, when you lift up the wrench to switch directions in my case, the clacking stops? I have to go and loosen more to get it to clack... What is this? And how should I proceed in this case? Confusing...
 
Last edited:

scott2093

I'm Awesome
Joined
Apr 23, 2023
Messages
517
Reaction score
380
Location
Florida
edit edit....
so it looks like the quarter turn past clacking has resolved my issue... will verify... seems like not enough if fsm says full turn past zero? obviously I can't know if everything is stock but I feel pretty sure it is...
Lost a quart of oil before I got the hang of it.... Still feel nothing is precise...

What do you do when you hear the clacking but, when you lift up the wrench to switch directions in my case, the clacking stops? I have to go and loosen more to get it to clack... What is this? And how should I proceed in this case? Confusing...
bump
 

clutterhead

Newbie
Joined
Aug 23, 2023
Messages
18
Reaction score
11
Location
Earth
1993 Yukon 5.7
Did the intake manifold gasket this weekend. I'd been getting a random sewing machine/marbles in a can sound from the top of the motor on passenger side as best I can tell. Didn't get to go as far as finding help to really narrow it down and the noise would only appear randomly so I'm only fairly certain the noise was from the motor.
Already removed bellhousing cover and checked for loose bolts and cracks as best I could. New starter looks like it is where it should be and doing fine.
Anyway, I thought it would be a good time to replace the leaky intake gasket and peek in the valve covers.

At one point I attempted to set the lash and preload on the valves.First time......
The factory manual obviously says 1 turn after zero lash but, after I got going, I remembered that, although this crate motor is stock, I have no idea how stock. And my buddy I bought the truck from over a decade ago doesn't think it totally is but he doesn't know at all.So I just did a half turn from what I thought was zero lash. I did the GM fsm method with finding tdc compression #1, doing the set of valves it says, then rotating 360 and doing the other set.

Could barely get the truck to start. Guess I dropped dizzy in a little off which still confuses me but whatever. Got it timed and truck is running. But loping real bad like I have a giant cam.. Thinking feels like a missfire but it's very wump wump wump.....
Revs good enough. Stays running.

When I put it in gear, it really loped hard and I hear knocking from motor... Shut off truck...

While idling, Noticed no o2 sensor cross counts...no O2 sensor activity....stuck around .7 to .9v unless I revved...it would start oscillating..blm 90.....
Everything else normal afaik.....even in closed loop....same behavior...

I thought a half turn past zero lash would be safe enough if I went to far setting zero since manual calls for 1 turn but, I'm not 100% what I'm dealing with.
Should I just pull the covers and adjust from there as a check?
That knocking or heavy tapping didn't sound good..
Even thinking flex plate sound but everything was fine before goofing with this stuff....
no codes....

Any advice?
:(


edit...
I pulled the valve covers and did a couple of preload adjustments with engine running. Seems like this may be the area causing issues judging from the way it changes the running... Very messy. A few of the rockers are streaming oil over the head as opposed to what the others look like where it pumps down the rockers...is this a sign of something? It stops when I loosen the rocker..need to verify...
Afraid to start a fire... have some cardboard now deflecting most of it.....
Guess I'll give it another go. Truck was semi warm but not up to temp so I guess my idle is a little high... No breather either obviously.....
I think I'll just do 1/4 turn for now. It seems to run better and bogs a bit at half turn like it was??idk
definitely over my head here... literally I guess too...

edit edit....
so it looks like the quarter turn past clacking has resolved my issue... will verify... seems like not enough if fsm says full turn past zero? obviously I can't know if everything is stock but I feel pretty sure it is...
Lost a quart of oil before I got the hang of it.... Still feel nothing is precise...

What do you do when you hear the clacking but, when you lift up the wrench to switch directions in my case, the clacking stops? I have to go and loosen more to get it to clack... What is this? And how should I proceed in this case? Confusing...

You might get more help by starting a new thread, but I'll give my thoughts.

The o2 sensor is reading rich. Do you have the ability to see if it's in closed loop when looking at the o2 voltage? In open loop the voltage would be around 450mV give or take. I wouldn't be surprised if that's the actual reading seeing as your BLM is 90. That's way too low. Its indicating its very rich and it's trying to subtract fuel.

I think your problem is all in the valve lash. I'm not an expert on these engines by far, and I too had a hard time getting confident with setting the lash on these engines. People say it's easy but that's all relative to experience of course.

Let it warm up fully and verify your timing is set at 0deg with the computer wire disconnected. On that note, you sure the plug wires are in the right order? Very easy to cross a few of them if you took them off the cap when doing the intake gaskets.

Considering that's all good, do as you started with the cardboard shielding the manifolds. Back off the rocker nut till you hear the clicking, then go to either 1/2 or 3/4. Do it in 1/4 increments. So turn 1/4, wait a few seconds. You'll hear the engine bog a little as things settle into adjustment. Do this to each rocker. It's the easiest way in my opinion. The manual says 1 turn, but that's assembled from factory spec when everything like the springs were new. 1/2 to 3/4 is fine. Check base timing after you're done and see how it responds.

The thing with the service manual method is that it's for experienced people. So people that have the feel for what is "tight" and "loose" when spinning the pushrod. What happens is that most people who try this method over-tighten the valves even if they're sure they didn't. The other "easy" method is to set lash by pulling the pushrod up and down on a loose rocker as you tighten the nut till it has no more play, and move on to the next valve to be adjusted per the service manual, or by turning the crank in 90 degree increments and taking the play out of each pushrod till they're all at zero lash. Then you make your final 1/2 to 3/4 turn on all the nuts and you're done. I've successfully done these other two methods, but adjusting while running is by far the easiest and you know it's adjusted without any doubt.


A side note on the tapping noise. It's probably unhappy valve adjustments if you're just hearing bad tapping now, but the original noise you heard could be something like the alternator pulley or drivebelt pulleys. I've had a sbc where I thought I had a slight lifter tick on the passenger side and it turned out to be the alternator pully bearing. Maybe do the valve and timing checks, and if it gets you back to your original symptom, pull the belt off and start the engine and see if your noise went away. I've also heard the marbles sound from bad misfiring (the backfire through the manifold on TBI engines), timing too advanced, and bad fuel injectors. I don't think it's your injectors though. Thats pretty rare.
 

scott2093

I'm Awesome
Joined
Apr 23, 2023
Messages
517
Reaction score
380
Location
Florida
You might get more help by starting a new thread, but I'll give my thoughts
Sorry about that. Your title was so good I figured it was a good place. And Schurkey mentioning valve lash I figured I'd place it here since I was having issues with that and the stumbling..


The o2 sensor is reading rich. Do you have the ability to see if it's in closed loop when looking at the o2 voltage? In open loop the voltage would be around 450mV give or take. I wouldn't be surprised if that's the actual reading seeing as your BLM is 90. That's way too low. Its indicating its very rich and it's trying to subtract fuel.
Yeah it was closed loop too. It would oscillate with revs though. Once I sop up the mess I'll run the scanner. thanks! Felt like trying to put a socket over an old rain bird sprinkler on some of them....
I think your problem is all in the valve lash. I'm not an expert on these engines by far, and I too had a hard time getting confident with setting the lash on these engines. People say it's easy but that's all relative to experience of course.
Tell me about it... even taking the valve covers off is easy enough. Getting them back on, not so much.probably why you don't see that many videos of putting them back..lol.But yeah I thought I obsessed over zero lash. Did the shake up and down method.. Spent way too much time and still no cigar

Let it warm up fully and verify your timing is set at 0deg with the computer wire disconnected. On that note, you sure the plug wires are in the right order? Very easy to cross a few of them if you took them off the cap when doing the intake gaskets.
Yeah timing is perfect... I was looking at the valves the entire time. Just number 1 is pointing more towards the middle of the engine now...truck is purring nicely..

My final concern is that I only did a quarter turn after clacking stopped on all of them. seems small?idk

.... That and the clacking would appear when I'd loosen but disappear before I had time to tighten the nut? So I loosened more. Had to do that on a few...

Do you think I should go in and just do another quarter? I haven't driven the truck yet. Hopefully here soon. Maybe I'll see what it acts like but it already sounds and feels better for sure.
 

Road Trip

Supporting Member
Supporting Member
Joined
Jul 8, 2023
Messages
1,117
Reaction score
3,185
Location
Syracuse, NY
Sorry about that. Your title was so good I figured it was a good place. And Schurkey mentioning valve lash I figured I'd place it here since I was having issues with that and the stumbling..


Yeah it was closed loop too. It would oscillate with revs though. Once I sop up the mess I'll run the scanner. thanks! Felt like trying to put a socket over an old rain bird sprinkler on some of them....

Tell me about it... even taking the valve covers off is easy enough. Getting them back on, not so much.probably why you don't see that many videos of putting them back..lol.But yeah I thought I obsessed over zero lash. Did the shake up and down method.. Spent way too much time and still no cigar


Yeah timing is perfect... I was looking at the valves the entire time. Just number 1 is pointing more towards the middle of the engine now...truck is purring nicely..

My final concern is that I only did a quarter turn after clacking stopped on all of them. seems small?idk

.... That and the clacking would appear when I'd loosen but disappear before I had time to tighten the nut? So I loosened more. Had to do that on a few...

Do you think I should go in and just do another quarter? I haven't driven the truck yet. Hopefully here soon. Maybe I'll see what it acts like but it already sounds and feels better for sure.

Hello scott2093,

You may want to consider starting your own (re)Build Thread in the members' area.
When you bounce your work around the forum, it's makes it a lot harder for others
to figure out the context/history of your vehicle when they are trying to assist.

****

Anyway, setting the valves cold (with the intake manifold off) is doable, with all
new parts, and freshly machined everything...but at the same time it's still easy
to get it wrong and set stuff too tight, even for experienced wrench turners.

I find that a 'running lash' (actually running preload) adjustment is the best way to
optimize setting the hydraulic lifters on an older engine with variables all over the place.
But it can get messy, especially the first time or two. (I like the socket over the Rain Bird
analogy. :0)

But there are a couple of tricks to make this much easier to do. If you haven't seen
this demonstration video of a running valve lash setting, it's both short & definitive:

xc_hide_links_from_guests_guests_error_hide_media


NOTE: Just click "Watch on YouTube".


Another trick I learned was to either buy a set of deflector clips that divert the
oil shooting out of the rocker arm spit holes down to the pivot balls -or- get
some heavy duty aluminum foil from the kitchen and temporarily tent over
the spit holes, again deflecting the oil down to the pivot ball.

And don't just adjust the noisy side. Adjust all 16 rockers.

One more tip. Go through and set each one, loosen until the clacking
sound starts, and then tighten it back up until the noise just stops.

Leave it alone. Go on to the next rocker arm, do the same thing, until
all 16 are set. Turn off the engine. Set each one 1/4 <> 1/2 a turn.
Do it sequentially so you don't lose your place. And turn off your phone
so that you aren't interrupted in the middle.

Wait a minute or two after adjusting the last rocker arm, and then fire
the engine back up. It should now be as quiet and smooth as it can
possibly be.

One last cross check and you will be done. Realize that you may be able
to (temporarily) quiet a lifter/cam lobe combination that's starting to wear
away. So how do you tell if you have an issue with one or two lifter
positions? The answer is to check to see if ALL of the lifter locking nuts
are the same number of threads from the top after your adjustment.

For example, let's say that 15 of your rocker arm retaining nuts are ~5 threads
down from the top. But rocker arm #16 is 7 threads down from the top?
This tells me that this last assembly either has a good lifter/cam lobe but
the pushrod is shorter? (Bent) Or the pushrod is straight, but the lobe
is wearing away, and we had to adjust further down in order to get back
into the lifter's hydraulic compensation area? And of course this won't last...

And finally, just like wearing a bib at a lobster dinner, sourcing an old pair of
valve cover tins for a few bux at the Treasure Yard and then cutting the tops
off (or just access holes for doing the adjustments) will go a long ways to
making this adjustment a lot less messy to perform.

Again, watch that short video in order to get the technique down.

Hope this is helpful. The running lash (preload) adjustment is a really
good way to make the most of what you have to work with. And given
how many times these trucks have been around the block, it's quite
possible to be trying to get your truck to run right *despite* the poor
valve train adjustment left behind by the PO? Hint: It's really hard to try
and tune around one or more valves that are been held slightly open by
a 'too tight' lifter adjustment.

FWIW. Best of luck --
 
Last edited:

scott2093

I'm Awesome
Joined
Apr 23, 2023
Messages
517
Reaction score
380
Location
Florida
Great info!
Thank you!..

You may want to consider starting your own (re)Build Thread in the members' area.
When you bounce your work around the forum, it's makes it a lot harder for others
to figure out the context/history of your vehicle when they are trying to assist.
I'll look into that. Sounds like a good idea. Never knew there was something like.
Moderators feel free to move this to a new thread if you like .
 

Road Trip

Supporting Member
Supporting Member
Joined
Jul 8, 2023
Messages
1,117
Reaction score
3,185
Location
Syracuse, NY
Great info!
Thank you!..
:waytogo:

I'll look into that. Sounds like a good idea. Never knew there was something like.
Moderators feel free to move this to a new thread if you like .

I first came to this forum just for the broke/fix info. But after joining, I found
the Member Trucks section became my new go-to. I enjoy seeing the thought
process, skills on display, craftsmanship, etc. (See attached for jumping off point.)

Cheers -
 

Attachments

  • Functional Resto thread - Bang for the buck Functional Renewal of rust belt '99 C2500  GMT400.jpg
    Functional Resto thread - Bang for the buck Functional Renewal of rust belt '99 C2500 GMT400.jpg
    122.9 KB · Views: 3
Last edited:
Top