NorthState
I'm Awesome
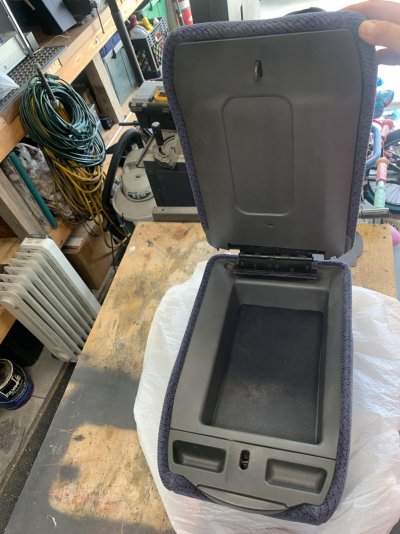
My truck had the tan interior from the factory. It was in rough shape, and cleaning was not an option. The PO scored a whole interior from a local junk yard! The only drawback was that it was blue. The only color harder to find parts for would be the red one! Anyhow it was complete and that was a huge plus! It had the true buckets with floor-mounted console.
First, I delicately inserted flat screwdrivers and wood wedges and shims in between the plastics to unsnap them. Be very careful as this plastic is super brittle. (More on that later.) the clip-board was cracked, but does anyone actually use that thing? I removed it and pondered how to fill the space. I wanted to get a piece of rubber to lay in after I filled it. Heck if I can, I may try to do a wireless charger there… sweet! Anyway, here are some pics of the fill piece.
You have to trim out that strip on the left and right, along with about 3/16 deep off of that clip board stopper piece at the top. I did mine with a cut off wheel. I later found out that an oscillating tool works better! Both require steady hands. I drilled several holes and pushed plastic trim retainer buttons in. I used my soldering iron to melt them flat. This worked moderately well, but ultimately I mixed up some Harbor Freight 2-part epoxy and poured over the top. It still needs sanded, but I’m happy.
Here is where it gets a little weird. For some reason, GM left a rectangular hole in the bottom side lid trim that shows the under-side of the clip-board holder.
What I did, was trim off the lip from the inner trim piece and use another piece of flat plastic to fill the hole. More pics and steps to follow…
You must be registered for see images attach
I am a big fan of the 60/40, so I jumped at the chance to get a non-ripped set of blue ones at the same yard that the other interior came from! Pics to follow. The 60/40’s console button was missing so I found a donor blue one whose lid was snapped, to rob parts off.First, I delicately inserted flat screwdrivers and wood wedges and shims in between the plastics to unsnap them. Be very careful as this plastic is super brittle. (More on that later.) the clip-board was cracked, but does anyone actually use that thing? I removed it and pondered how to fill the space. I wanted to get a piece of rubber to lay in after I filled it. Heck if I can, I may try to do a wireless charger there… sweet! Anyway, here are some pics of the fill piece.
You must be registered for see images attach
You must be registered for see images attach
You have to trim out that strip on the left and right, along with about 3/16 deep off of that clip board stopper piece at the top. I did mine with a cut off wheel. I later found out that an oscillating tool works better! Both require steady hands. I drilled several holes and pushed plastic trim retainer buttons in. I used my soldering iron to melt them flat. This worked moderately well, but ultimately I mixed up some Harbor Freight 2-part epoxy and poured over the top. It still needs sanded, but I’m happy.
Here is where it gets a little weird. For some reason, GM left a rectangular hole in the bottom side lid trim that shows the under-side of the clip-board holder.
You must be registered for see images attach
You must be registered for see images attach
I don’t think you can access the console w/o opening the lid, so I don’t see the point in leaving this hole. Anyhow, having drilled those holes, I left a mess to cover up underneath.What I did, was trim off the lip from the inner trim piece and use another piece of flat plastic to fill the hole. More pics and steps to follow…
Last edited: