Dash removal and replacement

Disclaimer: Links on this page pointing to Amazon, eBay and other sites may include affiliate code. If you click them and make a purchase, we may earn a small commission.

MTOJosh

Newbie
Joined
Jan 6, 2021
Messages
11
Reaction score
5
Location
Spring Lake NC
Continued...

My old dash pretty much fell apart when I pulled it from the truck. What were once small cracks quickly expanded. It's trashed...

You must be registered for see images attach


The remaining alldata instructions are for pulling the radio, HVAC, switches, etc. from the dash. You can pretty much wing it from here...


32. Remove the accessory switch(es) as necessary.
33. Remove the instrument cluster bezel. See: Service and Repair
34. Remove the headlamp switch.
35. Remove the HVAC control assembly.
35.1. Disconnect the electrical connectors.

35.2. Disconnect the cables (if equipped).
36. Remove the instrument cluster screws and the cluster.
37. Remove the IP auxiliary storage compartment (if equipped).
38. Remove the IP cupholder.
39. Remove the ashtray assembly.
40. Remove the radio from the carrier.
41. Remove the two air distribution duct screws.

The air duct needs to come out so that you can remove the wiring harness beneath. It's held in place with two screws on the ends and a clip in the radio/hvac cavity. I didn’t get a picture of the clip, but take out the radio and a/c control panel and it’s in there.

One screw is on the passenger side


You must be registered for see images attach


and one on the driver side behind the wiring


You must be registered for see images attach


You must be registered for see images attach


42. Remove the air distributor duct from the IP. Squeeze the clips from the front of the IP in order to release the duct.
43. Disconnect the antenna lead-in.


You must be registered for see images attach


44. Remove the retaining clips from the inflatable restraint IP module or the IP compartment assembly.
45. Remove the inflatable restraint IP module.
46. Remove the four nuts that retain the IP compartment assembly to the carrier (vehicles over 8,600 GVWR).

Remove passenger airbag. It has four screws, two are captive. I didn't get a picture of the other two, but they go up toward the top of the dash.

You must be registered for see images attach


47. Remove the rosebud retainers on the right side of the IP forward harness.

There are several metal clips and plastic christmas tree clips that hold the harness to the dash. Just disconnect all wiring harnesses to the cigarette lighter, 4x4 buttons, airbag switch, cargo light, etc. and remove from dash. I started with the passenger side.

You must be registered for see images attach


You must be registered for see images attach


You must be registered for see images attach


You must be registered for see images attach


Be careful with the connector to the instrument cluster. Squeeze the side clips and push the connector forward (toward the steering wheel), turn it and then pull it back through the opening.

You must be registered for see images attach


And that's about it. Transfer the wiring harness to the new dash and install the HVAC ductwork onto the new dash. Reinstall the radio, passenger airbag, etc. and go from there. Installation in the truck is the reverse.
Does anyone know what this is under my dash 1998 2500

You must be registered for see images attach
 

AK49BWL

GMT400 Forever!
Joined
Mar 21, 2015
Messages
1,790
Reaction score
2,789
Location
Longview, TX
4x4 transfer case control module for the trucks with electronic shift. If you have that, use the module you have rather than the donor unless the part number on it is identical.
 

MTOJosh

Newbie
Joined
Jan 6, 2021
Messages
11
Reaction score
5
Location
Spring Lake NC
I got my new dash in place and now I'm connecting up the engine compartment wiring from the convenience center. Does anyone know the home of these connectors
You must be registered for see images attach
 

AK49BWL

GMT400 Forever!
Joined
Mar 21, 2015
Messages
1,790
Reaction score
2,789
Location
Longview, TX
The red wire doesn't have a connector, that's the fuel pump test lead. The five pin goes to your rear lighting. Plug for it is probably hiding under the brake booster. The brown one is not familiar to me.
 

MTOJosh

Newbie
Joined
Jan 6, 2021
Messages
11
Reaction score
5
Location
Spring Lake NC
The red wire doesn't have a connector, that's the fuel pump test lead. The five pin goes to your rear lighting. Plug for it is probably hiding under the brake booster. The brown one is not familiar to me.
Thank you...it took me a little bit of digging but you are right, it was burried deep under the booster. I'm going to start the truck without the brown wire and see what happens :)
 

MTOJosh

Newbie
Joined
Jan 6, 2021
Messages
11
Reaction score
5
Location
Spring Lake NC
Thank you...it took me a little bit of digging but you are right, it was burried deep under the booster. I'm going to start the truck without the brown wire and see what happens :)
I'm hoping this is the last question and maybe one day I can be more helpful instead of always needing help. I got my truck started and am putting things back and tightening things down. I have a little staple clip that was on my bag of parts labeled steering column. It looks important but currently I can't find it's home.
You must be registered for see images attach
 

AK49BWL

GMT400 Forever!
Joined
Mar 21, 2015
Messages
1,790
Reaction score
2,789
Location
Longview, TX
That little guy holds the automatic shifter cable to the column where it snaps into the bracket. I don't have an auto or I'd go take a pic for you lol
 

MTOJosh

Newbie
Joined
Jan 6, 2021
Messages
11
Reaction score
5
Location
Spring Lake NC
That little guy holds the automatic shifter cable to the column where it snaps into the bracket. I don't have an auto or I'd go take a pic for you lol
And just like that it has a home. I thought I looked everywhere and my wife is laughing because I say that everytime I can't find my keys. For those of you that might want a picture
You must be registered for see images attach
 

cew-z71

Newbie
Joined
Oct 9, 2021
Messages
3
Reaction score
1
Location
Brandon, MS
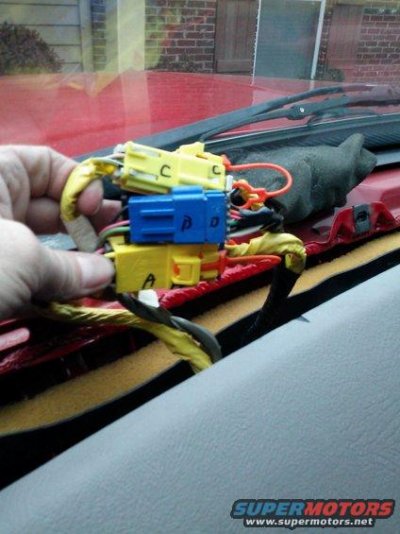
Great write up! I just went through this a couple days ago. A question about one of your removal pictures...the one showing the 3 plugs at the base of the windshield you had to disconnect, what are those 3 for? I think the 2 yellow ones are for airbags but no i've no clue about the blue one.
 

Attachments

  • cam00180.jpg
    cam00180.jpg
    41.3 KB · Views: 2

Forum statistics

Threads
64,254
Messages
1,389,896
Members
51,248
Latest member
wadectist2002
Top