97 K1500 5.0 Coolant in Cylinder 1

Disclaimer: Links on this page pointing to Amazon, eBay and other sites may include affiliate code. If you click them and make a purchase, we may earn a small commission.

L31MaxExpress

I'm Awesome
Joined
Apr 21, 2018
Messages
6,022
Reaction score
7,798
Location
DFW, TX
Felpro sells two versions of the gasket- one without the metal backing and one with which is the Permadry. The one with the backing is supposed to address the stock-style issues if what we read on the internet is true. Never had an issue with the metal style…probably have 90k miles on one set of them.

You must be registered for see images attach

You must be registered for see images attach

Did not even have 40K in 4 years on the metal backed 98000T set that failed around the water ports. The rubber delaminated off the metal carrier. Saw the same in a 99 Suburban I parted out with unknown age and mileage on the same gaskets. Makes me wonder if higher average year long temperatures have some factor in their life.
 

east302

I'm Awesome
Joined
Oct 4, 2013
Messages
3,434
Reaction score
3,156
Location
Jackson, MS
Hmm, well that’s not promising - I’m in Mississippi. So the rubber just peeled off of the metal?

The last one that I pulled had the same “standard” Felpro as the OP had. The truck had been completely neglected when we bought it, but the gasket defects in the corners were pretty typical of the other two trucks that I had with similar gaskets.

Got a picture of that metal-backed gasket when it leaked? Curious to see what it looked like.

You must be registered for see images attach


You must be registered for see images attach
 

Trig

Newbie
Joined
Jan 11, 2018
Messages
17
Reaction score
6
Location
Waynesburg, OH
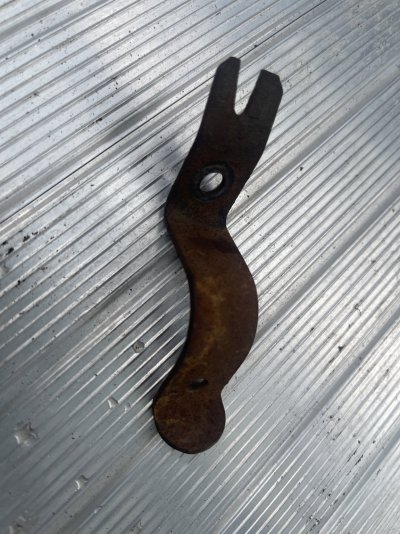
Anyone recognize this? Got everything (obviously not ha) back together and this guy is lonely.
 

Attachments

  • IMG_0352.jpeg
    IMG_0352.jpeg
    357.2 KB · Views: 6

Trig

Newbie
Joined
Jan 11, 2018
Messages
17
Reaction score
6
Location
Waynesburg, OH
Got a couple of issues after getting this buttoned up:

1) No compression in any cylinder. I'm hoping I tightened up the rocker arms too much thus not allowing any of the valves to fully close. I followed the procedure in the Haynes manual and confirmed by the 1A Auto head gasket video (TDC #1 compression, do half of the valves then rotate the crank 360 and do the other half). For each instance I rotated the push rod with my fingers while tightening until I couldn't rotate it anymore and then added a full turn.

Thoughts/guidance on this for my second attempt?

2) When the fuel pump primes I'm reading about 60 PSI via the test port. However after it stops priming the pressure drops off considerably. While cranking it's in the 40's. From what I gather on the Vortec's that's not proper.

Based on the advice I saw via another thread I replaced the fuel pressure regulator on the spider while I had the manifold out with GM GENUINE 19210686. However that part didn't match with what I took out, and at the time I assumed it didn't matter as it was an updated part or similar. After looking at the parts available on RA this part matches visually with what I took out - ACDELCO 2172251. Both are listed as fitting my application on RA and other interchanges (perhaps they all pull from the same source I'm not sure).

So, did I get the wrong part or do I potentially have a bad regulator out of the box? I'm aware it could be a bad check valve back at the fuel pump area, just seems odd that I have an issue like this after replacing that regulator.

Appreciate the help everyone.
 

Trig

Newbie
Joined
Jan 11, 2018
Messages
17
Reaction score
6
Location
Waynesburg, OH
The OEM nuts are self-locking. There is no "torque spec" for small-blocks and Mark IV big-blocks.

With the lifter for that rocker on the base-circle, tighten the nut just until there's NO up-and-down free-play in the pushrod. (Zero-lash) Then add "your choice" of lifter-plunger preload. Factory spec used to be one full turn. Most guys only go 1/2 turn. Some go less than that. Everyone has their own comfort zone for lifter preload.

Some aftermarket lifters have restricted travel, if this engine has restricted-travel lifters, "zero lash plus a RCH" is about all you'd need. But you probably don't have that kind of lifter on that engine.


There are about a dozen tried-and-true ways to adjust lifter preload on a typical SBC. Every way has it's followers who swear "their" way is best.

The absolute simplest, fastest, most fool-proof method is to loosen all the rocker nuts.
Tighten all rocker nuts only to the point where the pushrod has no up-and-down free-play. (Zero-lash)
Turn the crankshaft EXACTLY one turn.
SOME of the pushrods will now have freeplay. Tighten only the loose ones to zero-lash.
Tighten ALL the nuts "your choice" of preload. 1/2 turn is common.
Put the valve covers on. Have a beer.

I found this post from Schurkey from a year ago - based on this description I've got them too tight. I'll try this and report back on what I find.
 

Trig

Newbie
Joined
Jan 11, 2018
Messages
17
Reaction score
6
Location
Waynesburg, OH
Whew. Re-adjusted each valve to 1/4 - 1/2 turn past "zero lash". No experience with this, and knowing I was way too tight previously I likely error'd the other direction. Essentially I did each 1/4 turn past zero lash for every one. Then made sure each rocker arm wouldn't rotate and click/come off the valve stem if that makes any sense. If it did I added an eighth turn until it wouldn't do that anymore. Rotated the the crank 360 and repeated the process. Not every valve needed it but there were a few at each rotation notch.

After that I tested compression (with everything still apart, you don't have to worry about oil going everywhere with the handful of crank rotations needed for the compression test for those that don't know). Thankfully all cylinders were 185 - 195 on a brand new OTC tester so while I don't know how accurate that is I believe I'm good to go based on cylinder to cylinder.

So, going to swap out that fuel pressure regulator and hopefully get this thing buttoned back up and see if it fires.
 

Trig

Newbie
Joined
Jan 11, 2018
Messages
17
Reaction score
6
Location
Waynesburg, OH
Alrigh, seeing the finish line on this finally. Been a journey.

Fired it up for the first time last night and it started up, but was running rough. Scanned and got a P0340, which ended up being operator error as I forgot to plug the distributor connector back in after the valve adjustments and replacing the fuel pressure regulator. Got that plugged in and the P0340 went away.

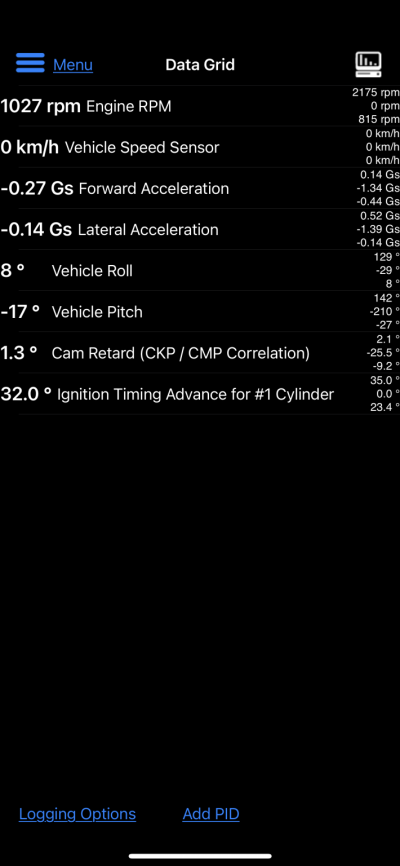
Then got the P1345 which is what I was expecting from research and posts in this thread. Need a scan tool to read the cam retard and it needs to be between -2 and 2 degrees. I already had a OBDLink MX+, and I tried Dash Commander on my iPhone with the 1997 GM add on. $10 for the app, $10 for the year addon for reference. Not sure what MX+'s are now, I gave $100 a handful of years back.

Got a reading and it was -19.7 degrees. Rotated clockwise and tried again, got -13 then -8 etc etc. Leveled out at -4 and I couldn't turn it anymore. So I took a file to the bottom of the housing where the screw is and shaved a little plastic without taking it out of the vehicle. Didn't take much, and after a couple more tries I settled at around +1.3. At higher RPM it dips to around +0.8 or so. I imagine shaving plastic isn't exactly the greatest solution but it seemed like it was so close so I gave it a try. SES light went out on its own after getting it in spec.

So, hopefully I'm good to go on the engine side. I replaced the brake lines and have done an initial bleed but need to go through that again based on a Kelsey Hayes bleed document I found in another thread that Schurkey posted up. Hopefully that'll get it a little better and then I'll head down the gravel road and get the ABS to kick in and then bleed again.

I'll make a completion thread here in the next few days with thoughts/tips etc for the next guy.

Thanks to everyone that posted/replied - helped a ton.
 

Attachments

  • IMG_0364.PNG
    IMG_0364.PNG
    140.3 KB · Views: 5
Top