88-94 5.7 Suburban A/C Diagnosis and Tuning

Disclaimer: Links on this page pointing to Amazon, eBay and other sites may include affiliate code. If you click them and make a purchase, we may earn a small commission.

Wildblue19

I'm Awesome
Joined
Jul 21, 2020
Messages
295
Reaction score
721
Location
Lone Star
Progress: got the big bad 4805 installed this evening and disconnected all the lines for flushing tomorrow to prep for the swap to PAG100. My old 4864 leak was confirmed; in several places on the compressor (behind clutch, at rear 'flex' fitting area, around case seal) I found old "sludge" buildup of previously leaked oil. Will report with new compressor results shortly.

One warning: the enhanced 4805 comes with a bare bullet connector with no diode, while the 4864 comes with a weatherpack style connector and a diode built in to the clutch wiring. I swapped the connectors from the 4864 to the 4805 since my truck was already wired for the weatherpack and I liked the idea of the diode built in.


You must be registered for see images attach
 

Wildblue19

I'm Awesome
Joined
Jul 21, 2020
Messages
295
Reaction score
721
Location
Lone Star
Back with some data.

E fan installed, moderately helps at idle, delta around 25-30° with 105 ambient 20% RH.

Highway with recirc remains around 35° steady state same conditions.

Been experimenting with some orifice tube diameter changes. I tried the VOV, Black/Wt OE GM (0.072) fixed, a yellow (0.062), and orange orifice (0.056) tube. No significant change in pressures or temps from the VOV down to the yellow, but the orange was significantly worse in terms of limiting the refrigerant flow and failing to flood and cool the evaporator. For now, I'm running the OEM GM one with 152a at 36oz. Pressures once at operating temp at idle are 48/245 and around 2k RPM 45/255.

I got some thermal imaging hardware in and these were the images captured. Not sure how useful these will be, but maybe those with some experience can weigh in on what they are seeing.

**EDIT, the measurements taken of the high and low side hoses were taken with out any protection on the shiny pipes to account for emissivity / reflection. The following posts will have matte painter's tape over the hoses when measured to ensure these factors don't skew readings.
 

Attachments

  • 1689884251227_100.JPG
    1689884251227_100.JPG
    607.8 KB · Views: 7
  • 1689884216861_100.JPG
    1689884216861_100.JPG
    442.2 KB · Views: 8
  • 1689883838326_100.JPG
    1689883838326_100.JPG
    401.1 KB · Views: 7
Last edited:

Wildblue19

I'm Awesome
Joined
Jul 21, 2020
Messages
295
Reaction score
721
Location
Lone Star
For any HVAC specialists out there, maybe @L31MaxExpress can weigh in...

I know in this thread it was recommended not to use superheat values for automotive systems, but I took some measurements today and put together this table.

I was curious what this is telling me about the system with regards to charge and theoretical vs actual performance.

You must be registered for see images attach

(Saturation table here)

It appears I may be slightly undercharged based on the superheat, but I'd like someone with experience to weigh in before throwing more refrigerant in the system.
 
Last edited:

L31MaxExpress

I'm Awesome
Joined
Apr 21, 2018
Messages
6,011
Reaction score
7,765
Location
DFW, TX
I concur with you. System seems low. That being said the rear evaporator should show more superheat than the front one since it has a TXV regulating its flow. The front one should be flooded to the point where some liquid refrigerant is flowing back into the accumulator. In normal operation the accumulator should be roughly 1/2 full of boiling refrigerant and near the same temperature as the liquid line right after the orifice on its way to the evaporator. I have a feeling as you start to add refrigerant your low side pressure is going to decrease once the unit starts to cool properly. The lines should be cold to the touch and sweating all the way back to the compressor. The compressor relies on cool refrigerant gas for cooling and once cool gas starts returning to the compressor, the head pressures will actually decrease a bit. My pressures did not change much in the van adding 1 entire can.
 

L31MaxExpress

I'm Awesome
Joined
Apr 21, 2018
Messages
6,011
Reaction score
7,765
Location
DFW, TX
When I checked my pressures last night after getting the system cooling. Temp Probe reading 109F in front of the grille and ~56% humidity. Sorry no wet bulb reading.

Idle (Front Center Vent @ 44*F)
Low Side = 40 psi
High Side = 203 psi

1,500 rpm (Front Center Vent @ 36*F)
Low Side = 27 psi
High Side = 230 psi

At 1,500 rpm the accumulator actually had frost starting to form on the upper exterior surface not covered by the accumulator blanket.

At idle the condenser had Zero subcooling and at 1,500 rpm it had 11° sub cooling. It is hard to get a good accurate reading on the suction lines because they sit so close to the draft of the cooling fan the probe clamps heat soak.

xc_hide_links_from_guests_guests_error_hide_media
 
Last edited:

L31MaxExpress

I'm Awesome
Joined
Apr 21, 2018
Messages
6,011
Reaction score
7,765
Location
DFW, TX
On your superheat question. It is less than 10°F warmer at the suction line off the accumulator than the calculated from pressure refrigerant temp in the evaporator. This was last years test when I first put the system back in operation.

xc_hide_links_from_guests_guests_error_hide_media
 

Wildblue19

I'm Awesome
Joined
Jul 21, 2020
Messages
295
Reaction score
721
Location
Lone Star
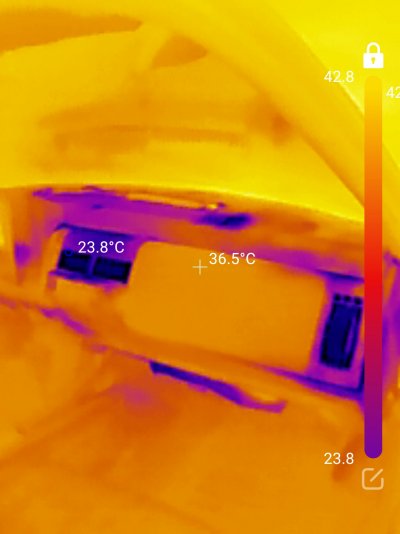
Thanks for the good data points and videos for reference. I put in 5oz more refrigerant and it has helped the system out, on the highway I was seeing 55 or so at the vents at 95* ambient so we're moving in the right direction.

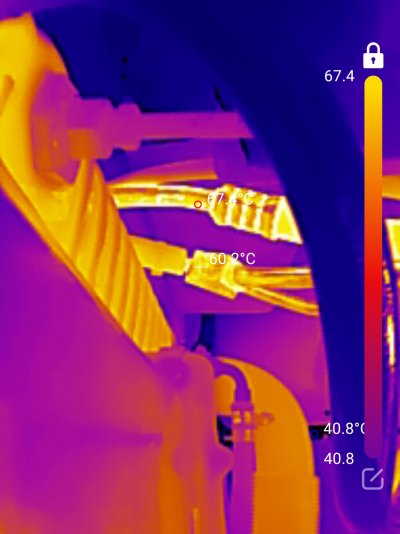
After beating on the truck a little to get everything hot, I then sat it in the sun and let it idle to heat soak in the 105* ambient, direct sun for about 20 minutes. After this time, everything was about as hot as you can get it. Measuring the high side, it was around 275 and the low side around 57psi. Interestingly, at this point the rear TXV was wide open, barely cooling the suction lines to about 86*F. I'd guess internal air in the truck was maybe 120*. The front was hanging on, but overall not much air was getting cooled.

This brings up a few questions...

1) I never changed the rear TXV when I flushed and rebuilt the system. It appears to work, but to my understanding the valves are refrigerant specific. Perhaps changing it to a 134 truck's version would help things out?

2) If the rear TXV is wide open but not cooling efficiently, the way I see it is that it isn't getting the constant liquid refrigerant flow it needs. The rear A/C has no receiver-drier. In the OE configuration the long 20' supply line is, I suppose, the 'reservoir' that feeds the valve. Would it be beneficial to plumb a receiver in to feed the TXV more consistently?

2a) Secondarily, in the current situation, the TXV is wide open and -may- not be acting like a restriction as intended. Could this lack of restriction raise suction side pressures making the system cool worse - creating increased heat load on the evaporator, causing a negative feedback loop for the entire system? Perhaps the TXV has an internal orifice limit to try and avoid the potential of it acting as a pass-through instead of a valve.

3) Finally, the ultimate goal I'm looking for is to have lower low side pressures in a properly charged system. If the orifice tube and TXV are fighting each other for refrigerant and obviously doing a poor job of operating as intended, where the rear TXV is starving for refrigerant and the front is therefore likely (?) flooding the evaporator, would putting a dual TXV setup be beneficial to the system? In essence, I'd pull the O-tube and accumulator and plumb in a second TXV or H-block as well as a large receiver-driver to simplify the system and only be pushing liquid refrigerant to both front and rear, and let the valves meter it from there. I can make custom hoses, I'm just trying to visualize the internal imbalance of a O-tube/TXV system as it is currently designed.

Again, thanks for the time and help. Trying to maximize efficiency in these systems has been as frustrating as educational, but without a formal background in it there's only so much I'm able to figure out on the more theoretical side.
 

L31MaxExpress

I'm Awesome
Joined
Apr 21, 2018
Messages
6,011
Reaction score
7,765
Location
DFW, TX
1) I left the rear R12 TXV on my G20 van and it never created an issue that I noticed.

2) You are correct on the rear lines being a reservoir, I had thought about a rear unit reciever dryer myself and never tested one.

3.) My 2011 Pathfinder is setup in this configuration from the factory. It runs about the same vent temps as the 2 vans I have had as well as my 99 Tahoe and my brothers 99 Suburban. They all take a while to cool the interior. When the interior is completely heat soaked they all take a solid 20 minutes of driving to cool to a level that is beginning to get comfortable. These bigger SUVs and vans have a lot of interior cubic footage and a lot of weight of interior components that hold heat in them. The air ducts, dash, seats, trim, upholstery, etc all have to cool down.

The best thing you could do keeping a single compressor is add a smaller remote mounted secondary condenser with an electric fan under the truck and split the compressor discharge hose into it. Run the front refrigerant through the main condenser and the rear refrigerant through the auxiliary condenser. This setup is how they keep limos and mini buses cool even with extended idle times. I have considered this approach on my van. The interior of my van was a solid 150°F when I left work this afternoon and it took a mile of slower driving with the windows down and the ac on outside air and about 4 miles at highway speeds after closing the windows and switching to recirculate for the vent temps to drop to 40°F.
 

L31MaxExpress

I'm Awesome
Joined
Apr 21, 2018
Messages
6,011
Reaction score
7,765
Location
DFW, TX
If I add one, my plan is to mount it fan down toward the road outside of the frame, up inside the body so the condenser has a bit of protection. I think this would be the best bang for the buck of any modification short of adding a 2nd compressor with the remote condenser the make the rear unit its own system. I actually already own this condenser setup. When I was collecting parts to put a LSA blown 6.0L in my van prior to building the 383, I was going to add low mounted mini sanden on the passenger side of the block and use it solely for cooling a killer chiller for the intercooler water.


What are you running for an engine fan?
 
Last edited:
Top