20” LTZ Wheel Refurbish

Disclaimer: Links on this page pointing to Amazon, eBay and other sites may include affiliate code. If you click them and make a purchase, we may earn a small commission.

NorthState

I'm Awesome
Joined
Jul 2, 2021
Messages
119
Reaction score
161
Location
Eastern North Carolina
Anyone have any advice on polishing aluminum wheels? I bought this set of LTZ20s cheap bc they were painted.
You must be registered for see images attach

Anyway, I got some “green” $9 stripper from the big box home improvement store. You get what you pay for! “Some” of the paint came off but it was mighty gummy. And after about 3 coats, here was the result.
You must be registered for see images attach

I went back to the store and got some spray paint and epoxy stripper by Jasco… holy cow! Game changer!

You must be registered for see images attach

You must be registered for see images attach
 

NorthState

I'm Awesome
Joined
Jul 2, 2021
Messages
119
Reaction score
161
Location
Eastern North Carolina
I guess there was about 5 coats on them:
1. Factory clear
2. Primer gray
3. Silver
4. Black
5. Black plastidip…ugh!

Anyway, where I need help is once I polished them, there are areas where the Previous owner buffed out some oxidation. While shiny, it’s a diff finish than the majority of the wheel. Any advice on how to make the shine uniform?
You must be registered for see images attach
 
Last edited:

NorthState

I'm Awesome
Joined
Jul 2, 2021
Messages
119
Reaction score
161
Location
Eastern North Carolina
***UPDATE***
Few lessons are as good as self-taught experimentation. The way I figured it was, if it doesn’t turn out, I can just powder coat these puppy’s a cool charcoal color.

Well I gathered as much courage as I could, and a sheet of 220 sandpaper!

Below are some random gleanings from my experience:

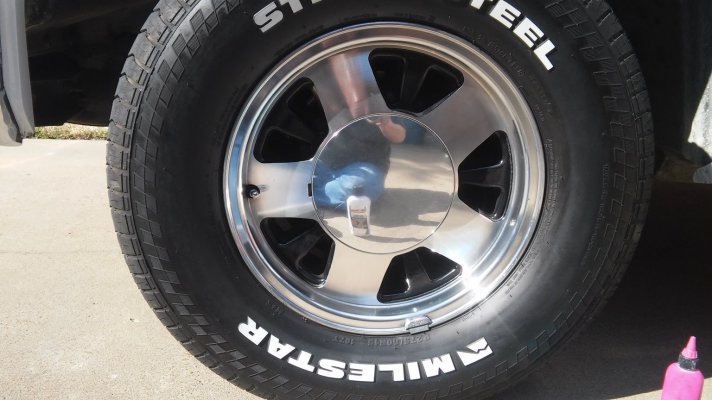
Turns out, you have to get worse before you can get better. That oblong dark spot in the center is polished more than the surrounding material. What you have to do is LIGHTLY scuff the whole area to a similar finish. REMEMBER, What you do at this point, you will have to buff back to a consistent sheen, so if you go nuts with too heavy of a grit paper, you will cuss yourself later! The key is to scratch, but not gouge! You own what you do at this point! Another thing I found is that your sanding direction is also important. Although I haven’t totally figured out the answer to it, I will tell you that I am having considerable trouble blending the finish right where the spoke meets the edge of the wheel.
You must be registered for see images attach

Anyway, as you lightly sand, I I had to make a conscious effort to NOT swirl with the 220. Once i got a uniform sanded texture, I switched to 500grit, then 1200grit. Finally, my Harley buddy gave me some stuff called “polishing paper”. It’s probably 1500/2000grit. Another thing I did that may or may not have helped, was to sand with polishing compound. My friend, @Carolina_'99Hoe
recommended White Diamond. It’s like $15/bottle, but it seems to be effective. After the polishing paper, I buffed with one of those cotton buffing attachments that goes on your drill. They were like $11 on Amazon. I had tried one of those Mothers polishing balls. Not only is it expensive, $29, but I don’t think it was abrasive enough for this step. I’m not saying it doesn’t work, I just think I needed more cutting power than the foam could deliver. Then buff with a microfiber cloth. The White Diamond instructions say that it turns black as you polish, this it very true, you need to have plenty of microfiber cloths. I used old rags and stuff but some shop cloths aren’t meant to shine aluminum. Get microfiber. The last thing I would recommend is DONT GET IN A HURRY! If you feel like you’re going agonizingly slow, you’re probably still going too fast! At any step in the process! There are still some lingering heavy scratches that are going to take more elbow grease. Like this one.
You must be registered for see images attach

It was cloudy today, but I could probably get by with them as is.
You must be registered for see images attach
 
Last edited:

kennythewelder

Officially Retired, B31-3 (6-G) certified welder.
Staff member
Super Moderator
Joined
Jul 14, 2014
Messages
6,521
Reaction score
9,166
Location
Louisiana
You mean like this. The second pic is fairly new. First pic, is older. After striping with paint remover, buffing with a cotton buff wheel, and some white jewelers polish, then some white diamond metal polish, this is the end result. Oh yeah, and of course, I painted the inner sections black. My rims have been polished for several years.
 

Attachments

  • 20190127_132259.jpg
    20190127_132259.jpg
    228.9 KB · Views: 13
  • 20210726_164234.jpg
    20210726_164234.jpg
    266 KB · Views: 13

NorthState

I'm Awesome
Joined
Jul 2, 2021
Messages
119
Reaction score
161
Location
Eastern North Carolina
Those came out great!
Thanks DonYukon!

The last pic I posted is the most finished of the set. It will also be, however the worst looking of the set. If you zoom hard into it at 1000, you will see some really hurtful gouges that I am certain I won’t be able to get out. Alas, I may end up finding a single somewhere to take its place and make that one my spare.
 

NorthState

I'm Awesome
Joined
Jul 2, 2021
Messages
119
Reaction score
161
Location
Eastern North Carolina
You mean like this. The second pic is fairly new. First pic, is older. After striping with paint remover, buffing with a cotton buff wheel, and some white jewelers polish, then some white diamond metal polish, this is the end result. Oh yeah, and of course, I painted the inner sections black. My rims have been polished for several years.
@kennythewelder, BETTER THAN FACTORY! Great job!
 

Staff online

Forum statistics

Threads
64,334
Messages
1,391,489
Members
51,439
Latest member
sherberto
Top