99 L29 454 build

Disclaimer: Links on this page pointing to Amazon, eBay and other sites may include affiliate code. If you click them and make a purchase, we may earn a small commission.

Scottm

I'm Awesome
Joined
Aug 24, 2021
Messages
289
Reaction score
222
Location
AZ
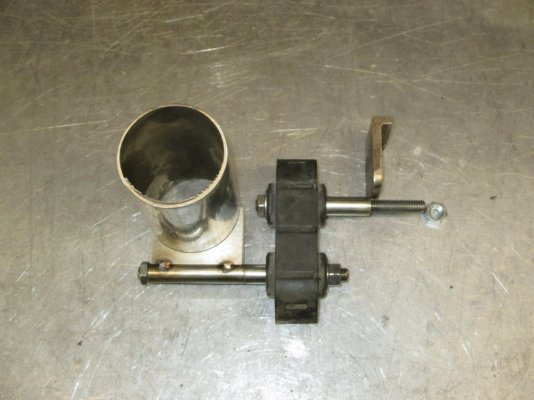
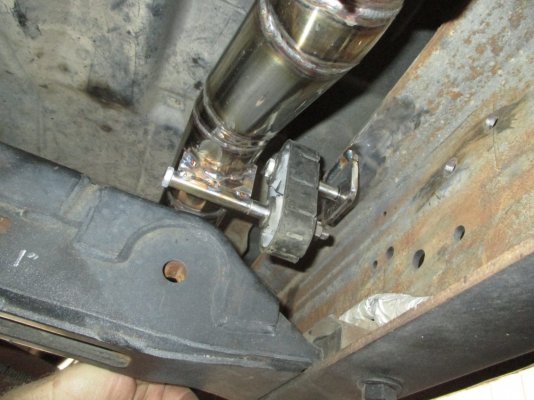
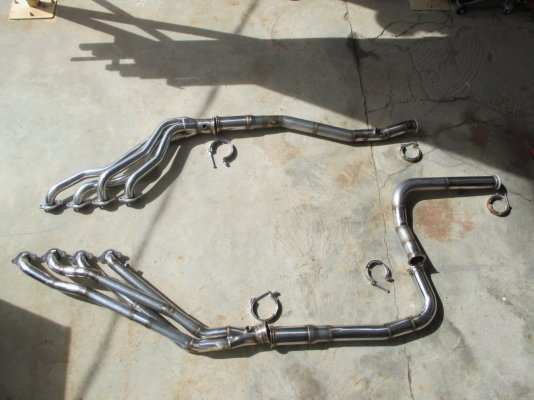
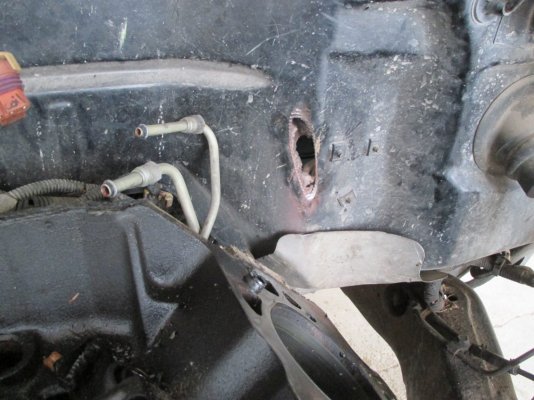
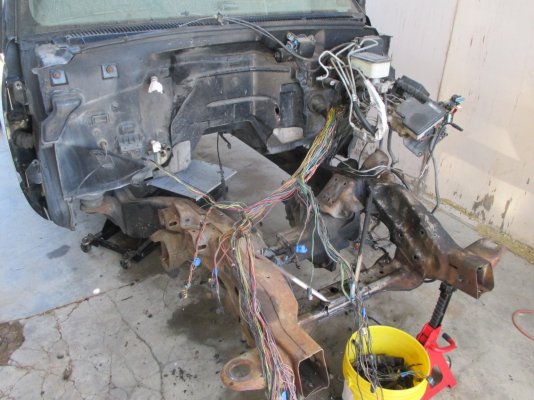
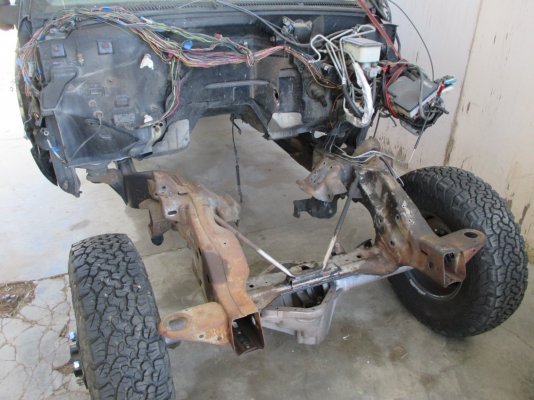
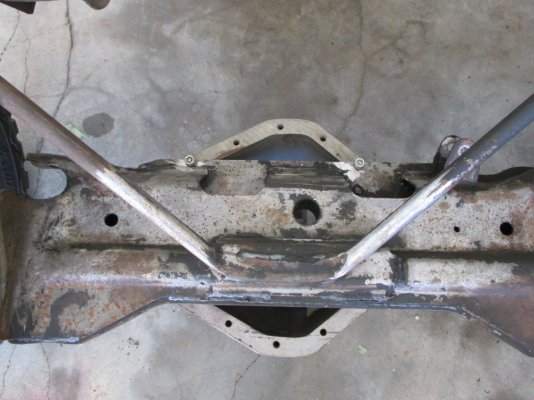
The hardest part of my new exhaust has been figuring out how to support it. I'm not going to use those crappy auto zone straps. It took 3 weeks of experiments with a couple different kinds of rubber suspenders and making tabs with a cut off wheel. The laser shop cut .090 stainless pieces to go up against the 2-1/2 inch tubing, and I made pieces of 1/2 inch stainless tubing and 3/8 stainless all thread to make something that could be detached easily. The right side only needed one hanger but the left side will need two. The last pic also shows the torsion bar cross member under the ex pipe. The right side has come loose, which I think explains a nasty thump I used to hear all the time.
 

Attachments

  • IMG_1815.JPG
    IMG_1815.JPG
    258.1 KB · Views: 24
  • IMG_1817.JPG
    IMG_1817.JPG
    219 KB · Views: 24
  • IMG_1818.JPG
    IMG_1818.JPG
    271.4 KB · Views: 24

Piratehunter

I'm Awesome
Joined
Nov 3, 2019
Messages
303
Reaction score
564
Location
Colorado
looking good! all your handy works makes me miss my old friend's shop, he passed away a couple of years ago. we would make custom truck, boat, gun, whatever parts we needed. fun days. is the engine about ready to fire?
 

Scottm

I'm Awesome
Joined
Aug 24, 2021
Messages
289
Reaction score
222
Location
AZ
Thanks! I'm pretty much able to weld and machine anything I need, which keeps me busy doing things for friends too. The old engine is still in the truck for the exhaust fab work. The new engine needs the heads and valvetrain put on. Plus I keep messing around with other toys, like my mountain bike and .308 target rifle. At this rate it will take 6 months to get the new engine in, 0411 swap done, and everything debugged.
 

Supercharged111

Truly Awesome
Joined
Aug 20, 2015
Messages
12,709
Reaction score
15,509
Thanks! I'm pretty much able to weld and machine anything I need, which keeps me busy doing things for friends too. The old engine is still in the truck for the exhaust fab work. The new engine needs the heads and valvetrain put on. Plus I keep messing around with other toys, like my mountain bike and .308 target rifle. At this rate it will take 6 months to get the new engine in, 0411 swap done, and everything debugged.

You should move to CO. We could be besties with that TIG machine of yours.
 

Scottm

I'm Awesome
Joined
Aug 24, 2021
Messages
289
Reaction score
222
Location
AZ
It has taken almost 3 months, but I finally finished the exhaust today. I left the old engine in for the exhaust work, so now it's time to get it out. I pulled the heads today and got a good look at this big gash in the firewall, made by the egr flex pipe! I knew I was feeling hot air coming in from somewhere..
 

Attachments

  • IMG_1821.JPG
    IMG_1821.JPG
    255.4 KB · Views: 30
  • IMG_1822.JPG
    IMG_1822.JPG
    278.6 KB · Views: 30

Spareparts

Supporting Member
Supporting Member
Joined
Aug 12, 2021
Messages
1,110
Reaction score
1,491
Location
North Idaho
My egr pipe was hitting the firewall also. 3 foot pry bar and 2 minutes later fixed it.
 

Scottm

I'm Awesome
Joined
Aug 24, 2021
Messages
289
Reaction score
222
Location
AZ
I got the entire drivetrain out and the frame somewhat degreased. I want to have the frame sandblasted like the back half was in 2021. But how to roll the truck out into the yard for blasting? Well I happen to have a gm 14 bolt full float axle, stripped and sandblasted, ready for building into a desert race axle. So I put the front wheels of the truck on the axle, and set the crossmember of the frame right on it. I drilled two holes in the xmember and put bolts into the cover holes! Now I can roll it straight back into the dirt for blasting. So this is either the easiest 'solid axle swap' of all time, or maybe one of those 'why women live longer' moments..

In other news, I am still digging deeper into the truck, rather than starting to put new stuff back on. I stripped all the old split-loom and petrified electrical tape off the wire harness. It's a total rat's nest and the average wire is probably 50% longer than it needs to be. That will be cleaned up and rewrapped some time in the future, hopefully before it is 117F in July.

The ac has hardly blown at all in the 10 years I have owned it, so the evap core is probably clogged with leaves and crap. There are vids on youtube of how to get the core out without removing the dash, but they often cut and break things, and that's just not right for the way I'm restoring this truck. I want to take the ac box completely out to fix it and reseal it properly, which means removing the dash... *shudder*

But it's really not that bad. The steering shaft is already off, so removing the steering column is actually easy. Here the column is out and the dash is free, supported on two jackstands and a tiedown strap on the passenger grab handle. I made videos along the way, which may end up on youtube someday for fixing the ac the right way. Tomorrow I pull the firewall screws to the ac box and see what's going on in there.
 

Attachments

  • IMG_1843.JPG
    IMG_1843.JPG
    299.4 KB · Views: 22
  • IMG_1844.JPG
    IMG_1844.JPG
    285.6 KB · Views: 20
  • IMG_1845.JPG
    IMG_1845.JPG
    267.5 KB · Views: 20
  • IMG_1846.JPG
    IMG_1846.JPG
    213.6 KB · Views: 23

Scottm

I'm Awesome
Joined
Aug 24, 2021
Messages
289
Reaction score
222
Location
AZ
Does anyone know what this is? It was attached to a bracket just to the left of the steering column. A small circuit board inside and a lot of wires.
 

Attachments

  • IMG_1847.JPG
    IMG_1847.JPG
    168.9 KB · Views: 12

Scottm

I'm Awesome
Joined
Aug 24, 2021
Messages
289
Reaction score
222
Location
AZ
I'm starting to realize why my ac flow was so weak..
 

Attachments

  • IMG_1854.JPG
    IMG_1854.JPG
    298.7 KB · Views: 17
Top